Studio Projects SP828 User Manual
Page 2
3
3
INSTR
UCTION
BOOK
CONTENTS
What
is
Studio
Projects............................................................................................2
Front
Panel
Controls
–
Individual
Channel
Controls.............................................3
Front
Panel
Controls
–
Master
&
Monitoring
Controls............................................5
Rear
Panel
Connections
–
Individual
Channel
Jacks...........................................6
Rear
Panel
Connections
–
Master
Jacks................................................................7
Block
Diagrams
........................................................................................................8
S
pe
ci
fic
at
io
ns
..
..
..
..
..
..
..
..
..
..
..
..
..
..
..
..
..
..
..
..
..
..
..
..
..
..
..
..
..
..
..
..
..
..
..
..
..
..
..
..
..
..
..
..
..
..
..
..
..
..
..
..
10
P
ro
b
le
m
s.
..
..
..
..
..
..
..
..
..
..
..
..
..
..
..
..
..
..
..
..
..
..
..
..
..
..
..
..
..
..
..
..
..
..
..
..
..
..
..
..
..
..
..
..
..
..
..
..
..
..
..
..
..
..
.1
1
T
ro
ub
le
sh
oo
tin
g.
...
...
...
...
...
...
...
...
...
...
...
...
...
...
...
...
...
...
...
...
...
...
...
...
...
...
...
...
...
...
...
...
...
..1
1
Origins
and
manufacture.........................................................................................1
1
Declarations
of
conformity
........................................................................................1
1
WHA
T
IS
STUDIO
PR
OJECTS?
Studio
Projects
is
a
technology
company
committed
to
designing
and
bringing
to
market
high
quality
pro
audio
products
at
an
af
fordable
price.
As
a
small
sized
company
with
lower
expenses
than
many
of
our
competitors,
we
pass
along
the
savings
to
our
end
users.
When
we
introduced
our
“C”
Series
microphones
in
2001,
both
end
users
and
reviewers
acclaimed
the
build
and
sound
quality
as
nothing
short
of
amazing.
Pushing
the
“Price
Vs.
Performance”
envelope
even
further
,
we
brought
out
the
“B”
Series
mics
in
2002.
As
part
of
the
“B”
series
we
introduced
our
first
electronics
product,
the
highly
acclaimed
VTB1
Mic
Pre/
Direct
Box.
Now
we
of
fer
our
second
release
in
what
will
be
a
series
of
electronics
products,
the
SP828.
This
unique
product
of
fers
the
best
possible
quality
and
feature
set
in
its
price
class.
W
e
hope
you
enjoy
using
it
as
much
as
we
enjoyed
making
it
for
you!
2
3
Studio
Projects
is
manufactured
and
marketed
under
the
direction
of:
PMI A
UDIO GR
OUP
USA:
1845 W
. 169th Street
Gardena, California 90247
toll free:
877-563-6335
fax:
310-323-9051
UK:
P
.O. Box 358
Torquay
, Devon
TQ2 5XS
tel:
+44 (0) 180 32151
11
email:
FR
ONT
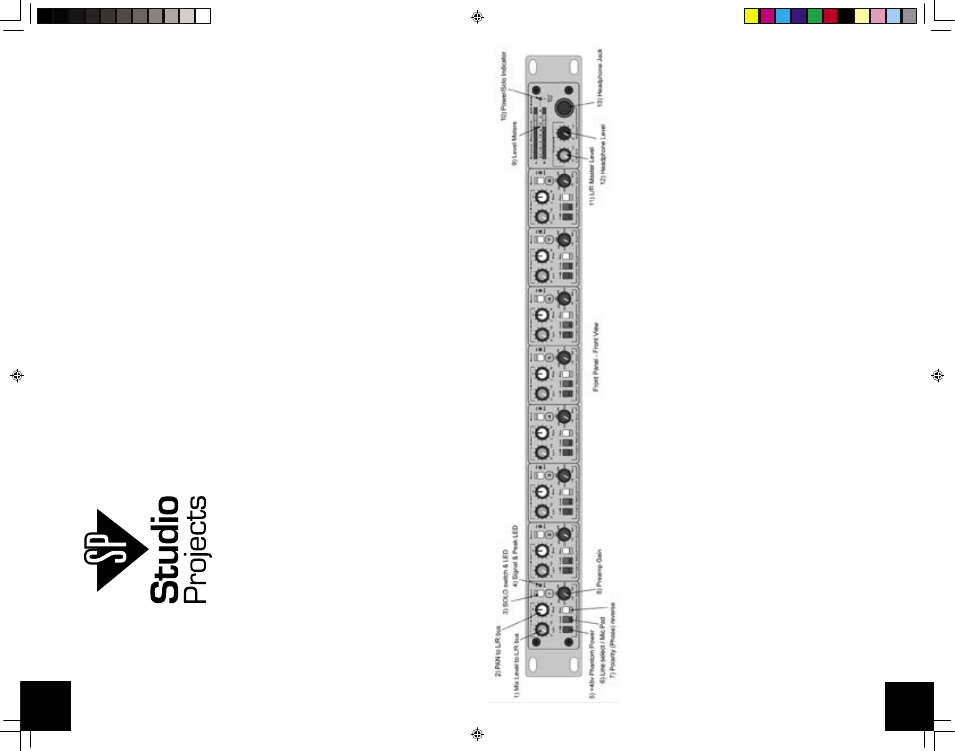
P
ANEL
CONTR
OLS
-
INDIVIDU
AL
CHANNEL
CONTR
OLS
1)
Mix
Le
v
el
to
L/R
bus
Controls
the
amount
of
the
channel
signal
that
is
sent
to
the
L/R
mix
buses.
Use
these
individual
channel
level
controls
to
create
a
mix
of
all
the
channels
within
the
SP-828.
NOTE:
This
control
does
not
af
fect
the
level
at
the
rear-panel
Channel
Output
jack
(#16).
2)
P
AN
to
L/R
bus
Positions
the
channel
in
the
L/R
mix.
CCW
is
full
Left,
CW
is
full
Right.
The
channel
signal
will
be
3dB
down
to
both
buses
in
the
center-detent
position.
Create
a
stereo
blend
of
the
8
channels
within
the
SP-828
with
the
P
AN
controls.
3)
SOL
O
s
witc
h
&
LED
When
depressed,
the
LED
illuminates
and
the
channel’
s
signal
is
sent
to
the
SOLO
mix
bus.
This
signal
is
independent
of
the
Mix
Level,
only
the
Preamp
controls
(#6,
#7,
#8)
will
af
fect
this
signal.
Use
the
SOLO
system
to
set
the
Preamp
gain
(#8)
for
proper
signal
level.
4)
Signal
&
P
eak
LED
This LED will vary in Green intensity with the signal level of the channel. It will turn Red when the channel level is within 3dB of clipping. Used with the
Solo system and Preamp Gain to properly set the channel level.
5)
+48v
Phantom
P
o
w
er
This switch applies +48 volts to Pins 2 & 3 of the channel XLR connector
. This Phantom power (as it’
s called) is used to power condenser microphones
and direct boxes. It is not needed for Dynamic microphones and should be avoided with Ribbon mics.
sp828 manual.indd
2/22/05, 11:06 AM
4-5