SeaShell SS-i Quick Setup Guide User Manual
Quick setup guide, Components, Seashell iphone
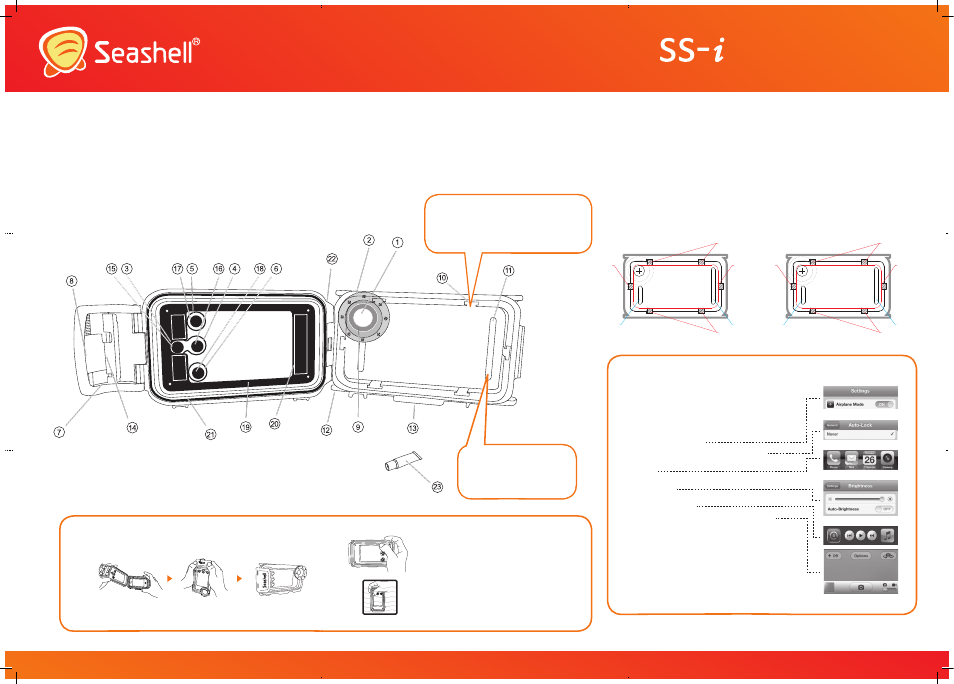
1. Lens Window
2. Lens Ring
3. Button A
4. Button B
5. Button C
6. Button D
7. Lock
8. Lock Button
9. Lens Hood Cover
10. Side Spacer
11. Front Spacer
12. Strap Mount
13. Brace Hole
14. Lock Hinge
15. Button A - Rubber Head
16. Button B - Rubber Head
17. Button C - Rubber Head
18. Button D - Rubber Head
19. Cushion Holder
20. Back Foam Cushion
21. O-Ring
22. Hinge
23. O-Ring Grease
#2
#2
#4
#4
#2
#2
iPhone 3G / 3GS
#4
#4
#4
#4
#2
#2
iPhone 4 / 4S
2
Insert the Front Spacer into the four cushion
slots on the front housing. Please be sure that
the Front Spacers are properly affixed.
Adjust your iPhone
#
in a dry surface before loading it to SS-i:
- Insert the Side Spacer into the slots on the camera
case’s front housing.
- Place the iPhone
#
into the front housing and check
that the Side Spacers (on two sides) can keep the
iPhone
#
in place properly. Replace the Side Spacers as
necessary.
Install Front Spacer
1
Install Side Spacer
3
Test before Use
Installing iPhone
#
Test the Operation of the iPhone
#
Load the iPhone
#
into
Seashell SS-i
Flip the Lock to close
the housing
Pull the lock to test if it is
secured
• Ensure the inside surface of SS-i is clean and dry without
installing the iPhone
#
.
• Close the case and flip the Lock to the front of housing. Push
gently and lock.
• Put the housing into at least 200 mm deep water for 5 minutes.
• Check if there is any water seepage inside the housing.
• If there is no water leak, take out the housing, dry it with a
towel.
• Set the iPhone
#
to camera function and load the iPhone
#
into
the housing.
• Repeat the steps to lock the housing before putting it to water.
• Check if the button functions are working while in water.
Pre-installation Preparation
Components
Preparation of iPhone
#
Copyright © Zear Corporation Limited. All Rights Reserved.
International Patents Pending
Seashell iPhone
#
Waterproof Photo Housing
Quick Setup Guide
• Seashell iPhone
#
Waterproof Photo Housing is suitable to different models of iPhone
#
. List of
supported models can be found from our site (http://www.seashell.hk/).
• Some spacers are pre-set in SS-i to directly load iPhone
#
4 / 4S models. Illustrated below is the
recommended sizes of Side and Front spaces for iPhone
#
3G, 3Gs, 4 & 4S without an iPhone
#
jacket.
• iPhone
#
with a jacket can fit into SS-i by adjusting the sizes of spacers.
• While configuring your iPhone
#
into SS-i housing, leave some spaces between the iPhone
#
and
the spacers. User do not need to fit the iPhone
#
to the housing too tightly. SS-i housing can well
enclosed the iPhone
#
.
Please refer to the User Manual for detailed installation steps.
* Before operating or adjusting this product, please read the entire User Manual.
#
The copyright of the trademark “iPhone” is held by Apple Inc..
a. Make sure the battery has enough charge.
b. Make sure the iPhone
#
has enough memory.
c. Make sure the touchscreen of the iPhone
#
operates well.
d. Set the iPhone
#
to Airplane Mode and switch off all
alarms and notifications.
e. Set the iPhone
#
Auto-Lock function to “Never”.
f. Move the Camera icon to the bottom right corner of the
screen.
g. Adjust the brightness of the iPhone
#
screen to the
highest level.
h. Lock the Portrait Orientation to make sure the screen
does not auto-rotate.
i. Set the iPhone switch off the flash (iPhone
#
4/4S).
j. If you need to use other photo functions, follow the
instructions released from Apple Inc. to manage photos
and video in your iPhone
#
.
If you have finished all the preparation for SS-i housing and
iPhone
#
, you can load the iPhone
#
into the housing.
* The Camera icon should be the end of right and do not move Mail or
Message at the left side of these icons when moving the four icons to
the bottom right corner. It is wrong procedure, but push Button D before
goes to photo taking mode by pushing Button C, the message screen
will display for the confirmation. The iPhone* should be unloaded to
clear this message.