SeaShell SS-2 Quick Setup Guide User Manual
Quick setup guide, Ss-1/ss-2, Universal water proof camera case
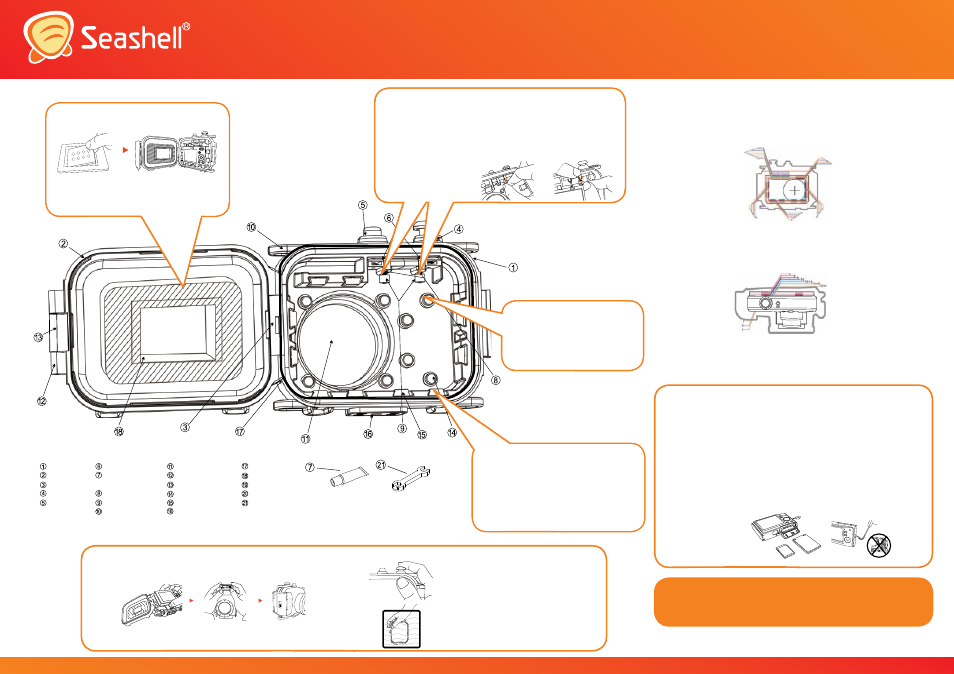
Front Housing
Rear Housing
Hingeavant
Shutter Button
Power On/Off
Button
Hanging Clamps
Water Sealing
Lubricant Grease
Actuator Shafts
Probe Pad
Strip Mount
Lens Window
Lock
Lock Button
Fish Tail Cushion
Partie avant
Brace Hole
O-Ring
Screen Pad
Neck Strap
Hand Strap
Mini Spanner
Length of Power On/Off Actuator
and Shutter Actuator
Length of Top Fish Tail
Type Cushions
Length of Left Fish Tail
Type Cushions
Length of Bottom Fish
Tall Type Cushions
Length of Right Fish
Tail Type Cushions
Thickness of Back Foam Pad
Length of Round
Type Cushions
Remove the strip from
camera (if any)
4
3
2
Choose the correct Screen
Pad for thickness and screen
size.
- Remove the appropriate block
from the Screen Pad.
- Affix the Screen Pad to the read
housing.
- Insert the Round Cushions into the four
cushion holders on the front housing.
- Please be sure that the Round Cushions are
properly affixed.
- Insert the Fish Tails into the slots on the camera case’s
front housing.
- Place the camera into the front housing and check that
the Fish Tails (on four sides) can keep the camera in
place properly.
- Replace and or adjust the length of the Fish Tails as
necessary.
- Using the Mini Spanner tool, loosen the shutter actuator shaft.
- After placing the camera into the front housing, move the Hanging Clamp and Shutter
Actuator Shaft to be directly over the shutter release button.
- Lock the Shutter Actuator Shaft in place.
- Check to make sure the Shutter Actuator Shaft position is correct.
- Make re-adjustments if required.
- Use the same procedure for the
Power On/Off Actuator Shaft.
Install Screen Pad
Install Actuator Shafts
Install Round Type
Cushions
1
Install Fish Tail Type
Cushions
5
Test before Use
Installing Camera
Rear Housing
Front Housing
Test the Operation of the Camera
Load the camera into
Seashell
Close the Seashell
housing by flipping
the lock
Test the lock by pulling the
lock to see if it is secured
- Close the Seashell camera case without the camera
installed .
- Submerge the Seashell to a depth of 200mm for at least 5
minutes to ensure there is no water leak.
- Insert the camera into the Seashell.
- Close the housing by flipping the lock.
- Test the lock by pulling on the latch to see if it is secured.
- Check the operation of the camera.
Pre-Installation Preparation
Camera Preparation
Use the supplied Fish Tail Type Cushions, Round Type
Cushions, and Screen Pads provided.
* Please refer to User Manual for detailed installation steps.
Use the Fitting Sheet (Cross Section Diagram) to help determine the size of
the Fish Type Cushions and Actuator Shafts.
Use the Fitting Sheet (Top View Diagram) to help determine the length of the
Round Type Cushions and Screen Pad.
- Turn the power of the camera to the “On” position.
- Set the camera to “Power Saving” mode, (if available).
- Set the camera to “Under Water” mode or “Auto” mode.
- Set the camera to Auto ISO or ISO400 or above.
- Set the camera to “Auto Review”, (if required).
- Set the camera to the widest angle.
- Remove the camera strap.
Please refer to the User Manual for detailed installation steps.
* Before operating or adjusting this product, please read the entire User Manual.
Copyright © Zear Corporation Limited. All Rights Reserved.
International Patents Pending
SS-1/SS-2
Universal Water Proof Camera Case
Quick Setup Guide
Illustration of Seashell SS-1 are used for the “Quick Setup Guide”
purpose. The operational procedures are the same for the
Seashell SS-2.