A - b - c, Installation instructions, Page 02 – Santec 5275DL User Manual
Page 2: 3/4” max
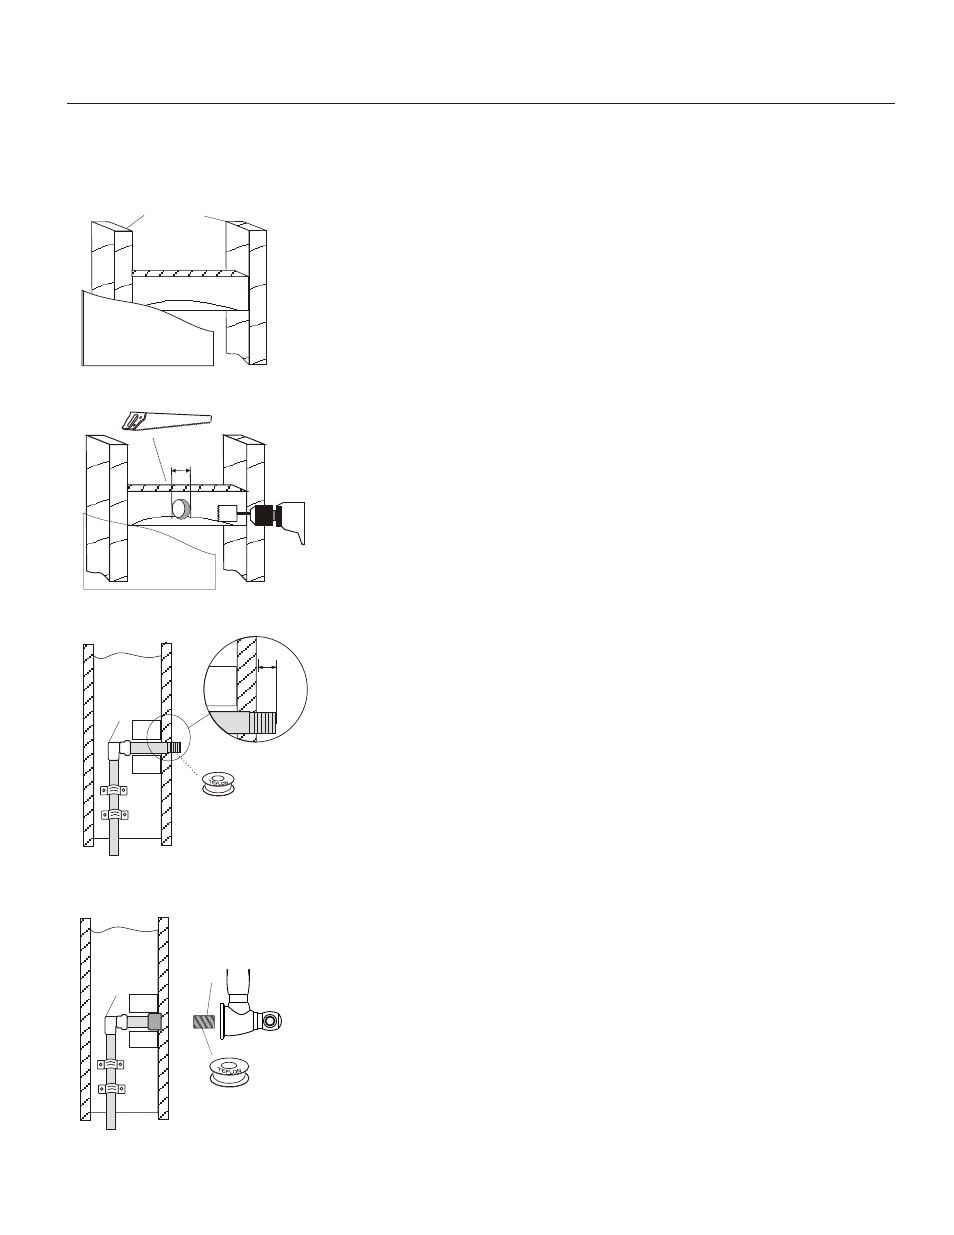
2”X4” STUDS
In order to assure that the pot filler is firmly secured. It is recommended
that the pot filler’s flange screws be fixed against wood stud (wood
runner/ header).
Preferably, the wall surface should be open for easier installation. Since
it may be necessary to have access to the backside of the wall for pipe
connection.
If the wall is closed, using a stud finder, mark the location where the
flange screws will be fixed onto.
To secure the supply line, either a hand saw or electric drill can be used
to open the space.
If using a hand saw, cut a 1” to 1-
1/4
” clearance on the horizontal stud to
accommodate the supply line pipe.
If using a drill, drill a hole at the center of the stud with the diameter
between ½” to 3/4”. on the center of the flange.
Æ
1” ~ 1-
1/4
”
INSTALLATION INSTRUCTIONS
5275DL _ _
DRY WALL
MAKE SURE THE WATER SUPPLY IS OFF
Connect the pipes.
Secure the supply line pipe with clamps firmly against the stud.
CONNECTING WITH 1/2” MALE INLET PIPE
The maximum distance between the tip of the threaded male outlet pipe
and finished wall is 3/4”.
Apply a layer of Teflon tape on the threaded inlet pipe and install the Pot
Filler.
ALTERNATE
CONNECTING WITH 1/2” FEMALE INLET PIPE
Apply a layer of the Teflon tape on the male threaded nipple.
Connect the male nipple to the Pot Filler inlet.
Connect the Pot Filler to the pipe outlet.
Make sure that the Pot Filler and leveled and the flange is completely
flushed against the finished wall.
A -
B -
C -
SANTEC RECOMMENDS THAT THE POT FILLER TO BE INSTALLED APPROXIMATELY 8” ABOVE THE
COOKING SURFACE (FROM THE POT FILLER’S LOWEST POINT).
wood stud
dry wall
½” NPT
connection
SIDE VIEW
supply line
clamp
PAGE 02
3/4” max
1/2” NIPPLE
wood stud
dry wall
½” NPT
connection
SIDE VIEW
supply line
clamp