Useful information, Folding and unfolding – phil&teds espresso buggy User Manual
Page 4
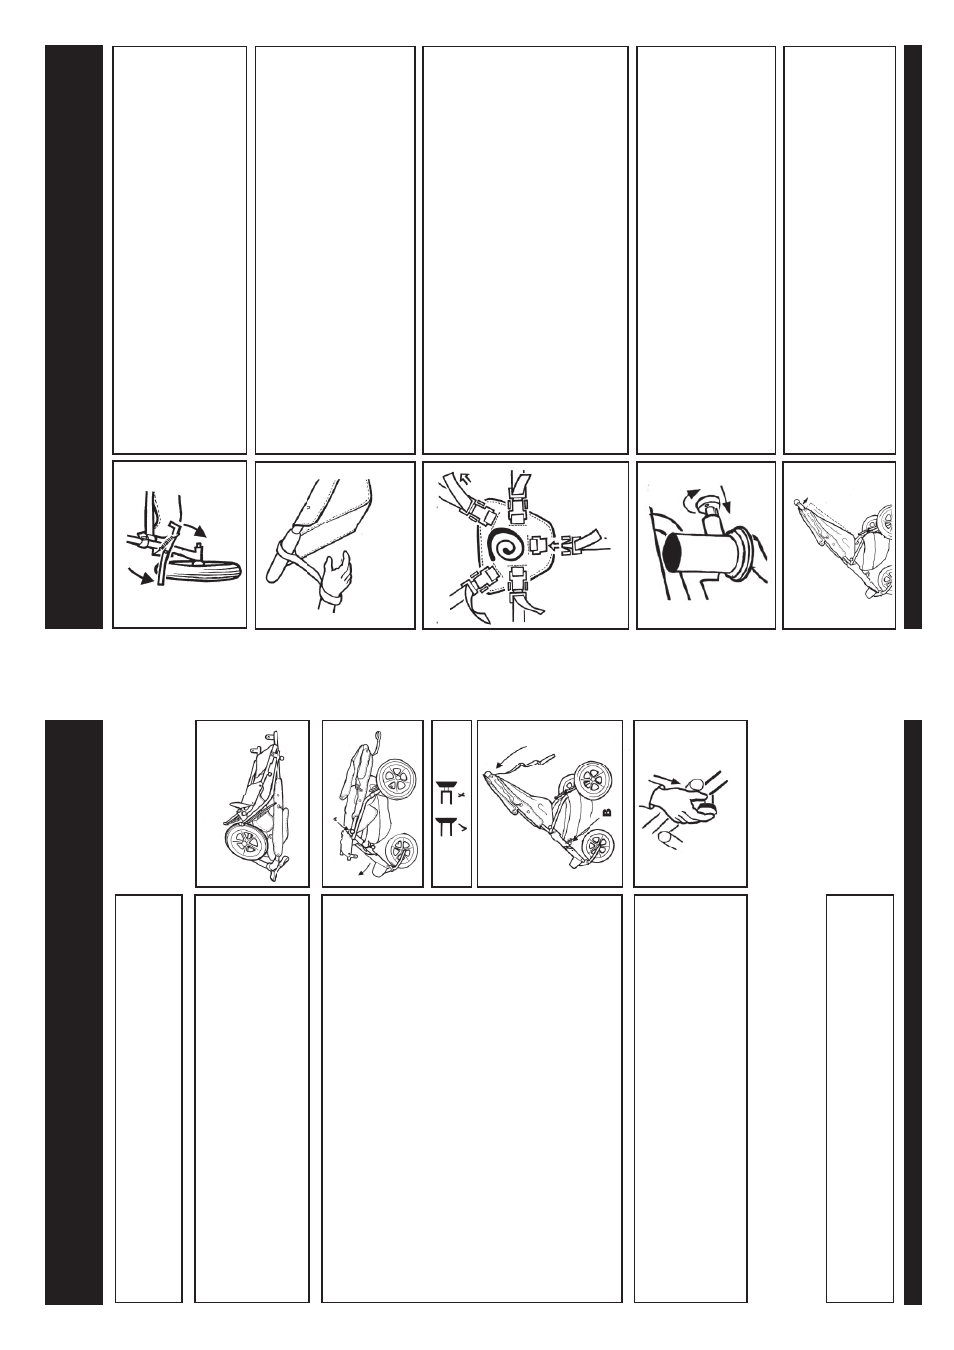
Useful Information
Brakes
•
The brakes work best when the tires are properly inflated.
Always apply both brakes when parking your buggy
.
•
T
o brake, push your foot down on the top of each brake.
The
spring will force and hold it onto the wheel.
•
T
o release the brake, push your foot hard down on the tab at
the inside end of the brake.
Safety wrist strap
•
Y
our buggy is very free wheeling so the safety wrist strap should
be worn at all times.
•
T
ake special care when using your buggy in high winds, when
running, climbing stairs, mounting or dismounting escalators,
walking down hills or on rough terrain.
•
T
he snap fastener attaches to the footplate to keep buggy folded
when not in use.
Harness & Breastplate
The breastplate is padded and features an adjustable 5-point
harness.
Always secure your child with the harness.
T
o
fasten:
•
click the 5 buckles into the buckle ends on the breastplate.
•
adjust each strap for a firm fit.
•
thread the straps back through the plastic keepers to lock them
in place.
•
adjust the crotch strap
Swivel wheel auto-lock
•
T
o fix the front wheel: turn the black cap on the housing, to match
the small hole on the underside and the pin. It clicks.
•
S
et the wheel to trail straight; the lock clicks into place.
The wheel
is now fixed.
•
Swivel mode: pull the cap outwards and half turn.
The black cap
rests on the pin, letting the wheel swivel.
Layback seat
•
U
nzip the gusset inside the sling to recline sleepy children.
•
This position is
not
recommended for newborns who need to
recline more. Use the inside zips as well.
Folding and Unfolding
Before you go
•
Check that no components are damaged.
•
Ensure that all locks engage before use.
Put on the wheels
1
A
ttach the rear wheels by sliding each axle through the axle
tubes.
Depress
the
‘nib
spring’
on
each
wheel.
2
M
ake sure the button of the spring pops out once pushed
through.
These hold the wheels in place. Remove wheels as
required.
Set up from folded position
1.
Stand the buggy upright on the handle, pull the front wheel out
and up. Set all three buggy wheels on the ground.
2.
Extend the front wheel fully until the side auto-lock (A) clicks into
place.
This locks the front and rear sections of the frame
together
.
Make sure it clicks!
The lock pin must extend fully
.
3.
Apply brakes.
4.
Lift the handle upwards, as far as it can go, until the auto-locks
(B) on
both
sides of the front section of frame click into the holes
on each end of the handle.
5.
Check that both locks extend fully through both holes, so that the
handle is locked in place, parallel with the front frame section.
6.
Snap the snap fastener on the wrist strap to the footplate to hold
buggy folded.
Make sure children are clear of the Kiwi Espresso Buggy
TM
before folding, erecting or adjusting the buggy
.
T
o
fold the buggy -
reverse the procedure above.
Auto-locks on
handle section are tight.
T
o
release, push down with palm of
hands on the frame directly above the auto-locks (B) releasing the
auto-locks with thumb and forefinger
. Release 3rd auto-lock (A).
Fold frame. Ensure swivel-lock is of
f.
Attach the snap fastener on
the wrist strap to the footplate to hold buggy folded.