Pacific Drums & Percussion FS SERIES User Manual
Page 4
4
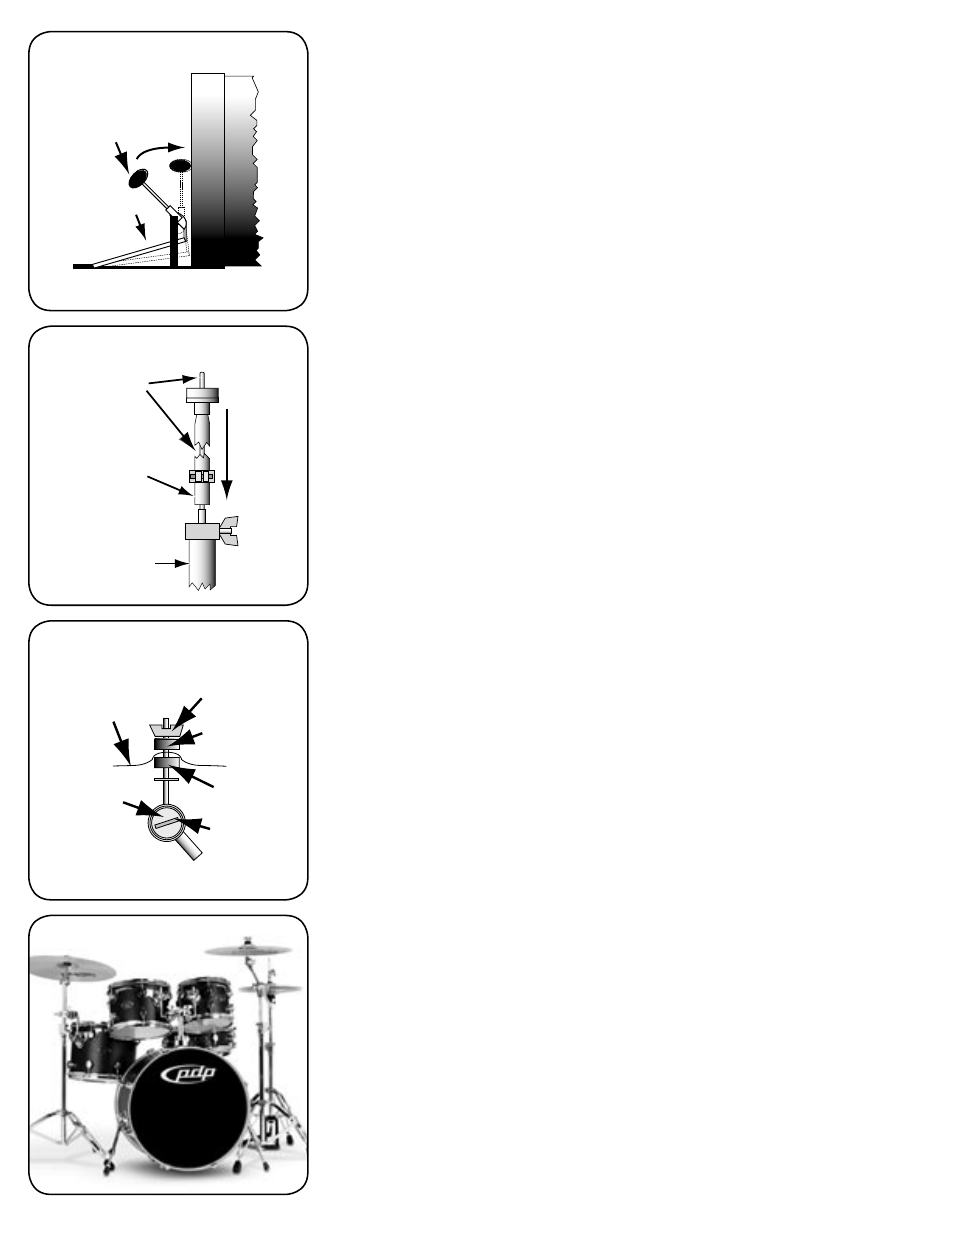
Bass Drum Pedal
Step 1: Remove the rubber band from the radius rod of the Bass Drum Pedal (P) and insert
the radius rod into the holes at the bottom of the pedal’s base.
Step 2: Rotate the hex shaft counter clockwise until the spring hub is at the 6:00 position
and the chain is wrapped around the cam. Stretch the spring up onto the rocker hub.
Step 3: Attach the pedal to the bottom of the bass drum hoop on the clear batter head
side using the drum key screw activated clamp on the side of the pedal.
Step 4: Secure the beater ball rod into the rocker hub so that the ball rests about one inch
higher than the center of the bass drum head. Position either the felt or the rounded plas-
tic side towards the head depending on your preference.
Hi-Hat Stand
Step 1: Spread the legs on the bottom section of the Hi-Hat Stand (Q).
Step 2: Screw the upper rod into the the center of the stand. DO NOT PLACE THE ROD IN
THE STAND WITHOUT SCREWING IT IN. Turn it clockwise until it is hand tightened.
Step 3: Remove the clutch from the upper rod. Slide the upper tube of the hi-hat stand into
the base section and tighten the wing screw.
NOTE: To attach hi-hat cymbals (not included), place the bottom hi-hat cymbal through the rod
so that it rests upside-down on the felt seat at the top of the upper tube. Open the clutch by
removing the bottom nut and felt washer. Position the stem of the clutch through the hole in the
top hi-hat cymbal and replace the nut and felt. Using the top nut, adjust the space between the
cymbal and felts. Place the clutch on the rod and tighten the wingscrew so that the clutch sits
3/4 to 1” above the bottom cymbal.
Final Adjustments
Cymbals (not included): Place your cymbals on the top (tilter section) of the stands. Be
sure to use a felt washer above and below each cymbal. Then hand tighten the wing nut
on top of each tilter.
Adjustments: Position the snare, 14” tom and hi-hat stand behind the bass drum. Sit
at your drum kit and adjust the heights and angles of all your drums and cymbals to a
comfortable playing position. Adjust tuning as necessary. (Please see below for tuning
guidelines.)
Have fun!: Play by yourself, play with records or start a band. Ask your local authorized
Pacific Drums and Percussion dealer about available add-on drums, hardware, accesso-
ries, books, videos and lessons.
Tuning Your Pacific Drums
There is a standard “criss-cross” pattern in which you should ALWAYS tune a drum. Use the recommended tuning
sequence positions indicated on your snare drum as a guide. Use this criss-cross sequence for each drum you
tune. The following suggestions begin with the drums completely assembled and the tension rods finger-tight.
Step 1: Start with the snare drum. Take your Drum Key (A) and place it over the tension rod at
position 1. Give the key two turns clockwise.
Step 2: Repeat at positions 2, 3, 4, 5, 6, 7, and 8.
Step 4: Return to position 1 and turn the key a quarter of a turn and tap the drum with your
finger about two inches in front of the tension rod. Using the criss-cross method continue
tightening each tension rod while tapping the drum to make sure it sounds like the last posi-
tion. Continue this process around the drum.
Step 5: When each position is the same pitch as all the other positions, you are ready to start
tuning the bottom (resonant) head.
Step 6: Follow the same procedure and pattern for the bottom (resonant) head. It is best to
tune the resonant head slightly higher than the batter head for the Snare and Bass Drums and
slightly lower in pitch for your Tom Toms.
Step 7: Use this same procedure for each drum, including the Bass Drum and Tom-Toms.
Beater
Upper Rod
Base Section
Upper Tube
Bass Drum Pedal
Hi Hat Stand
Cymbal
Wingnut
Upper Felt
Cymbal Tilter
Lower Felt
Wingscrew
Cymbal Assembly
Final Adjustments