Operation fryer burner lighting, Leak testing, Setup – Coleman 9994 User Manual
Page 8: Danger, Warning, Caution, English-8, English-7, How to check for leaks
DANGER
• CARBON MONOXIDE HAZARD
• For outdoor use only.
• Never use inside house, camper, tent, vehicle
or other unventilated or enclosed areas. This
unit consumes air (oxygen). Do not use in
unventilated or enclosed areas to avoid
endangering your life.
DANGER
• EXPLOSION - FIRE HAZARD
• Propane is heavier than air and can
accumulate in low places. If you smell gas,
leave the area immediately.
• Always attach or detach propane source
outdoors; never while unit is lighted, near
flame, pilot lights, other ignition sources or
while unit is hot to touch.
• This unit is very hot during use and can ignite
flammables too close to the burners.
• Minimum distance shall be at least 10 ft (3 m)
from any structure or combustible material.
• Do not use gas fryer on or under any
apartment, or condominium balcony or deck.
• Keep gasoline and other flammable liquids and
vapors well away from unit.
■ Do not attempt to operate until you have read
and understood all General Safety Information in
this manual and all assembly is complete and
leak checks have been performed.
WARNING
• BURN HAZARD
• This appliance will be hot during and after
use. Use insulated oven mitts or gloves for
protection from hot surfaces or splatter
from cooking liquids.
• Never leave fryer unattended when hot or
in use.
• Keep out of reach of children.
10. Observe the flame from below the fryer, looking
between the fryer housing and the grease tray
(Fig. 18).
11. Flame should be blue with a hint of yellow
on tips.
English-8
Operation
Fryer Burner
Lighting
IIN
NS
ST
TA
AS
ST
TA
AR
RT
T™
™ E
Elle
ec
cttrro
on
niic
c
IIg
gn
niittiio
on
n F
Frryye
err::
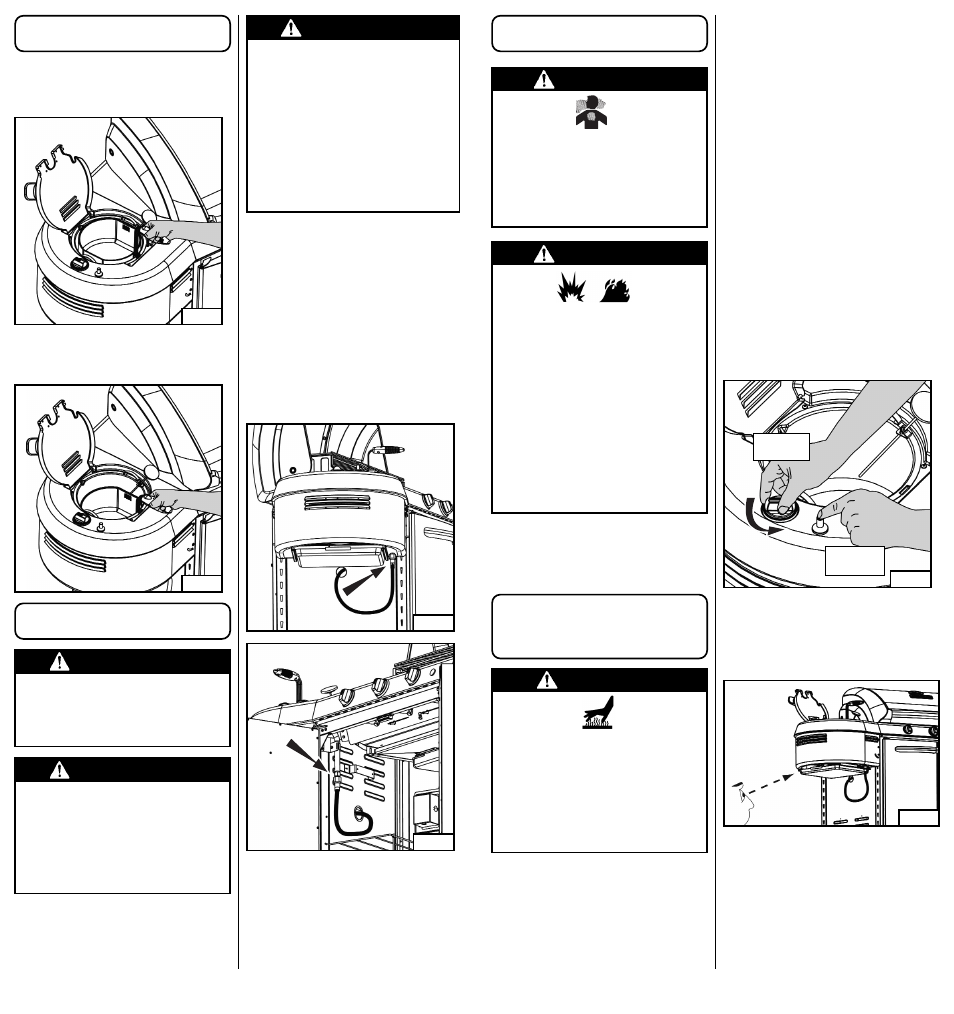
1. Open the lid.
2. Make sure all valves are OFF.
3. Turn on the cylinder valve.
4. Push in and turn on the Fryer Control Knob
counterclockwise to HIGH. (Fig. 17).
5. Continue to depress and hold the Fryer
Control Knob.
6. Repeatedly press the igniter switch until
the flame ignites.
7. After burner ignition, continue to hold Fryer
Control Knob in for 15-30 seconds.
8. If ignition does not occur in 5 seconds, turn
the Fryer Control Knob off, wait 5 minutes,
and repeat the lighting procedure.
9. If the burner does not light after trying
again, turn off Fryer Control Knob and try
match lighting the burner.
HINT: If the igniter fails to light the fryer
burner, adjust electrode tip with needle-
nose pliers. A spark must jump near a gas
opening in the burner when igniter is
activated. Use care not to damage the
ceramic insulator on electrode.
Fig. 18
Fig. 17
Depress
and Hold
Push
Repeatedly
5. Place the basket in the fryer (Fig. 13). This
illustration shows the basket in the upper
position for draining the food after frying.
English-7
Leak Testing
How to Check for Leaks
1.
Make a soapy solution of equal parts mild
liquid dishwashing detergent and water.
2.
Turn off all burner control knobs.
3.
Turn on the fuel supply by turning the
cylinder valve knob counterclockwise (right
to left) one rotation.
4. Apply a soap solution to the connections
indicated with the arrows in Fig. 15 and 16. If
bubbles appear at these areas, a leak is
indicated.
5. Also follow the “Leak Check” section in the
manual that came with your grill.
WARNING
• Perform leak test outdoors.
• Extinguish all open flames.
• NEVER leak test when smoking.
• Do not use the outdoor fryer until connection
has been leak tested and does not leak.
CAUTION
• SERVICE SAFETY
• Keep all connections and fittings clean.
Inspect propane cylinder and fryer propane
connections for damage before attaching.
• During set up, check all connections and
fittings for leaks using soapy water. Bubbles
indicate a leak.
Never use a flame.
Fig. 15
Fig. 16
Setup
(cont.)
Fig. 13
6. Figure 14 shows the basket lowered into the oil
for frying. Never close the lid during use.
Fig. 14
CAUTION
Inspect the gas supply hose before each
use. Look underneath the grill to inspect
the hose assembly below the grill. If
there are cuts, damage, excessive
abrasion or wear, replace the hose prior
to operating the appliance. During
assembly of the grill and when attaching
or replacing the L.P. gas cylinder, insure
that the gas supply hose is free of kinks
and/or damage and is at least three
inches away from hot surfaces such as
the grill housing. Use only hose
replacements specified in the parts list.