Caution, Fryer burner lighting, Fryer assembly – Coleman 9994 User Manual
Page 7: Setup, Danger, Mma attc ch h lliig gh httiin ng g, English-9, English-6
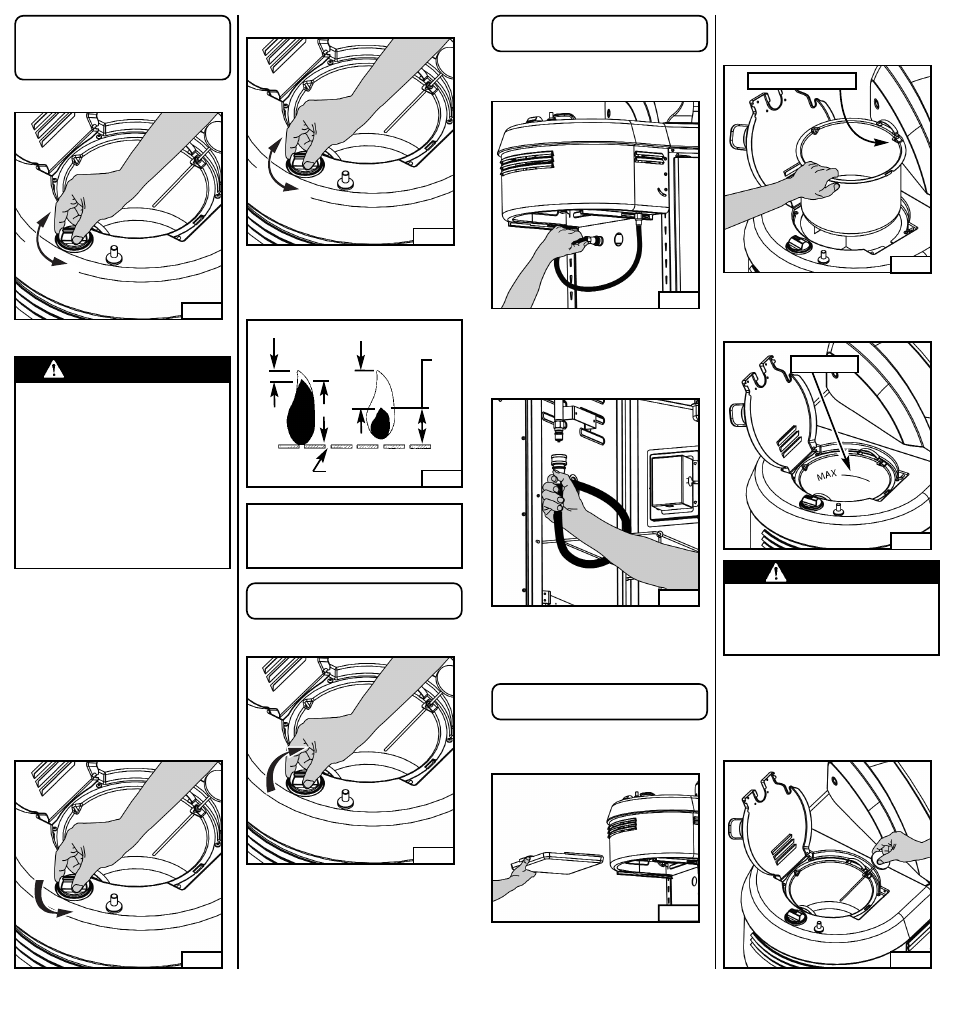
■ A good flame should be blue with minimal
yellow tip. Some yellow tips on flames are
acceptable as long as no carbon or soot
deposits appear (Fig. 22).
G
OOD
Yellow
Blue
Holes in Burner
Blue
Yellow
B
AD
NOTE: If the burner flame is accidentally
extinguished, turn off the control knob
and wait 5 minutes before relighting
the appliance.
12. Adjust flame with the control knob (Fig. 19).
M
Ma
attc
ch
h LLiig
gh
httiin
ng
g::
CAUTION
Use a LONG wooden match or a butane
lighter with an extension. Make sure all
burner controls are off except for the
burner being lighted. If a long-reach
match or lighter is not accessible, use the
match extension. The match extension is
located inside the doors. Insert a match in
the holder end of the extension, strike and
place the burning match near the
BURNER being operated. Removing the
Fryer Grease Pan will make it easier to
access the Fryer Burner. Be sure to
replace the Fryer Grease Pan as soon as
the burner stays lit.
1. Open the lid.
2. Make sure all valves are OFF.
3. Turn on the cylinder valve.
4. Strike and place the burning match
near the burner gas por t holes, from
below the fryer.
5. Push in and turn on the Fryer Control Knob
counterclockwise to HIGH (Fig. 20).
6. Continue to depress and hold the Fryer
Control Knob.
7. After burner ignition, continue to hold Fryer
Control Knob in for 15-30 seconds.
English-9
Turn off the control knob (Fig. 23).
To Turn Off
Fig. 19
Fig. 23
Fig. 21
Fryer Burner
Lighting
(cont.)
2. Place the oil reservoir in the Side Fryer.
Locate the thermometer bracket on the right
side (Fig. 10).
4. Place the thermometer in the holder (Fig. 12).
7. Open the door to reveal the Quick Coupler in
the upper corner. Retract the Collar on the
Quick Coupler before attaching to the male
fitting (Fig. 8). Release the collar to lock the
connection.
3. Fill the oil reservoir with 2.67 qts (2.53 liters)
maximum of cooking oil, indicated by the marks
on the oil reservoir (Fig. 11).
Fryer Assembly
(cont.)
English-6
Setup
Fig. 8
Fig. 10
1. Slide the grease tray into the rails below the
fryer (Fig. 9).
Fig. 9
Thermometer Bracket
Fig. 11
Max Fill Line
Fig. 12
8. Check that the hose has no kinks or sharp
bends and clears areas that will become hot
during use. Never put strain on the hose where
it joins a fitting.
6. Push the fuel hose connection through the
opening in the side grill panel (Fig. 7).
Fig. 7
8. Adjust flame with the control knob (Fig. 21).
Fig. 20
DANGER
DO NOT FILL PAST MAXIMUM FILL LINE
MARKED ON THE OIL RESERVOIR or an oil
overflow may occur resulting in a fire which
could cause property damage, personal injury
or death.
Fig. 22