A. b. c. d. e, Warning, Avertissement advertencia 3 – Closet Maid Custom Closet Organizer S16TS User Manual
Page 3
0 - 48”
0 - 48”
0 - 1,22 m
0 - 1,22 m
0 - 48”
0 - 48”
0 - 1,22 m
0 - 1,22 m
SECURE BASE UNIT TO WALL
FIXER LA BASE AU MUR
FIJE LA UNIDAD DE BASE A LA PARED
USE SMALLEST SCREWS!
UTILISER LES PLUS PETITES
VIS!
¡USE LOS TORNILLOS
MÁS PEQUEÑOS!
5
x2
x2
x2
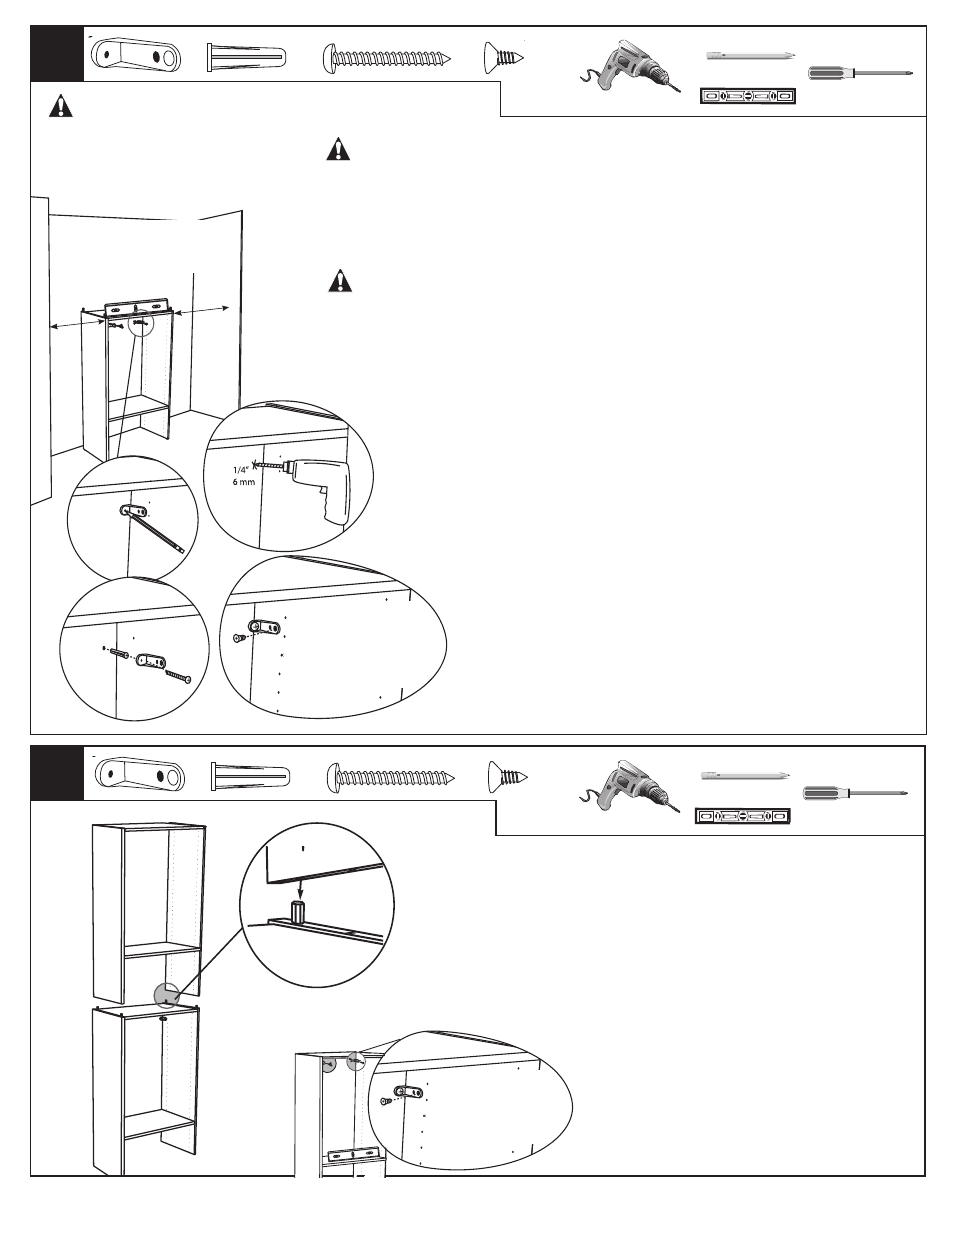
a.
Place base unit inside closet (allow 0-48" on each side for hang rod).
Use a level and adjust leveling feet to be sure base is square.
b.
Place L-bracket inside base as shown. Mark hole location on wall.
c.
Use a 1/4" drill bit to drill marked hole.
d.
Insert wall anchor into hole and secure L-bracket to wall with wall
screw.
e.
Drill 1/16" pilot hole and secure L-bracket to gable with L-bracket
screw.
Repeat all steps to secure opposite side of base.
a.
Placer la base à l’intérieur de la garde-robe (laisser 0 à 122 cm de
chaque côté pour la barre à cintres). À l’aide d’un niveau, ajuster les
pieds de nivellement en s’assurant que la base est bien d’aplomb.
b.
Positionner le support en L à l’intérieur de la base, tel qu’illustré.
Marquer l’emplacement du trou sur le mur.
c.
Percer le trou à l’aide d’une mèche de 6 mm.
d.
Insérer une douille d’ancrage dans le trou et fixer le support en L au
mur à l’aide d’une vis murale.
e.
Percer un trou de guidage de 1,5 mm et fixer le support en L au
côté à l’aide de la vis du support en L.
Répéter ces étapes pour
fixer l’autre côté de la base.
a.
Coloque la unidad de base dentro del clóset (deje entre 0 y 122 cm
en cada lado para la barra de colgar). Use un nivel y ajuste las patas
niveladoras para
asegurarse de que la base esté a escuadra.
b.
Coloque el soporte en forma de L dentro de la base como se
muestra. Marque la ubicación del agujero en la pared.
c.
Use una broca de 6 mm para perforar el agujero marcado.
d.
Inserte el tarugo de pared en el agujero y fije el soporte en forma de
L a la pared con el tornillo de pared.
e.
Perfore un agujero piloto de 1,5 mm y fije el soporte en forma de L al
gablete con un tornillo de soporte en forma de L.
Repita todos los
pasos para fijar el lado opuesto de la base.
a.
b.
c.
d.
e.
6
a.
Align dowels in base unit with holes in bottom of top
unit. Stack units.
b.
Repeat Step 5 to secure top unit to wall.
a.
Aligner les goujons de la base avec les trous du bas de
la partie supérieur. Empiler les modules.
b.
Répéter l’étape 5 pour fixer la partie supérieure au mur.
a.
Alinee las espigas en la unidad de base con los
agujeros en el fondo de la unidad superior. Apile las
unidades.
b.
Repita el paso número 5 para fijar la unidad superior a la
pared.
a.
SECURE TOP UNIT TO WALL
FIXER LA PARTIE SUPÉRIEURE AU MUR
FIJE LA UNIDAD SUPERIOR
A LA PARED
USE SMALLEST SCREWS!
UTILISER LES PLUS PETITES
VIS!
¡USE LOS TORNILLOS
MÁS PEQUEÑOS!
b.
Finished edges to front!
Bordures ouvrées à l’avant!
¡Bordes terminados hacia
el frente!
x2
x2
x2
x2
x2
All units MUST be fastened to the wall. When stacking units,
the unit on the bottom must be attached to the wall first before
setting another unit on top.
WARNING
Tous les modules DOIVENT être
attachés au mur. Pour empiler
les modules, celui du bas doit
d’abord être fixé au mur avant
l’installation d’un autre module
par dessus.
Todas las unidades DEBEN
sujetarse a la pared. Cuando las
unidades se apilen, la unidad del
fondo debe sujetarse a la pared
primero antes de colocar otra
unidad encima.
AVERTISSEMENT
ADVERTENCIA
3