Read and save these instructions, Important, Intex – Intex QUEEN FOAM TOP AIRBED WITH BIP 2014 User Manual
Page 2
246
PO
(246PO) AP619A BUILT-IN ELECTRIC PUMP ENGLISH 4.875” X 7.25” 06/14/2013
246
PO
(246PO) AP619A BUILT-IN ELECTRIC PUMP ENGLISH 4.875” X 7.25” 06/14/2013
READ AND SAVE THESE INSTRUCTIONS
READ AND SAVE THESE INSTRUCTIONS
Page 3
Page 4
4. Press “I” to switch ON. See Fig (4).
5. When the airbed is fully inflated to the desired
firmness, press “O” to switch OFF. See Fig (5).
6. Pat on the bed surface to adjust the foam.
Note: Leave the vacuum valves open to
allow the foam to re-shape itself, this may
take up to five minutes before initial use.
7. Close the foam vacuum valves. See Fig (6).
8. Lie down on the airbed to test the firmness.
9. If the sleeping surface is too hard, adjust
the firmness by turning the control dial
counterclockwise gradually until air starts
to exit through the air passage. See Fig
(7).
Turn the control dial fully clockwise when
the desired firmness is achieved. See Fig
(8).
If the airbed becomes too soft repeat step #3
thru #7 as necessary.
10. Disconnect the AC line cord from the wall
socket, place it inside the cord compartment
and close the cover. Make sure the power
cords are free of twist, kink and knot.
FIG (7)
FIG (8)
Proper inflation of the airbed.
The ambient temperatures of air have an effect on the airbed internal pressure. At low ambient
temperature the air will contract within the airbed and the airbed will feel softer: add air as necessary.
At high ambient temperature the air within the airbed will expand significantly and the airbed will
become hard and may burst: release air to avoid damage to the airbed or to soften the feel.
Do not expose the airbed to extreme temperatures (hot or cold).
Stretching is a natural characteristic of new vinyl. During initial use, the airbed may become soft and
require additional inflation to maintain desired firmness. This is normal for the first few days of use.
Dimensions shown are approximate and will vary due to the vinyl temperature and the air
temperature.
In no event shall Intex, their authorized agents or employees be liable for damages (such
as pin holes) to the airbed caused by negligence, ordinary wear and tear, abuse and
carelessness, or external forces.
IMPORTANT NOTE
DEFLATION
1. Open line cord compartment cover. See Fig
(1).
2. Plug in the AC line cord into an AC electrical outlet. See Fig
(2).
3. Turn the control dial counterclockwise until arrow points to deflation mark ( ). See
Fig
(9).
Marketing Ltd.
Long Beach,CA 90801-1440 USA
countries of the world by Intex
Trading Ltd.,under license from Intex
Trademarks used in some
2004 Intex Recreation Corp.,
Made in China/Fabrique en Chine/Hecho en Chin
a
FIG (9)
FIG (10)
Marketing Ltd.
Long Beach,CA 90801-1440 USA
countries of the world by Intex
Trading Ltd.,under license from Intex
Trademarks used in some
2004 Intex Recreation Corp.,
Made in China/Fabrique en Chine/Hecho en China
FIG (11)
INFLATION OPTION
1. If electrical power is not available then a conventional foot
or manually operated air pump can be connected to the
control dial valve for inflation. See Fig
(12).
2. Turn the control dial clockwise until arrow points to the
inflation mark ( ).
3. Insert air pump nozzle to the control dial valve to inflate the
airbed.
FIG (12)
Inflate only with a low pressure inflator. Do not over inflate. Fill with cold air only.
IMPORTANT
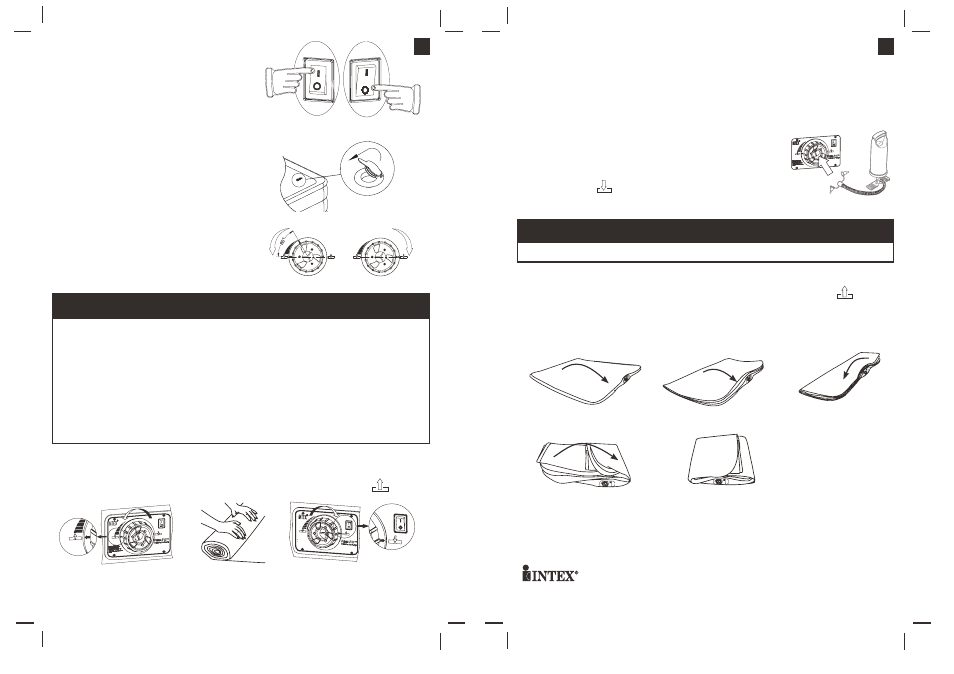
STORAGE INSTRUCTIONS
1. Deflate the airbed following the "DEFLATION" instructions.
2. Turn the control dial counterclockwise until arrow points to deflation mark ( ). See
Fig
(9).
3. Make sure the airbed is clean and dry.
4. Lay bed flat with sleeping surface facing upwards and follow the folding steps on Figs
(13 - 17). Fold the airbed loosely and avoid sharp bends, corners and creases which can
damage the airbed.
FIG (13)
FIG (14)
FIG (15)
INTEX
INTEX
FIG (17)
INTEX
INTEX
INTEX
INTEX
INTEX
INTEX
FIG (16)
INTEX
INTEX
5. Turn the control dial fully clockwise. See Fig
(11).
6. Place the airbed inside the storage bag and store in a dry, cool storage location.
©2013 Intex Marketing Ltd. - Intex Development Co. Ltd. - Intex Trading Ltd.- Intex Recreation Corp.
All rights reserved/Tous droits réservés/Todos los derechos reservados/Alle Rechte vorbehalten. Printed in China/Imprimé en Chine/Impreso
en China/Gedruckt in China.
®™ Trademarks used in some countries of the world under license from/®™ Marques utilisées dans certains pays sous licence de/Marcas registradas
utilizadas en algunos países del mundo bajo licencia de/Warenzeichen verwendet in einigen Ländern der Welt in Lizenz von/
Intex Marketing Ltd. to/à/
a/an Intex Trading Ltd., Intex Development Co. Ltd., G.P.O Box 28829, Hong Kong & Intex Recreation Corp., P.O. Box 1440, Long Beach, CA
90801 • Distributed in the European Union by/Distribué dans l’Union Européenne par/Distribuido en la unión Europea por/Vertrieb in der Europäischen
Union durch/
Intex Trading B.V., Venneveld 9, 4705 RR Roosendaal – The Netherlands Consumer Service 1-800-234-6839\
www.intexcorp.com
4. Press "I" to switch ON. See Fig
(4).
5. When the airbed is completely deflated, begin rolling the airbed from the foot of
the airbed towards the head of the airbed where the pump is located. See Fig
(10).
6. When all air is removed from the airbed, press "O" to switch OFF. See Fig
(5).
7. Turn the control dial fully clockwise. See Fig
(11).
8. Disconnect the AC line cord from the wall socket, place it inside the cord compart
ment and close the cover. Make sure the power cords are free of twist, kink and
knot.
FIG (5)
FIG (4)
FIG (6)