Playback – Interlogix NVR 20 Quick Start User Manual
Page 11
TruVision NVR 20 Quick Start Guide
9 ‐ EN
Playback
When you first log into the TVN 20, the default page is
on the Live view tab. To move to the Playback page,
click on the Playback tab at the near the top of the TVN
Browser page. The various buttons are explained in
Figure 7 below.
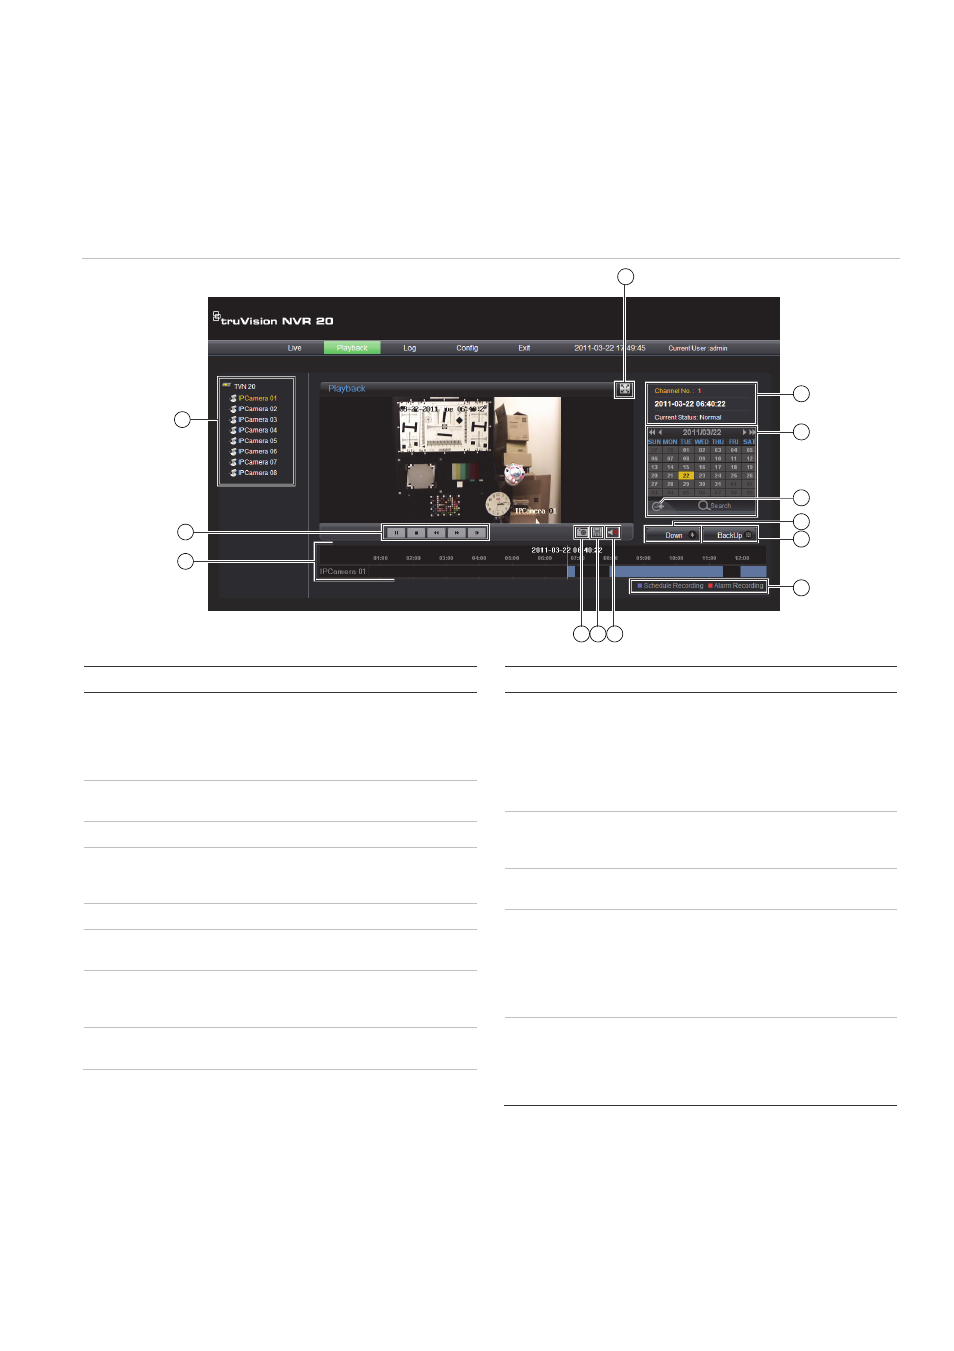
Figure 7: Playback Browser Page
Item Name
Description
1
Connection Tree
The left hand panel shows the
configured IP cameras on the TVN 20.
Clicking on an individual camera’s arrow
icon will load it into the current display
window.
2
Playback Controls Play/Pause, Stop, Frame Reverse,
Frame Advance, Fast Forward
3
Video Timeline
A graphical display of the selected video
4
Snapshot
Takes a snapshot of the currently
highlight camera and saves it to the
local browser PC.
5
Save
Saved the selected video to the HDD.
6
Audio
Displays a Volume control slider if audio
is available.
7
Expand Screen
The display can be expanded to screen
by pressing the Expand button in the
upper right hand corner of the display.
8 Recording
Mode
LEDs
Recording Mode LEDs
Item Name
Description
9
BackUp Button
This button allows the User to backup
video segments on the TVN 20 to a
USB 2.0 and above memory stick that
can be plugged directly into the TVN 20.
The BackUp process can include
downloading a copy of the TVN 20 Mini-
Player.
10
Down Button
This button allows the User to copy
video segments from the TVN 20 to the
local PC.
11
Go to Button
Click the Go To button to enter a
specific time to go to for playback.
12
Day and Time
Search
Day Search: Select the Date to view
video from and press the Search icon.
Day and Time Search: Select the Date
to view video from and click the Go To
button to enter a specific time to go to
for playback.
13
Channel Status
During playback, the status display
shows the current playback IP camera
channel, the date and time of the video
in the display and also the playback
speed.
13
8
9
12
11
10
7
4 5
6
2
3
1