Cleaning & maintenance – Guardian Technologies AC4220 User Manual
Page 5
GENERAL CLEANING
Always unplug the unit before cleaning or servicing in any way.
Caution: Do NOT use gasoline, benzine, thinner, harsh cleaners, etc. on and/or in the unit
while cleaning as they will damage the product. NEVER use alcohol or other solvents.
Note: Do NOT stick any foreign objects or your fingers inside the unit.
1. Wipe the surface of the unit with a clean, dry soft cloth as needed.
2. Clean the Combination Filter monthly with the brush of your vacuum cleaner.
a. Remove Combination Filter from unit.
b. Remove the Pre-Filter/Charcoal layer
from the Velcro strips on the HEPA Filter
layer (Figure 2).
c. Clean both layers with the brush attachment
of your vacuum cleaner to remove lint and dust.
d. After cleaning, reattach the filter layers with
the Velcro strips and return filter to unit.
If the HEPA Filter layer turns from white to grey or black, it should be replaced with a new one. If
the HEPA Filter is still white, it does not need to be replaced.
FILTER REPLACEMENT
To maintain the performance of the air cleaner, it is recommended that the filter be replaced about
every 6 months. The replacement requirements will vary depending on usage and environmental
conditions. It’s time to replace the filter when
1. Filter Replacement Indicator light on the control panel will illuminate indicating that it is time
to replace your filter (Figure 3).
OR
2. The HEPA Filter has changed from white to grey or black.
IMPORTANT:
Do NOT try to wash and re-use the Combination Filter. Please contact
Customer Service at
1.866.603.5900 or visit us at www.guardiantechnologies.com to
purchase a replacement filter.
Replacement Filter: Filter D (FLT4220)
1. Remove and replace filter according to “Directions For Use” on page E-6.
2. Reset Filter Replacement Indicator. Insert pen tip into HEPA reset area on control panel next to
UV-C power button to reset the indicator (Figure 4).
E-8
E-9
CLEANING & MAINTENANCE
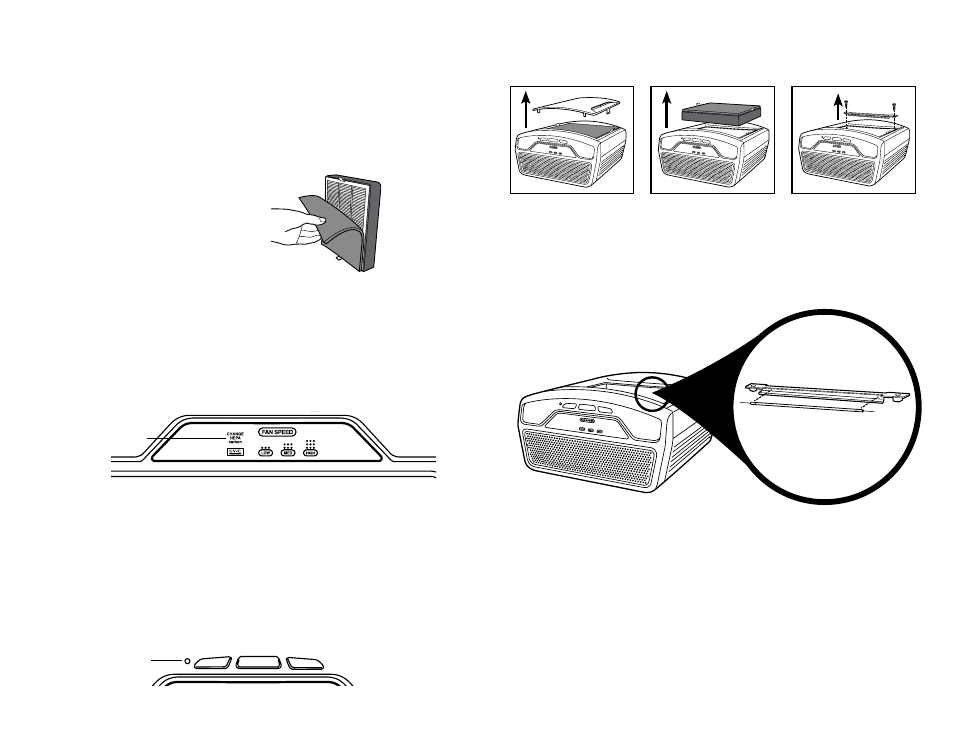
4. The UV-C Bulb is removed by carefully grasping the bulb with a clean cloth or tissue and pulling
the bulb straight out of the unit (Figure 5).
5. The UV-C Bulb is reinstalled by sliding it, horizontally, back into the slots.
IMPORTANT: The UV-C Bulb should be replaced every 10-12 months
depending on use. Please contact Customer Service at
1.866.603.5900 or
visit us at
www.guardiantechnologies.com to purchase a
replacement bulb.
Replacement UV-C Bulb: LB4220
Pull UV-C Bulb
straight out of unit.
1. Lift and remove the
Front Cover from the unit.
2. After removing the
Front Cover from the
unit, remove the
Combination Filter.
3. After removing the
Combination Filter, use a
Philips head screwdriver to
remove two (2) screws and
detach the UV-C Shield.
Figure 5
Figure 2
CLEANING & MAINTENANCE
UV-C BULB REPLACEMENT
Figure 3
Filter Replacement
Indicator Light
HEPA
Reset
Figure 4