Great Planes Sequence 1.20 EP/GP ARF - GPMA1232 User Manual
Page 14
14
SHCS, #8 lock washers and fl at washers and threadlocker.
❏
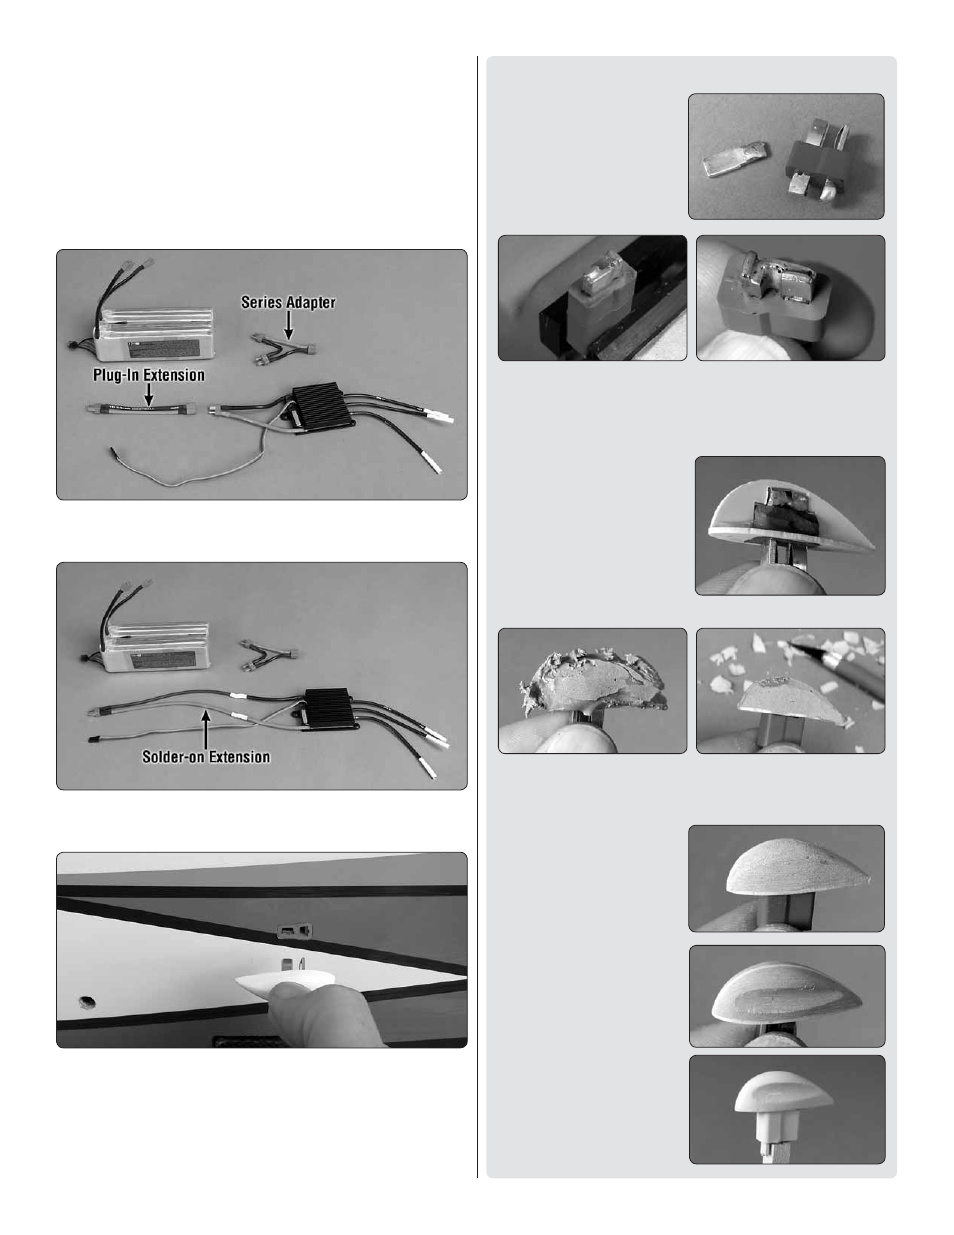
7. Before mounting the ESC consider the options for
connecting the battery. First, the wires coming from the ESC
are probably not long enough to reach the battery, so an
extension of some sort may have to be made. And if using two
3S LiPo packs connected in series (as illustrated here in the
manual), a Series Deans Ultra 2 to 1 Adapter (GPMM3143)
will also be required. (If using a single 6S battery pack no
adapter will be required.)
The easiest way to get the ESC wires to reach the battery is to
make a plug-in extension with a Deans connector on both ends.
Or, additional wire could simply be soldered directly onto the
ESC.
Finally, an external motor arming plug could be incorporated
with the necessary wiring and receptacle plug soldered to
the ESC. With an arming plug you’ll never have to handle the
airplane while the motor is armed—you can simply install
and connect the battery, mount the canopy hatch, then insert
the arming plug right before you fl y!
How to Make an Externally-Accessible Arming Plug:
❏
A. First, you’ll need a
short metal tab to bridge the
tabs across a Deans male
Ultra Plug. A tab extracted
from another male or female
plug works perfectly for this.
❏
B. Cut the tab to length and make a 90° bend on one
end. Solder the tab across the tabs on the plug. Hint: Plug
the arming plug into a female plug to serve as a heat sink
and to make it easier to hold in a vice for soldering.
❏
C. Trim the edges around
the Deans plug as shown.
Glue together the plastic
pieces of the frame for the
plug and test-fi
t the plug
into the frame. Make any
adjustments necessary and
glue the assembly together
with CA.
❏
D. Apply auto body fi ller to the frame and allow to
partially harden. While the fi ller is still “rubbery” use a
hobby knife to roughly carve it to a teardrop shape.
❏
E. After the body fi ller
has hardened use coarse
sandpaper to sand to the
fi nal profi le.
❏
F. Use a small rod or
dowel wrapped with medium-
grit sandpaper to cut the
depressions into the sides of
the plug so you can grip it.
❏
G. Prime, sand, then
paint—just about any kind
of paint will work, but we
used enamel spray paint.