Great Planes Edge 540T EP ARF - GPMA1572 User Manual
Page 18
18
FINISH THE MODEL
❏
1. The cowl is held on with four magnets. It fi ts over the
small lip and snaps into place. Note: If you will be performing
violent maneuvers, a piece of clear tape should be applied to
both sides of the cowl to help hold it in place.
❏
2. Use a prop reamer or drill bit to enlarge the spinner
backplate to fi t your motor’s prop adapter. Install the spinner
backplate, propeller with washer and prop nut and the
spinner cone. Secure the spinner cone to the backplate with
two 3 x 10mm sheet metal screws.
❏
3. Insert a fl ight battery in the fuselage and use the hook
and loop material to hold the battery in position. Do not
connect the battery to the ESC while balancing the model.
❏
4. Install the canopy.
Balance the Model (C.G.)
More than any other factor, the C.G. (balance point) can
have the greatest effect on how a model fl ies, and may
determine whether or not your fi rst fl ight will be successful.
If you value this model and wish to enjoy it for many fl ights,
DO NOT OVERLOOK THIS IMPORTANT PROCEDURE.
A model that is not properly balanced will be unstable and
possibly unfl yable.
At this stage the model should be in ready-to-fl y condition
with all of the systems in place including the motor, landing
gear, covering and paint, and the radio system.
❏
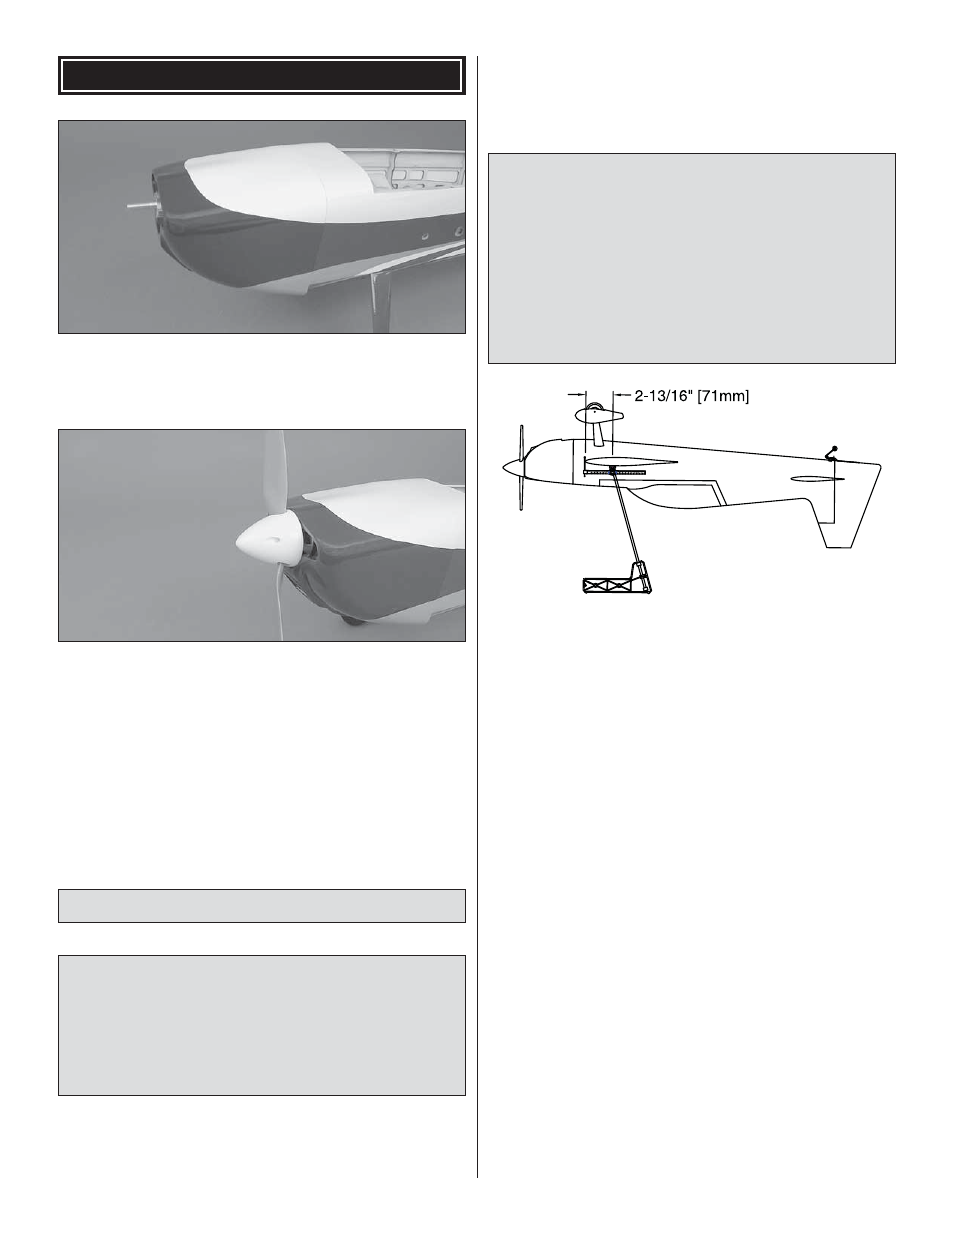
1. Use a felt-tip pen or 1/8" [3mm]-wide tape to accurately
mark the C.G. on the top of the wing at the side of the
fuselage. The C.G. is located 2-13/16" [71mm] back from the
leading edge of the wing at the side of the fuselage.
This is where your model should balance for the fi rst
fl ights. Later, you may wish to experiment by shifting the
C.G. up to 3/16" [5mm] forward or 3/16" [5mm] back to
change the fl ying characteristics. Moving the C.G. forward
may improve the smoothness and stability, but the model
may then require more speed for takeoff and make it more
diffi cult to slow for landing. Moving the C.G. aft makes
the model more maneuverable, but could also cause it to
become too diffi cult to control. In any case, start at the
recommended balance point and do not at any time
balance the model outside the specifi ed range.
❏
2. With the wing attached to the fuselage, all parts of the
model installed (ready to fl y), lift the model at the balance
point you marked.
❏
3. If the tail drops, the model is “tail heavy” and the battery
pack and/or receiver must be shifted forward or weight
must be added to the nose to balance. If the nose drops,
the model is “nose heavy” and the battery pack must be
shifted aft or weight must be added to the tail to balance. If
additional weight is required, use Great Planes (GPMQ4485)
“stick-on” lead. A good place to add stick-on nose weight is
to the motor box (don’t attach weight to the cowl–it is not
intended to support weight). Begin by placing incrementally
increasing amounts of weight on the fuselage over the motor
box until the model balances. Once you have determined the
amount of weight required, it can be permanently attached.
Note: Do not rely upon the adhesive on the back of the
lead weight to permanently hold it in place. Over time the
adhesive may soften and cause the weight to fall off. Use #2
sheet metal screws, RTV silicone or epoxy to permanently
hold the weight in place.
❏
4. IMPORTANT: If you found it necessary to add any weight,
recheck the C.G. after the weight has been installed.