GME TX670TP User Manual
Page 5
TX670TP
INSTRUCTION MANUAL
PAGE 5
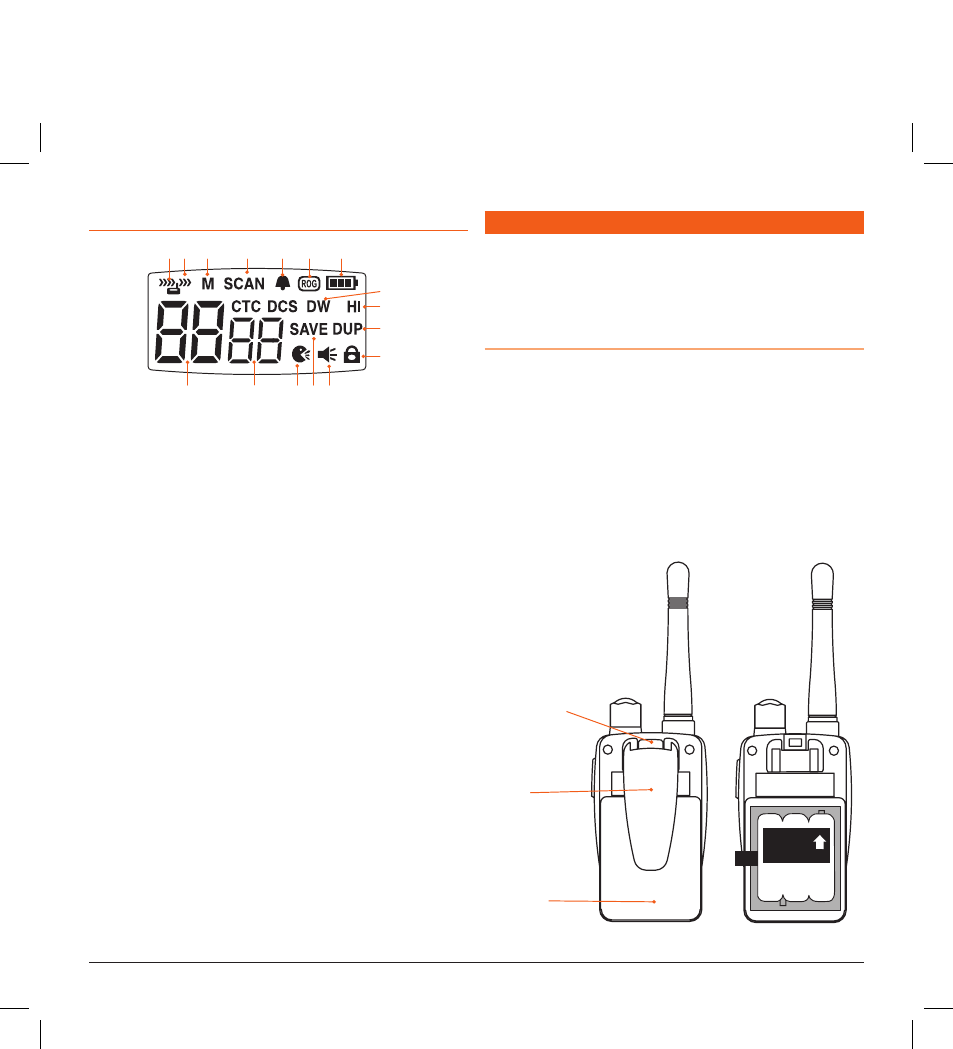
lCD DisPlAY
POWeRING THe RADIO
Your TX670 is powered by a Ni-MH rechargeable battery pack. If
left unused, the batteries will discharge within a few months. If you
have not used your TX670 for some time, you will need to recharge
your battery pack before use.
Installing the Batteries
Battery installation is more convenient when the belt clip is
removed. To do this, release the spring clip and slide the belt
clip downward and away from the radio body.
1. Press the centre-top area of the battery cover and
slide downwards.
2. Install the rechargeable battery pack in the direction
indicated on the pack until it ‘clicks’ into place.
3.
Replace the battery cover and belt clip.
1 2 3
4
5
6
7
8
10
11
12
13
14
15
16
9
1 Receiver Busy Icon: Appears
when receiving.
2 Transmit Icon: Appears when
transmitting.
3 Memory Icon: Appears when
the selected channel is stored
in the Scan memory.
4 Scan Indicator Icon: Appears
when SCAN is enabled and
the radio is scanning.
5 Button Beep Tone Icon:
Appears when the button
beep confirmation tone is
selected.
6 Roger-Beep Tone Icon:
Appears when the Roger-
Beep tone is enabled.
7 Battery Level Icon: Indicates
battery charge level. Flashes
when battery is almost empty.
8 Dual Watch Icon: Appears
when Dual Watch mode is
active.
9 High Power Icon: Appears
when High transmitter power
is selected.
10 Duplex Icon: Indicates that
Duplex communication has
been enabled.
11 Key-Lock Icon: Appears when
the keypad is locked.
12 Monitor Icon: Appears when
Monitor function is activated.
13 Power Save Icon: Appears
when the radio is in the
power save mode.
14 Voice Activated Transmission
(VOX) Icon: Appears when
the VOX mode is activated.
15 CTCSS Tone: Displays the
selected CTCSS tone
(from 00 – 38) on the
selected channel.
16 Channel Display: Indicates
the channel number in use.
Belt
Clip
Spring Clip
Battery
Cover
This side
faces up