Installing the tm-7 module and r607fs receiver – Futaba TM-7 User Manual
Page 4
Attachment of the Module
CAUTION
Be sure to turn off the power of the transmitter before
you install or replace the module.
1
Ensure that the transmitter is set to the PPM (pulse
position modulation) mode. Please consult the
respective owner's manual for your particular transmitter
for information on how to do so.
2
While it is unlikely that the existing transmitter will
interfere with the radio frequency transmission of
the TM-7, we suggest removing it from the transmitter if
possible as a precaution.
3
Next, with the transmitter's power off, remove the
existing transmitter module and install the TM-7
module with care so that the connector pins of the
transmitter won't be damaged.
Antenna of TM-7
1
As with all radio frequency transmissions, the
strongest area of signal transmission is from the
sides of the TM-7 transmitter module's antenna. As such,
the antenna should not be pointed directly at the model.
If your flying style creates this situation, easily move the
antenna to correct this situation.
2
Please do not grasp the transmitter's antenna during
flight. Doing so may degrade the quality of the RF
transmission to the model
Easy Link
Each TM-7 transmitter module has an individually assigned
unique ID code. In order to start operation, the receiver must
be linked to the respective TM-7's ID code. Once the linking is
done, the ID code is stored in the receiver and the re-linking is
not necessary unless the receiver is to be used with a different
TM-7 module.
Additionally, it is important to note that this TM-7 and R607FS
receiver set has already been linked by the factory. Should
you wish to re-link them, or if you have purchased a separate
receiver and would like to link it to this TM-7, please adhere to
the following procedure.
1
After the TM-7 module has been installed into the
transmitter, using the aforementioned steps, turn on
the transmitter. The green LED, located on the rear of the
TM-7 transmitter module, should begin to blink. If not,
power down the transmitter and turn it on once again.
2
With the transmitter on, and the green LED blinking,
turn on the receiver.
3
With the receiver on, press and hold the Easy Link
button, located on the receiver between the two
antenna exits, for approximately one second. When the
linking process has been completed, the LED on the
receiver will change to a solid green.
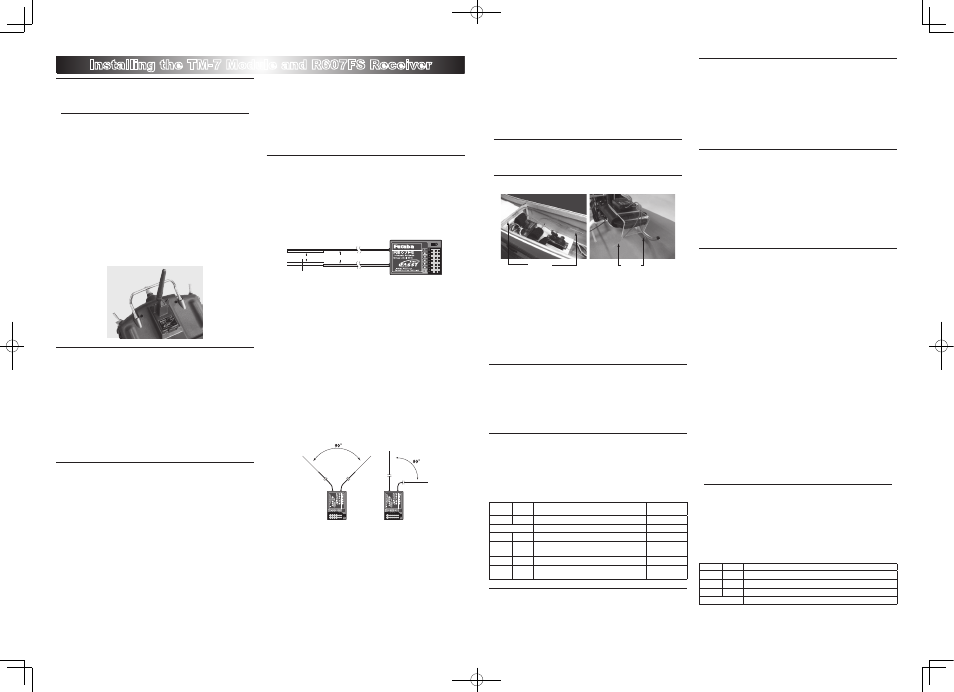
Receiver Installation
You will note that the R607FS differs in appearance from
the standard Futaba receiver. The R607FS incorporates two
separate antennas into its design which enables it to receive
the radio frequency transmission at two different locations.
Futaba's dual antenna diversity, or DAD, then seamlessly
selects the best signal reception between these antennas to
ensure that there is no loss of signal.
Antenna
*Must be kept as straight as possible.
Coaxial cable
R607FS Receiver
To obtain the best results from the R607FS receiver, please
refer to the following instructions and precautions:
1
Install the receiver in the aircraft using the same
methodology as you would a standard receiver. That
is, make sure that you wrap the receiver in foam rubber
or other such material to make it less susceptible to
vibration, etc.
2
Ensure that the two receiver antennas are kept as
straight as possible. This will allow you to obtain the
maximum effective range from your model.
3
If possible, please make sure that the two antennas
are placed at 90 degrees to each other. Please note:
This is not a critical figure, however, the most important
thing is to keep the antennas away from each other as
much as possible.
4
If your model includes metal conductive items which
may impact the receiver's ability to clearly receive
the radio frequency signal, we suggest mounting the
receiver so that the receiver antennas exit both sides of
the model. This will allow the best radio frequency signal
condition at any flying attitude.
5
Ensure that the antennas are at least 1/2" away from
any conductive materials such as metal and carbon.
Please note: this is not applicable to the coaxial portion
of the antenna. It is important, however, to not bend the
coax, or antenna in a tight radius.
6
If the fuselage is made of conductive materials such
as metal and carbon, the antennas part MUST be
positioned so that they exit the fuselage. Additionally, do
not attach the antenna itself to this fuselage.
* For example, there are many types of gliders which use carbon fu-
selage. When install the receiver into such models, it is imperative
that the antenna precautions are adhered to strictly.
WARNING
Be very careful when handling the receiver antennas.
Repeated bending and flexing of the antennas or ex-
cessive force could weaken or compromise the internal an-
tenna connections.
Keep the antennas away from the motor, ESC, and
other noise sources as much as possible.
Antenna
Antenna
* The main purpose of the photo demonstrates how the antenna
should be placed. For actual installation the receiver must be
wrapped with a sponge or placed with floating material to protect it
from vibration.
* The receiver contains delicate electronic parts and should be pro-
tected from vibration, shock and temperature extremes.
* The receiver is not impervious to damage from moisture. If moisture
should enter the receiver, intermittent operation or failure may result.
To prevent this from occurring, we suggest wrapping the receiver in
a plastic bag or similar protective covering. This will also protect the
receiver from any fuel or exhaust residue which can work its way
into the fuselage.
Area select
The TM-7 transmitter module has been designed to function
in many countries. If you will be utilizing this module in a
country other than France, please make sure that the switch is
set to the "General" position. If, however, this module will be
utilized in France, the switch must be set to "France".
Operation of the TM-7
When the transmitter is powered up, the LEDs on the rear of
the module will begin to glow or blink accordingly. The chart
below provides you with an easy reference as to the meaning of
the LEDs.
LED indication
Green
Red
Status
Fail safe (F/S)
Solid
Solid
Initializing (When Power Up)
---
Alternate blink
Check RF condition nearby
---
Solid
Off
RF power on
Off
Solid
Blink
RF power on (Power reduced to perform the
range check function)
Off
Blink
Off
RF power on
On
Blink
Blink
RF power on (Power reduced to perform the
range check function)
On
F/S (Fail Safe) mode setting
The F/S is suggested for use as it offers a safety factor when
controlling your models. It is also possible to cancel the F/S
operation if you do not wish to use it.
De-activating the F/S (Failsafe)
As noted above, it is also possible to de-activate the failsafe
setting of the receiver.
Depress the F/S button on the rear of the transmitter
while turning the transmitter's power on. The LEDs
should begin to glow. Continue holding the button until
the green LED begins to glow solidly and the red LED
blinks.
Re-Arming the F/S (Failsafe)
To activate the failsafe once again, depress the F/S
button on the rear of the transmitter while turning the
transmitter's power on. The LEDs should begin to glow.
Continue holding the button until the green and Red
LED's begin blinking.
* Please note: re-arming the F/S does not alter the pre-determined
throttle servo position. To modify this setting, please follow the F/S
position setting procedure.
F/S position setting procedure
The F/S position is stored, or modified, by the position of the
throttle stick during the linking procedure. As such, although
the TM-7 and R607FS have been linked at the factory, we
suggest re-linking them once again to adjust the throttle
position to your desired location. Prior to doing so, ensure that
the F/S is active. If not, please follow the Re-Arming of the
F/S procedure as noted previously.
1
With the transmitter's throttle stick in the desired
F/S position, and the receiver located within one
(1) meter of the transmitter, turn on the transmitter. The
green LED, located on the rear of the TM-7 transmitter
module, should begin to blink. If not, power down the
transmitter and turn it on once again.
2
With the transmitter on, and the green LED blinking,
turn on the receiver. Press and hold the Easy Link
button, located on the receiver between the two antenna
exits, for approximately one second. When the linking
process has been completed, the LED on the receiver will
change to a solid green.
3
Turn off the transmitter. The throttle servo should
move to the pre-determined F/S position.
WARNING
When setting the F/S function it is important to make
sure that there is no other FASST Air System in the ON
position nearby.
* Failure to adhere to this caution could cause your R607FS receiver
to link to the incorrect transmitter. If this were to happen your
R607FS would be under the control of the other transmitter.
Please refer to the table below for the LED status of the
receiver's condition.
Green
Red
Status
Off
Solid
No signal reception
Solid
Off
Receiving signals
Blink
Off
Receiving signals but ID is unmatched
Alternate blink
Unrecoverable failure (EEPROM, etc.)
Installing the TM-7 Module and R607FS Receiver
- 2 -
- 3 -