Sub filter, Sub phase, Led mode – EVE audio TS112 - User manual User Manual
Page 6: Saving your settings, Remote control
TS
108
TS
110
TS
112
TS
107
EVE
Audio product manual
LED Mode
Remote Control
10
11
OPERATION
OPERATION
filter to avoid the overlapping of frequencies between the subwoofer and
the satellites and to clean up the sound image in the lower end.
Generally speaking, the Sat. Filter should be engaged (default setting). If
inactive, for example, when the satellite speakers cannot reproduce the
frequency range below 80 Hz, the Sat Flat LED lights on and the audio
signal is not filtered.
3.8.
Sub Filter
The Sub Filter is a low-pass filter that allows you to set the upper frequency
limit of the subwoofer. It can be set from 60 Hz up to 140 Hz. We recommend
setting it at 80Hz, but do bear in mind that it might need to be adjusted
depending on the room and satellite speakers used.
In LFE mode the cutoff frequency is set to 300Hz. The LFE LED indicates
when this filter is activated.
3.9.
Sub Phase
This setting allows you to shift 180° the phase of the subwoofer signal. The
Sub Phase LED lights on.
Use this function when the overall sound (subwoofer + satellites) sounds
a bit thin. This can happen if the subwoofer’s phase is offset from the
satellites’ due to time differences.
3.10.
LED Mode
The LED mode determines in which of the four available fashions the LED
rings display the volume level. The LEDs represent given levels, which are
displayed and adjusted according to four or two steps. Intermediate steps
are indicated by the brightness between two adjacent LEDs.
•
Bright Ring
All LEDs up to the selected volume level light up brightly. The louder the
signal, the longer the brightly lit-up ring.
•
Bright Point
Only the LEDs corresponding to the selected volume level light up brightly.
The louder the signal, the further up the brightly lit-up point moves.
•
Dimly Lit Ring
All LEDs up to the selected volume level light up dimly. The louder the
signal, the longer the dimly lit-up ring. In this mode, the LEDs light up
brightly momentarily while you adjust the volume level.
•
Dimly Lit Point
Only the LEDs corresponding to the selected volume level light up dimly.
The louder the signal, the further up the dimly lit-up point moves.
!
Intermediate steps are indicated by the lighting of two adjacent LEDs. The
level ranges from -60 dB to +10 dB, taking “0 dB” as reference point.
3.11.
Saving Your Settings
All settings on the front and rear panels are automatically saved. The
loudspeakers can be disconnected anytime without the settings being
lost.
3.12.
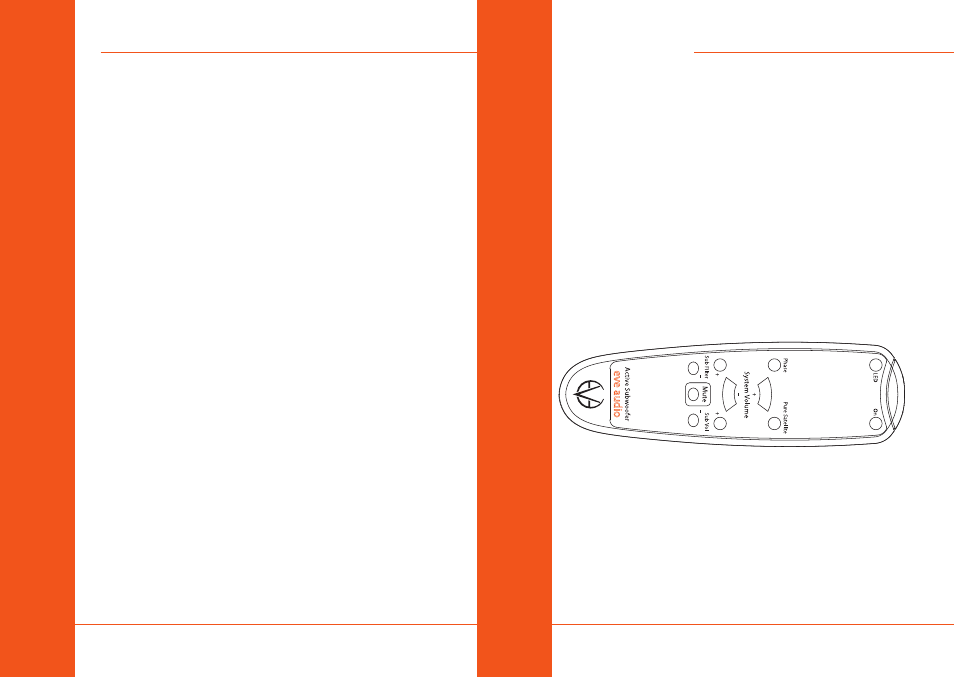
Remote Control
Your EVE Audio subwoofer comes with an IR remote control that allows
you to control almost all functions available on the front panel.
In order to start using the remote control, you must first insert the supplied
batteries in the battery compartment. Please pay attention to the polarity.
Hold the remote control in such a way that the infrared cell points towards
the receiver cell on the subwoofer. There should be no objects between
both cells in order to achieve the best performance.
•
On Button
Use the On button to put the subwoofer in Standby mode (see Powering
On/off: Standy Mode). Press the button again to exit the Standby mode.
•
LED Button
Use the LED button to select the LED mode of the subwoofer. The mode
changes every time you press the button (bright ring, bright point, dimly
lit ring, dimly lit point).
•
Phase Button
Press the Phase button to shift 180° the phase of the subwoofer signal
(see Sub Phase). The Sub Phase LED on the subwoofer lights on. Press the