Block diagram & section details, Example settings (cont’d), Troubleshooting – Empirical Labs EL-Q User Manual
Page 11: Various instruments bass, Elec. guitar, Vocals, The input & output, Four band parametric eq
Example Settings (Cont’d)
If a vocal is generally harsh and hissy, the high frequency limiter can provide a smoother sound.
This limiter is extremely smooth and will sound pretty natural working on just about every line of an
overly bright vocal. Just make sure that a gentle EQing wouldn’t be a better solution. The HF
Limiter can sometimes give an analog tape-like effect; warming the signal the harder you hit the Lil
FrEQ with level. Please see the DS application notes on page 12 for more details.
Various Instruments
Bass
– Bass is one of the difficult instruments to get “right in the mix”. Bass is notoriously hard to
round out and clarify sometimes, but the Lil FrEQ has many ways to help. First, if a low bass tone is
too pure and sine-wave-like, it will "fall off" on small speakers. By this we mean it will not be audible
because most of the bass frequencies are below the range of the speakers.
Try bringing out 700 to 2KHz with a mid PEQ Band. These will accentuate the upper harmonics
that will reproduce on small speakers. Sometimes pulling out frequencies around 300Hz will bring
out the low end and high end on a bass and give that frequency range more room in a mix for the
guitars vocals, etc. Pulling out toooo much 200 – 400 can give you a hollow sound that has no
warmth on small speakers – it’s always a constant trade off. There is also no one “right” sound,
which is part of the beauty of the recording process from tracking, right thru to final Mixdown.
It is not uncommon in this digital age to have tooooo many low frequencies on a bass track. By
rolling off 60Hz or so, you will be able to raise the bass level in a mix, giving it clarity and leaving the
sub freqs to the bass drum. The position of an EQ before or after compression can have a
sometimes dramatic affect. Boosting low freqs on an EQ before a compressor lets the compressor
grab the eq points and control them. Conversely, if you are boosting EQ after the compressor, those
new frequencies will be there to stay. When pulling out the subs on the bass, it is more drastic when
it’s after the compressor, as the compressor will tend to bring them right back up. Often
accentuating around 100Hz will give the bass plenty of bottom.
Band limiting the bass by rolling off the high frequencies is a verrrry useful technique. Try
pulling out a wide band at 4 KHz or above, or maybe turning the high shelve down to cut clack, hiss,
excessive pick noise etc. Start gentle since one doesn’t want to lose the definition on the bass,
especially in small speakers. I have seen engineers “band limit” the top and bottom end of the bass
to approximately 70Hz through 4 KHz, letting the rest of the tracks fill in above and below this band.
Elec. guitar
- Getting full and crunchy guitar sounds can be one of the most difficult tasks for a
novice engineer. It can also be the easiest if the guitarist got his tone from the start, with good
mic’ing. Because distortion adds an incredible range of harmonics, and because of the interaction
between a guitar, amp, speaker and mic, really drastic frequency spikes and resonances are
common on guitar tracks. They can make or break the track… and they can also make EQing very
tricky.
Muffly guitars are a common problem. Adding 3 – 7Khz can bring out the “STING” and clarity.
Too much though, and you end up with a buzzy mess. Often there are frequencies below 80 –
140Hz that just turn into mud in a mix. Here, the high pass filter can do MAGIC. Soloing guitars in
mixes can be dangerous, especially with the guitarist present! If for instance, you use the 100Hz
High pass on the guitar while soloing, the fullness will be thinned out somewhat, and the guitarist
isn’t going to want that… but the “Mix” might! Often adding 160 – 500 will bring back the body and
bring out some beautiful tone but… again, there are no rules except what your ears tell you while
listening in the mix. Conversely, another method to get rid of the “muffles” is to pull frequencies from
150 to 500. There’s more than one way to skin a cat, as they say, although why one would want to
skin a cat has always remained one of the great recording mysteries.
Band limiting guitars is an extremely useful technique, not only on the low end as above, but on
the high end also. Try rolling off 8 – 12KHz on electric guitars and often, they will sound tighter,
quieter, and often warmer. Set the high PEQ band to 10KHz .7 Oct, and pull it down 4 – 6dB.
Sometimes the guitar just needs a touch of fatness without losing attack, don’t forget that
cutting an upper mid (1.5- 3KHz?) can sometimes take out a nasty honk and let the body in the lower
frequencies pop out. Crunchy guitars, which are full of harmonics, are notoriously sensitive to tonal
changes. You can often notice a 1 dB boost or cut on an electric guitar much easier than you could
on a vocal, drum or other instrument. Analog tape was always a big help with vocals and electric
guitars because it clipped all the pointy peaks and saturated when the high frequencies piled up.
Using the DS dynamic HF limiter can get a verrry tape like affect if used judiciously. We have found
it to be verry useful on overly crunchy plucky guitars, and “spitty” vocals alike.
5
1)
Emulating the NEVE 1073. We have provided markings on the front panel that accurately
emulate the frequencies and curves of the NEVE1073 Preamp EQ. You will find two symbols
to guide you. One is an “N” and the other is a small “donut” symbol. The two mid frequencies
allow two 1073 frequencies and the N and donut are used to show the proper combination of
frequency and bandwidth (Q). Use the “N” frequency with the “N” bandwidth mark, and the
donut with the donut. The Low Mid uses the same Bandwidth setting for both Neve
Frequencies, and thus only one symbol, the donut, is shown on the Low Mid bandwidth knob.
We suggest using the transformer output to complete the emulation, since the 1073 used a
transformer on its output also. Our Highpass can also be used as you would on the 1073.
2)
Telephone Voice – Put the highpass on 330Hz, adjust the upper mid PEQ to 2.5 KHz and
boost 6dB 2 oct BW, and you can cut freqs above 10Khz if desired. Compressing after EQ
works nicely.
3)
Hi Shelf EQ from Parametric – Turn HF PEQ to Max Freq(20.5KHz), Max Q(CW), and VOILA,
you have a smooth second order Hi Frequency Shelve EQ.
4)
Emulate analog tape by using the DS section set to HF LIM, frequency at 6KHz. Adjust so
that when the frequencies harshly pile up, the DS section kicks in, integrating and smoothing
out the high end.
5)
Squeeky acoustic guitar parts – The DE-Ess function can often attenuate the occasional
hand slide squeak if adjusted just right. Start by setting the DS freq to 5Khz.
6)
Increasing transformer output Level – A jumper on the left side of the power supply board
inside can be moved to the front position to increase the transformer output level by 3.5 dB.
This can be over an 84 volt swing, which could conceivably damage the destination device.
7)
Line Amplifier – Use the Lil FrEQ to match or adjust audio levels. It’s hard to beat.
Troubleshooting
Clip light comes on but you shouldn’t be near clipping. Check that an EQ section is at full
boost and cut but maybe not being used (Bypassed)? Many potential “clip” points are monitored in
the unit and even an unused EQ section that’s clipping will light the CLIP indicator.
Unit is on but not doing anything - The unit may be bypassed or operating subtly. If bypassed,
you need to press the "BY-PASS" button so red LED goes off. The input and output levels should
always affect it even while bypassed. This allows the use of the “Inst In” as a DI box.
Distorted output - If there is any un-musical distortion, chances are you're hard clipping. Check
that the output cable is properly wired and any unused output pins (2 or 3) on the active XLR are
floating (left unconnected). Shorting an active output pin will not harm the unit but can show up as
distortion in the output driver. The transformer output should always have pins 2 & 3 going
somewhere. The BAD! Clip LED should always light just before any internal clipping, but if fuzz or
nasty clipping occurs and the Bad lite isn’t on, back down on input a half a number. Check to see
if an unused PEQ section is cut or boosted, even tho its off.
Low or thin sounding output - Make sure there is audio getting to the unit, and that the input
and output levels are turned up. If using the transformer output, try switching it to the active output
and see if the level and low frequencies improve. If they do, the transformer output wiring is
incorrect. Follow the explicit instructions on the rear panel, or see page 12 in this manual.
Bargraph on DS shows gain reduction but very little or no limiting is actually occurring -
The section is bypassed, or the unit is possibly severely out of adjustment. We use very stable
trim pots and high quality components, and it’s rare that long term component aging or failure will
cause failure, but… things do happen. At present you will have to return the Lil FrEQ to factory for
re-calibration. In the future there will be local dealers and/or service centers to help.
Unit seems noisy - The dynamic range of the Lil FrEQ is much greater than CD (16 bit) quality.
However, if you are boosting frequencies on a noisy signal, the noise could be accentuated.
Keeping the input higher without clipping can marginally improve signal to noise.
Unit forgets where it was when power was shut off – Non-volatile memory cap may be
defective. Some other type of logic failure is possible. Contact the factory for servicing.
No sign of life - Check power cord for firm connection. If still no life unplug unit and open top
cover by removing all top screws and check fuse toward rear next to transformer. If it is blown, pry
it out and replace it with extra fuse provided in fuse holder toward front of chassis. If fuse is OK,
ensure Voltage select switch is set to current wall outlet voltage (115, 230 VAC). If unit keeps
blowing fuses, and there is nothing visible floating around inside, it is best to return it to the factory
for
servicing.
10
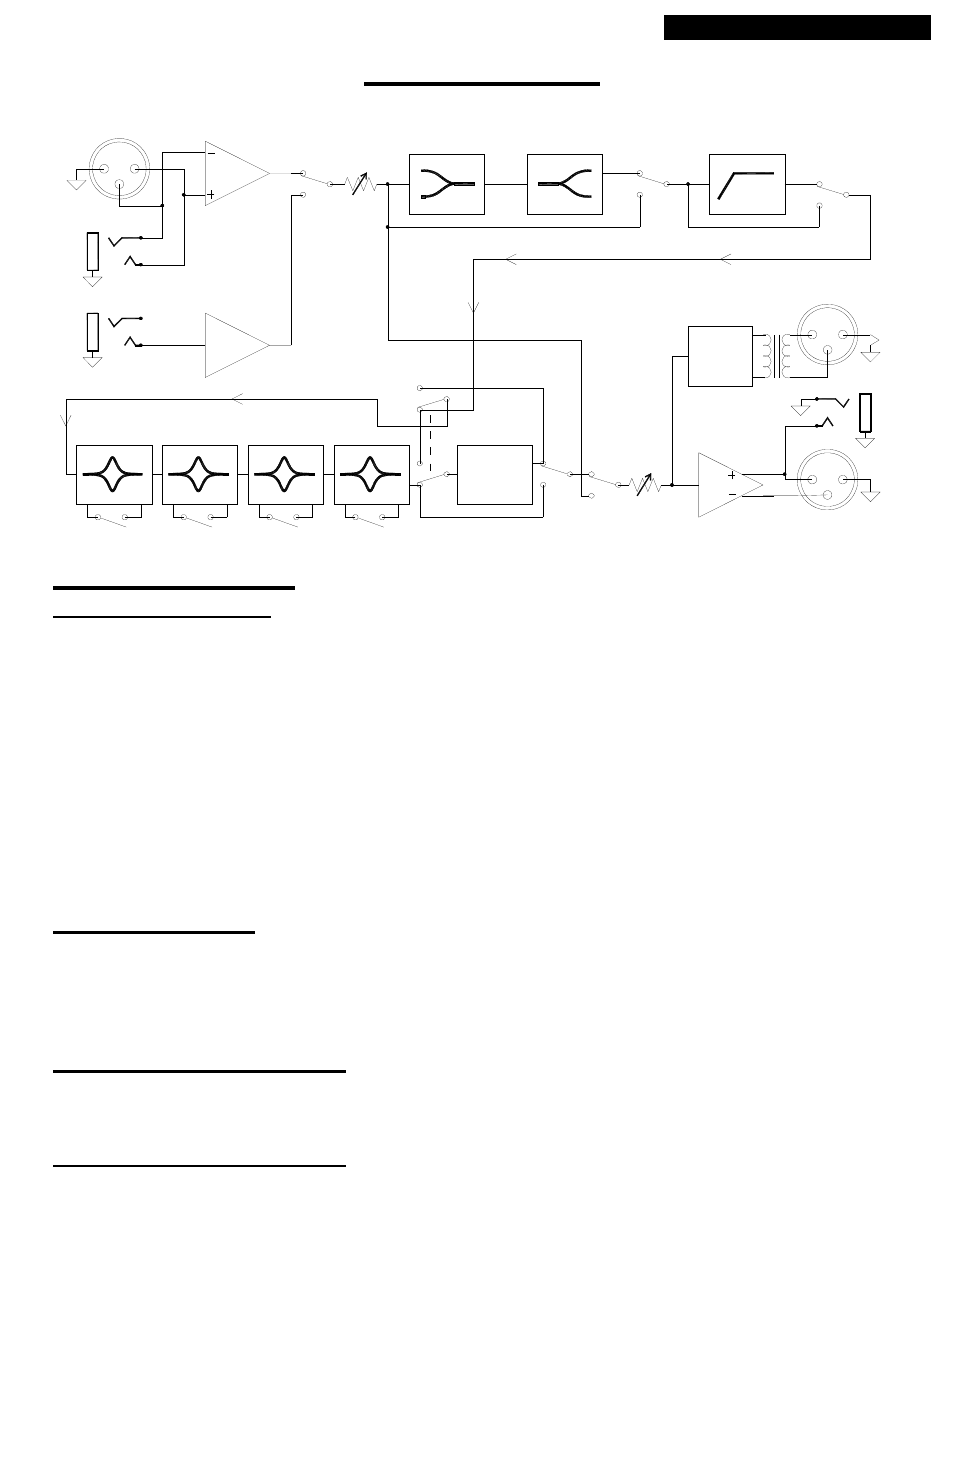
Block Diagram
Section Details
The Input & Output
The “Line Input” section is an electronically balanced line receiver circuit. It is relatively insensitive to
all kinds of wiring, be it balanced or unbalanced. The Line Input phone jack on the back is also
balanced but will terminate (“short out” in a GOOD way) one leg of the balanced input when a non-
stereo guitar type cable is inserted.
The Instrument Input on the front panel is an unbalanced, high impedance input with 10dB of
initial gain, designed for lower level, and higher impedance signal such as electric guitar, electric
bass, and other sources that may be sensitive to input loading. It uses circuitry that was designed
for a DI box. If your instrument is low impedance and has a hot output level, plug into the rear phone
jack if any clipping occurs on the Inst In jack.
There are three outputs on the Lil FrEQ, all of which can be used at the same time. The Active
Line outputs (the two outputs other than the Class A Transformer output), are wired in parallel with
the ¼” phone jack output being unbalanced. Pin 2 of the active output XLR is directly connected to
the tip of the phone jack output. Transformer ground can be lifted with a jumper. See page 12.
Highpass Section
This is a specially shaped, digitally controlled 3rd order highpass filter. The shape has been
selected to prevent thinning out frequencies just above the corner frequency. The slope of the roll
off is 18dB per octave, and because of this steepness, the HP must be used with caution, especially
during tracking. No compromise was used in this filter, with a single active stage design, 5% caps,
1% resistors used throughout. This filter is capable of .0005% THD and over 124dB dynamic range.
High & Low Shelf Section
This is a standard, single pole, 6dB per octave shelving equalizer. It is very similar to tone controls
except the performance exceeds any known commercially available unit. The corner frequencies
are around 120Hz, and 4KHz. Maximum boost and cut is 10dB as indicated on the front panel.
Four Band Parametric EQ
These are a series of fully parametric equalizer sections, each sweepable over different frequency
ranges. All four sections are capable of cutting or boosting a band 14dB. This PEQ’s (Parametric
EQ) performance is so high, we had to buy an Audio Precision Analyzer to measure the THD, which
operates below .0006% at extremely hot levels. This is the highest audio performance parametric
equalizer we know of. Almost all frequencies are covered in two separate bands, and many of the
mid frequencies are covered in three of the four parametric sections. Each section can be by-
passed separately, without any clicking or popping during pauses. This is very important during
“Spot” EQing. The BW (bandwidth) control’s most useful range takes up 80% of the knob rotation,
with the narrowest and widest BW’s or Q’s changing rapidly in the last 30 degrees of the minimum
and maximum rotation. This is why the BW’s markings get denser towards the extremes. The
PEQ frequency knobs are hand calibrated. 11
Example Settings (Cont’d)
Vocals
- One of the worlds favorite vocalists, Frank Sinatra, became so good at” working the
mic”, moving in when he was singing soft and wanted intimate body, moving back when he belted
and needed to get the higher notes out… he became so proficient that I have heard the engineers
used very little or no EQ his voice. He got the sound at the source. As he sang soft, he would
move in a little closer to the mic, giving his voice an intimacy. He would even turn his head quickly
to the side so certain breaths wouldn’t be heard. Modern singers of every style could learn from
what Frank was doing 40 yrs ago.
Sticking my neck out, I have to say I have never heard so many nasty vocal sounds on some of
today’s (2005) hit records. There are whole albums that have become painful to listen to because of
over compressed, over brightened, and “spitty” lead vocals. I would mention engineer’s names but
some of these people are our customers! It’s a little bit frightening that people accept these sounds
as normal or actually “good”. Some of it is the result of engineers thinking it’s cool to smash every
breath, word, and syllable with +20dB of compression… and some of it from using digital “software
plug-ins” that haven’t been designed with the greatest musicality. Let’s hope this is just a phase. A
little restraint, combined with getting things right from the start can help. Here are some tips.
Pick the right mic, the right distance and the right angle for the singer. The most expensive
mic isn’t always the best mic for a person’s voice. Moving a person a couple inches in and out from
the mic can make all the difference in the world. Putting the mic up above the person’s mouth
around their nose level can warm things up, avoid pops, and make a singer sound less nasal. When
a mic is aimed down a little towards the singer’s mouth, you will be aiming it at their body also, where
lots of low frequency resonance occurs. Conversely aiming it up can work, having the singer sing
over the top of the mic. Remember that a leading cause of “nasality” is the lack of sound and air
coming from a persons nose, so by aiming up or being level with the nose, an engineer can often
improve the basic quality of a voice. Remember to remind the singer they can move slightly in on
soft intimate parts, working the microphone ala “The Frank”.
EQing - Don’t overly brighten! One of the first things people do when they track or mix vocals
is to grab for that high end and crank it up. Of course, a certain amount of high boost is frequently
required. But, often harsh sibilant frequencies suddenly pop out making a perfectly good vocal
become this scratchy, hissy annoying squawk. UGH! Remember that pulling some woofy or pointy
lower mids can bring out the body and high frequencies without exaggerating the spit, S’es, and high
frequency resonances in a voice. Try pulling freqs from 300 to 4000 out to smooth and bring out the
low and top end. There is a danger in removing the body in the 300 – 600 range so keep your ears
alert when pulling out these freqs. A dB or two may be enough. Compression is going to bring
some of the body back up but will also bring out the honk, breaths and sibilants (sibilants are the
annoying S’es, T’s K’s that have a high frequency transient nature).
A very common technique used in pop and rock mixdowns today is applying different EQ’s to
different vocal sections. Splitting a vocal on to different channels or tracks to allow tweaking the EQ
sound is a day-to-day event for many major mixdown engineers. The engineer will mute the unused
channel(s) for different sections of a song. Sometimes different effects will also be applied to the
different sections. Even with digital editors, this is still a lot of work and takes experience to make it
sound natural and all fit together. Some of the most pleasing rock vocal sounds were achieved by
an engineer riding the EQ during mixdowns, punching an EQ section in or out or up and down during
certain sections. Again, the upper mids (3.5KHz) is a target for this kind of treatment.
The Lil FrEQ provides a dynamic equalizer in its DS section. There are some other
dynamic equalizers out there that work pretty well, but… hoping to get a great vocal sound using one
“holy grail” setting on a wildly dynamic vocal is dubious in our minds. We believe some experienced
engineers have gotten a bit lazy using some new toys and not their ears. Also, one very common
dynamic equalizer has extremely asymmetrical boost and cut, where the boost is 5 times wider than
when the same band cuts, leaving the engineer wondering why the vocal sound gyrates so widely
when compressing or expanding a frequency range. The Lil FrEQ DS section uses a crossover
method to control high frequency content and is extremely smooth and even in its response. The DS
can be moved before the EQ so that any boost in that eq, will not be undone.
On an occasional overly sibilant vocal, use the standard De-ess mode which is level insensitive.
Adjust the frequency for around 6Khz and adjust the threshold till the sibilants start sounding natural.
If lisping starts occurring, raise the frequency or raise the threshold to lower the De-essing. The De-
esser should only be working on the offending fricatives and sibilants.
4
XLRM
2
1
3
XLRM
2
1
3
XLRF
1
2
3
Input Select
Output
Gain
Shelf In/Out
HP In/Out
Parametric EQ (4 bands)
Input
Gain.
In/Out
In/Out
In/Out
In/Out
Dynamic Section
DS
Balanced In
Instrument In
High & Low Shelf
Digitally Controlled
High Pass Filter
Active Outputs
Transformer Output
Class A
Amp
Jump
Master
Bypass
DS position
Select Relay
Unit shown with all
EQ sections "In".