Program your cable or satellite remote, 9 extended warranties, B learn more – Vizio SV320XVT User Manual
Page 2: T) register now, Lcd quickstart guide, Setup, Help topics, Extended warranties, Cont.), Problem
Attention! The text in this document has been recognized automatically. To view the original document, you can use the "Original mode".
SV320X\^
SV370X\^
LCD
QUICKSTART GUIDE
® SETUP
(Cont.)
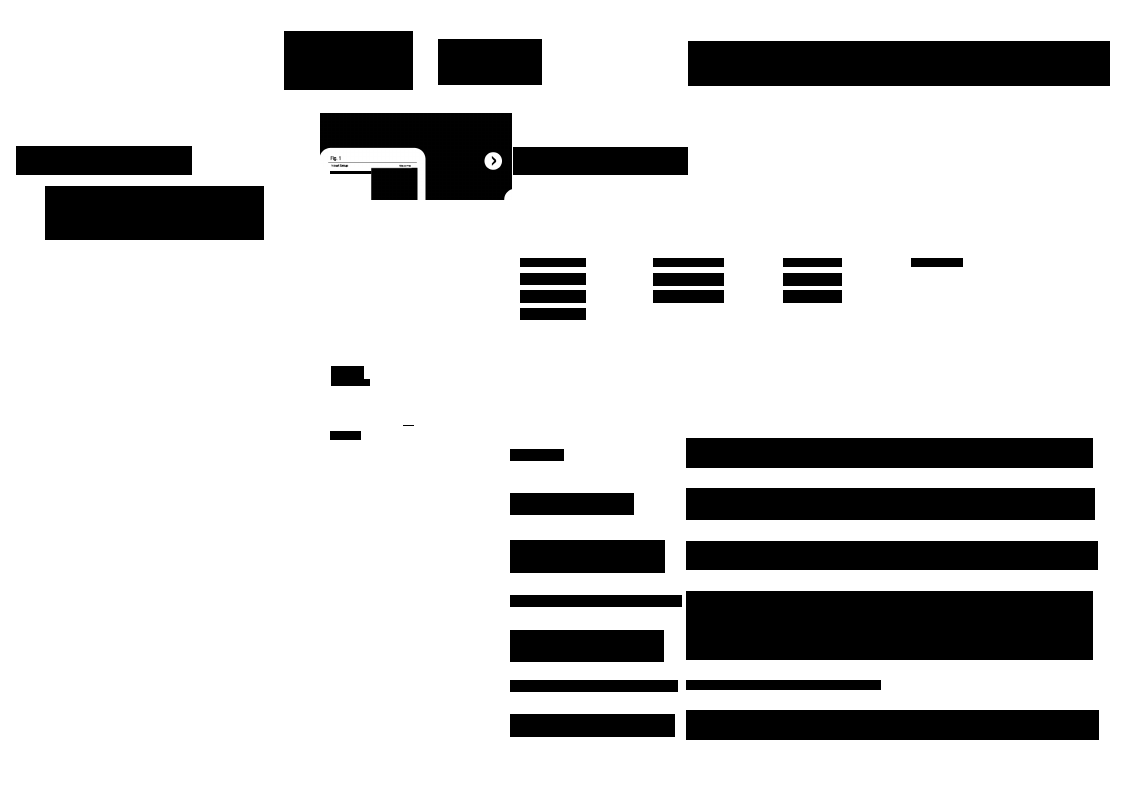
1. The Initial Setup menu should appear on-screen
(see Fig.
i). Follow the menu
instruction using your remote control to initialize the process.
2.
Select your desired language
(see ng.
2
).
3. Choose Home Mode for optimal energy savings.
«•licvf IT«; VlZ-C Sfllup'iVizi'eki
Fig. 2
Initia' Setup
HELP TOPICS
PROGRAM YOUR CABLE OR SATELLITE REMOTE
Call your Cable or Satellite provider to determine if you need a 3,4 or 5-digit code. Refer to the following chart of ViZIO codes and foilow your provider's instructions to program
your Cable or Satellite remote.
IF YOU'RE CONNECTING USING A CABLE OR
SATELLITE BOX:
1. Exit the Setup Wizard.
2. Set your input source to match the device you’re connecting to.
3. You’re done! Enjoy the show.
Fig.3
inrtifll Setup
SERVICE PROVIDER
CABLE
DIRECT TV
DISH NETWORK
5-DIGIT CODES
11758,10178,10128
11758,10178,10128
4-DIGIT CODES
1758, 0178, 0128
1758, 0178, 0128
3-DIGIT CODES
IF YOU'RE CONNECTING USING A CABLE FROM
THE WALL OR ANTENNA:
1. Choose between Antenna or Cabie to match your input source
(see Fig. 3).
2. Begin the scan for channeis
(see Fig. 4).
Note: Your Service Provider may provide access to HD channeis during the channei scan. Please be
patient and wait for 100% compietion.
3. Once the scan is complete, follow the on-screen instruction to exit the
initial Setup menu
(see Fig. 5).
.
Fig. 4
inibtf Setup
à!$i
A -
MOU Ciÿ Li'drnblh •*
C*-jrn“c''a
2
L:rur*W'
Fig. 5
Imtai S«Eup
iPitiul
C'3r‘p<':ec
CompClü
PROBLEM
No Power
SOLUTION
Make sure the power button is ON (the VIZiO logo glows white). Make sure the AC power cord is securely connected to the AC
socket and try plugging the TV directly into the wall. Plug another electrical device (like a radio) to the outlet to verify the outlet is
supplying power.
Picture is biurry or fuzzy/
image quaiity issues
9
EXTENDED
WARRANTIES
Protect your VIZIO product with up to 5 years of added
repair service! Extended coverage begins when the
manufacturer's warranty expires so you’ll receive
maximum protection!
Visit
US
oniine
at;
or Caii:
(
888
)
849
,
4623
For more info on Extended Warranties
b LEARN MORE
Refer to your User Manual for in-depth descriptions or
more information.
t) REGISTER NOW
Register your product today and receive the latest VIZIO news
and special offers.
Cannot change channels up and
down with direct cable hookup
from wall or antenna
Cannot return to the Setup Wizard
Screen is displaying blue/no
signal and/or turning off after a
few seconds
TV will not respond to the remote
Black or gray bars on top, bottom,
and/or sides of picture
For the best image quality, view HD wide screen programs where possible. If HD content is not available, view Standard Definition
from a digital source. Standard analog TV will always be noticeably inferior to HD because your digital flat panel TV has video that
is many times better than old TVs, and thus you can see interference and deficiencies you did not know you had.
Press the MENU button. Use the arrows to navigate to the TV TUNER MENU. Highlight the first option, called Tuner Mode. Select the
appropriate input by using the left and right arrows. Once Tuner Mode is correct, highlight "AutoSearch", then press the right
arrow.
The Setup Wizard is no longer accessible after being run once, but all of the same settings can still be changed. Press the MENU
button to access them. For channel scan, see the above topic.
Your TV may be on an inactive input. After powering on the TV, press the INPUT button on your remote repeatedly until a picture
re-appears. If this does not work, try it a second time but press the button slower this time; it can take as long as 30 seconds for
the image to reappear.
Press the TV Button at the top of the remote to control the TV.
Try setting your TV to wide or zoom mode; the image should fill the screen. If you still see bars, they are part of the image the TV is
receiving. Cable and satellite boxes may add black bars to the picture, especially when HDMI cables are used. For more
information, please contact your service provider.