Winterwarm fireplace insert or system, Prepare and install the winterwarm front – Vermont Casting WinterWarm Fireplace Insert or System User Manual
Page 34
34
WinterWarm Fireplace Insert or System
2000941
Prepare and Install the WinterWarm Front
Do not remove the WinterWarm Front from its ship-
ping container until the directions indicate to do so. The
installation of the front is much easier if you partially
assemble some of the components before removing it
from the container.
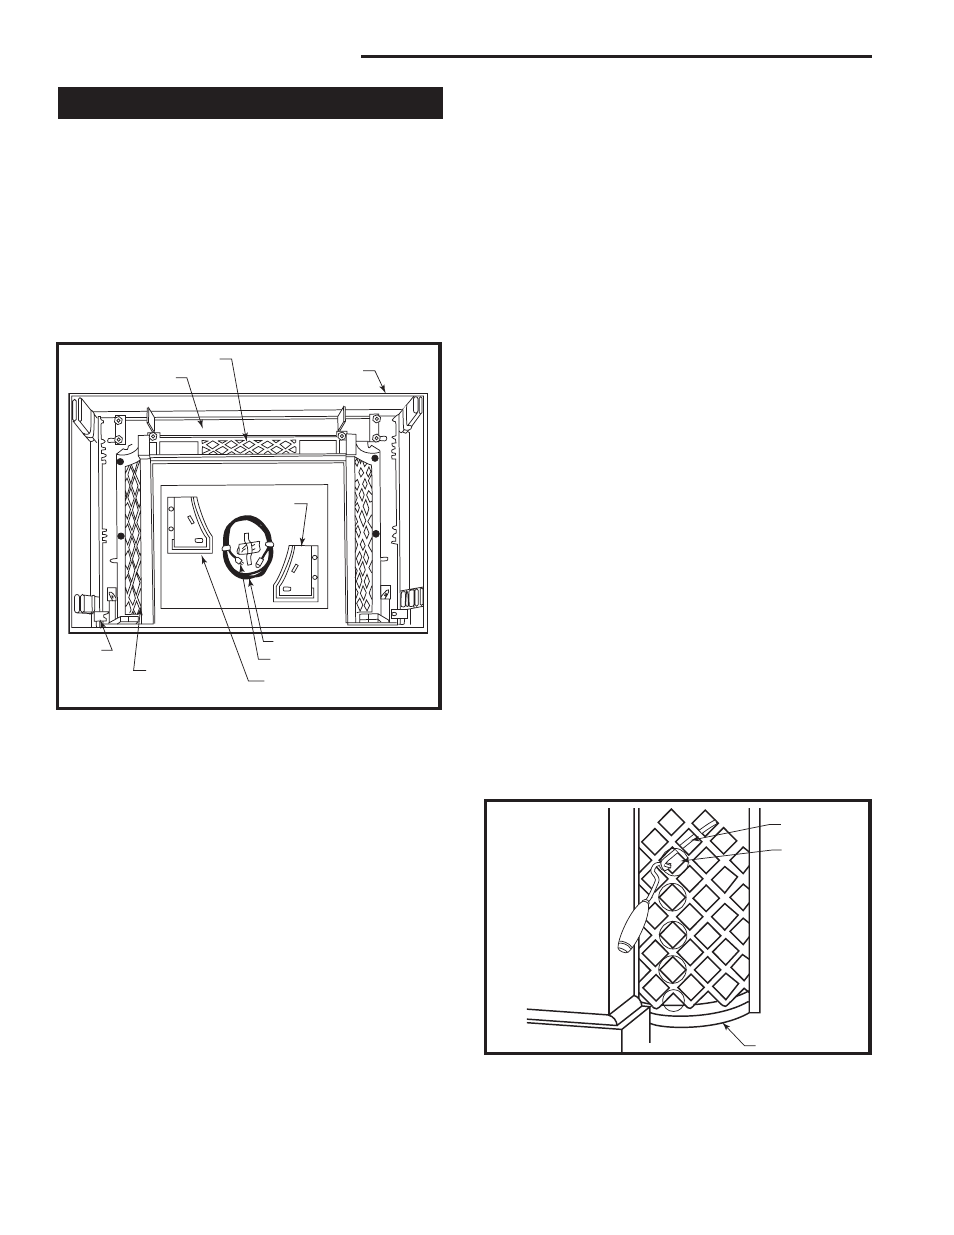
Refer to the Figure 52 for the location in the shipping
container of the various parts. Also clear a “grab-space”
nearby where you can keep handy the tools you’ll be
using (Phillips-head screwdriver, 11/32” (9mm) wrench,
7/16” (11mm) wrench, 9/16” (14mm) wrench and utility
knife) as well as the various parts you’ll be removing.
1. Open the Shipping Container. Remove the straps
securing the shipping container and then remove
its top. Among the parts you’ll see in the box is the
WinterWarm front (lying face down) a bubble-pack of
parts, and boxes containing the mantel and latticework
panels. To orient yourself for the following directions,
stand so that the bubble pack is nearest your feet and
the solid top cross-piece of the front (the “spandrel”) is
farthest away.
2. Unpack the Mantel, Latticework Panels, and Air
Dividers. Remove the large box on top containing the
mantel, and the two boxes beneath it containing the
latticework panels, and set them aside. Also remove
the two air dividers that are packed in the edge of the
carton next to the top of the front.
3. Loosen the Bolts in the Spandrel and the Top
Grille. The solid top cross-piece of the front (the “span-
drel”) is attached to the column sides with four bolts,
two per side. Also, the top grille of the front is secured
to the spandrel with two bolts. These fasteners should
be loosened (not removed) while installing the front so
that it will be easier to align the sides. These bolts must
be re-tightened once the sides are in their permanent
position.
4. Remove the Packing Straps and Discard Them.
These flat steel bars are secured by one bolt on each
side to the base of the column. Once you have re-
moved the bolts, lift the top of the WinterWarm front
and drag it slightly forward until it rests on the edge of
the shipping carton. This will create enough room in the
carton to slide the packing straps off the bottom of the
front column. The packing straps will not be used again
and may be discarded.
5. Unpack the Remaining Parts.
Slice open the bubble pack with your utility knife and
remove the electric cord, the hardware package, and
the two mantel end caps.
Open the boxes containing the mantel and latticework
panels and remove the contents. Set all of these items
aside.
6. Empty the Contents of the Hardware Package
onto your Grab Space.
7. Attach the Front to the Fire Chamber.
With assistance, lift the front into position against the
Fire Chamber, starting with the left side. Move it behind
the protruding load door hinge halves. Swing the right
side into position.
It may be necessary to adjust one of the levelling
screws to align the clevis of the front to the fire cham-
ber.
1
2
3
4
5
KT226
rod thru lattice
5/21/01 djt
Control
Rod
Correct
slot is
5th from
bottom
Latticework Panel
KT226
Fig. 53 To find the correct space in the latticework panel for
the outside air control rod, locate the second vertical row of
“diamonds” from the left and count five spaces up from the
bottom.
FP1130
WW front & parts
6/01
Spandrel
Top Grille
Air Dividers (Do
not overlook
them!)
Steel-
band
Packing
Strap
Winter-
Warm Front
Electric Cable
Hardware Pack
Mantel End Cap
FP1130
Fig. 52 The WinterWarm front and its related parts are shown
here after three separate boxes containing the mantel and
latticework panels have been removed. For easiest assembly
and installation, follow the sequence of the directions exactly.
Mantel End
Cap