The chimney system – Vermont Casting WinterWarm Fireplace Insert or System User Manual
Page 14
14
WinterWarm Fireplace Insert or System
2000941
•
Check the combustor and the bottom of the refractory
chamber for a build-up of fly ash, and remove any ash
by taking the combustor outside and gently blowing air
through the element. Do not brush the surface, as this
could damage the element. Carefully vacuum ash from
the refractory chamber.
•
Refer to the “Catalytic Combustor Appendix” on Page
37 for information on what kinds of damage or deterio-
ration to look for. Although small hairline cracks will not
affect performance, the combustor should be essen-
tially intact. If the combustor is broken in pieces or has
sections missing, it should be replaced. Call your local
Vermont Castings’ dealer for a replacement combustor,
item #30001152. Consult the warranty section at the
back of this manual for further information on catalytic
combustor replacement.
•
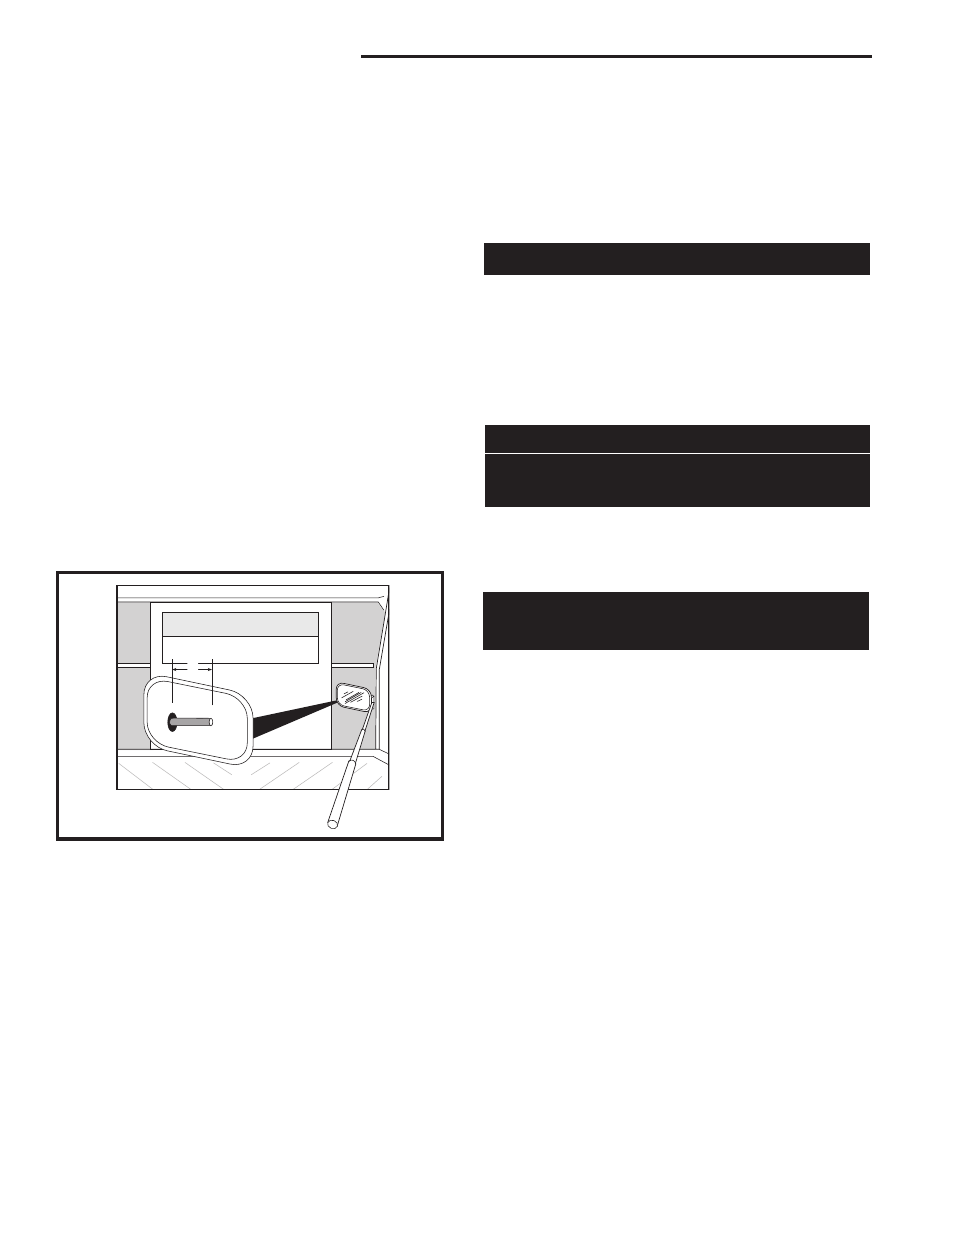
While the catalytic element is removed, check the
condition of the secondary air probe. Use an inspec-
tion mirror to locate the probe within the combustion
chamber. (Fig. 17) The probe should extend 1 to 1¹⁄₂"
(25 - 38mm) into the chamber and show no signs of
deterioration, (warping, short length). Refer to the next
illustration. A damaged secondary air probe could affect
catalytic performance. If the probe needs to be re-
placed, call your local dealer.
1"
ST559
Secondary
Probe inspection
11/00
ST559
Fig. 17 Use an inspection mirror to check the secondary
probe.
5. Reinstall the throat pieces, center edges first, then
outer edges. Tap the throat pieces downward firmly
to seat the lower fireback.
6. Replace the grate.
7. Replace the front grate bar. With the horizontal bars
pointing down and away from you, angle the bar
inside the firebox to seat the right end. Then, bring
the left end forward and lower it into position.
Watch for Better Results
Finish up by cleaning the chimney and chimney con-
nector. Then, use your WinterWarm in a typical man-
ner for two weeks and observe its performance, taking
particular note of the smoke observation test described
on Page 11.
If a problem persists, contact your local dealer for fur-
ther advice about your particular situation.
The Chimney System
A Clean Chimney System is
Safer and Works Better
Although the catalytic combustion system in your Win-
terWarm can reduce creosote formation dramatically, it
is not a substitute for regular inspection and cleaning of
the chimney and chimney connector.
Learn to Recognize —
and Avoid — Creosote
Your WinterWarm has been designed to reduce creo-
sote build-up significantly. However, regular chimney
inspection and maintenance must still be performed.
For safety, good stove performance, and to protect your
chimney and chimney connector, inspect your chimney
and chimney connector on a regular schedule. Clean
the system if necessary. Failure to keep the chimney
and connector system clean can result in a serious
chimney fire.
When wood is burned slowly, it produces tar, organic
vapors and moisture which combine to form creosote.
The creosote vapors condense in the relatively cool
chimney flue of a slow-burning fire. As a result, creosote
residue accumulates on the flue lining. When ignited,
this creosote makes an extremely hot fire within the
flue system that can damage the chimney and overheat
adjacent combustible material. If a significant layer of
creosote has accumulated —1/8” (3mm) or more — it
should be removed to reduce the risk of a chimney fire.
If you do experience a chimney fire, act promptly to:
•
Close the damper and thermostat lever.
•
Get everyone out of the house.
•
Call the Fire Department.
If the combustor is in good condition and clean, re-in-
stall it following this procedure:
1. Slide the element carefully back into the refractory
chamber, seating it securely. The element must be
fully to the rear of the support slot.
2. Install the access panel, making sure that it is flush
with the outer surface of the main refractory pack-
age.
3. Check the slot in the rear bottom plate for debris,
and clean if necessary.
4. Reinstall the lower fireback by inserting the base
of the fireback in the slot. Tip the fireback up into
place.