Manual mode operation, Automatic mode operation – Cabela's Pro Series Vacuum Sealer 08-0601-C User Manual
Page 12
-13-
-12-
BEFORE ATTEMPTING VACUUM PACKAGING, BE SURE THAT THE
VACUUM SEALER IS SET UP IN ACCORDANCE WITH ALL OF THE SAFETY
PRECAUTIONS LISTED IN THIS BOOKLET.
1. With the
Vacuum Sealer plugged in
and the power turned on, check to be sure
the
Manual Mode Light is illuminated; if not
press the
Mode Button until the manual light
is on.
2. Place the items to be vacuum sealed into
a vacuum bag. Allow at least 2” (5 cm) at the
open end of the bag in order to create enough
seal space. Be sure not to cover the
Vacuum
Ports (Figure D).
3. Close the
Vacuum Lid and check
that the bag opening is in the center of the
Vacuum Chamber.
4. While monitoring the vacuum bag, press
and release
START Button. The 2-Piston
Vacuum Pump will begin removing air from
the bag. When the desired level of air has
been evacuated from the bag, press and
release the
Manual Bag Seal Button. It
will start the sealing bag process.
Note: You may need to apply light pressure
to the
Vacuum Lid during this process.
Note: It requires some vacuum pressure in the bag to get good seal for the bag.
5. Once the
LED Seal Window has reached “0”, the Vacuum Sealer will
automatically stop the
Vacuum Pump and release the vacuum pressure moments
later.
DO NOT ATTEMPT TO PULL THE VACUUM LID OPEN BEFORE THE
VACUUM HAS BEEN RELEASED, SEVERE DAMAGE TO THE SEALING BAR
WILL RESULT.
MANUAL MODE OPERATION
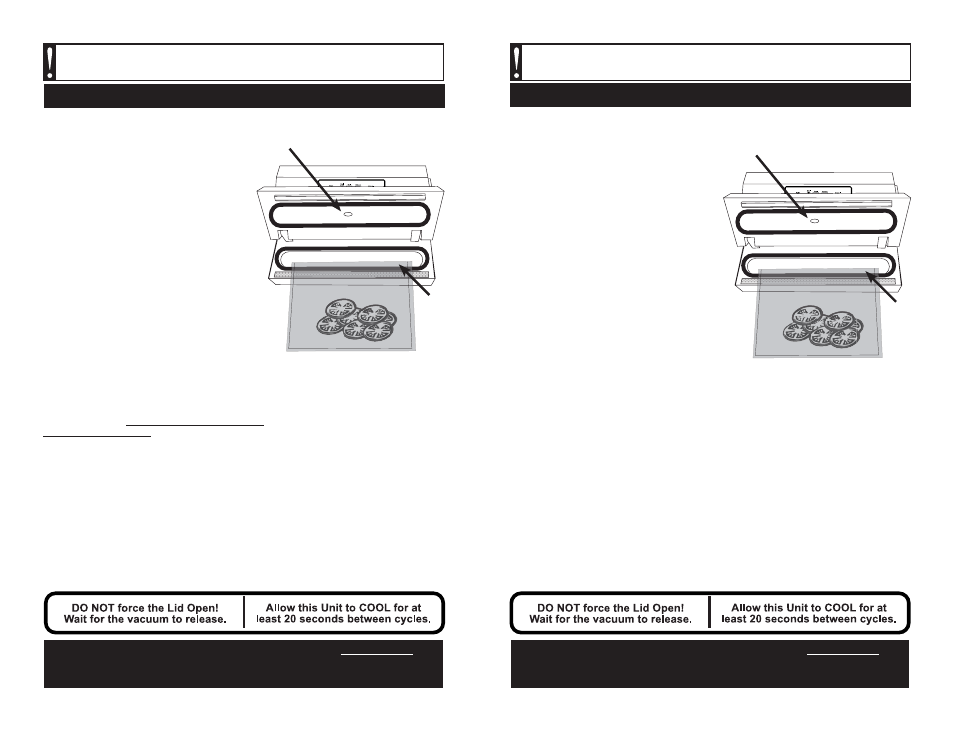
Figure D
Leave 2”
Seal
Space
Vacuum Port
WARNING!
Before cleaning, assembling or disassembling the
Vacuum Sealer, make sure the Vacuum Sealer is OFF and the PLUG IS
REMOVED FROM THE OUTLET/POWER SOURCE!
NOTE: The Vacuum Sealer is ONLY intended to be used with VACUUM BAGS. For
best results, only use the recommended vacuum bags. DO NOT USE HOUSEHOLD
BAGS! Any other uses of the Vacuum Sealer, other than the uses described in this
booklet, could potentially damage the appliance and void the warranty!
BEFORE ATTEMPTING VACUUM PACKAGING BE SURE THAT THE VACUUM
SEALER IS SET UP IN ACCORDANCE WITH ALL OF THE SAFETY PRECAUTIONS
LISTED IN THIS BOOKLET.
1. With the
Vacuum Sealer plugged in and
the power turned on, check to be sure the
Auto Mode Light is illuminated; press the
Mode Button until the Auto Light is on.
2. Place the items to be vacuum sealed into
a vacuum bag. Allow at least 2” (5 cm) at the
open end of the bag in order to create enough
seal space. Be sure not to cover the
Vacuum
Port (Figure C).
3. Close the
Vacuum Lid and check
that the bag opening is in the center of the
Vacuum Chamber.
4. Press and release the
Start Button. The
2-Piston Vacuum Pump will begin removing
air from the bag while the
LED Vacuum
Window begins to count up. You may
need to apply light pressure to the
Vacuum
Lid during the count-up process. The LED
Vacuum Window will count up starting at
the number “1” and going thru to the number
“9”, before automatically engaging the bag
sealing process.
These numbers represent
stages, not seconds.
5. Once the
LED Vacuum Window displays the number “9”, the sealing process
will begin by counting down from your chosen setting to “0” on the
LED Seal Window.
6. Once the
LED Seal Window has reached “0”, the Vacuum Sealer will
automatically stop the
2-Piston Vacuum Pump and release the vacuum pressure
moments later.
DO NOT ATTEMPT TO PULL THE VACUUM LID OPEN BEFORE
THE VACUUM HAS BEEN RELEASED, SEVERE DAMAGE TO THE SEALING
BAR WILL RESULT.
Figure C
AUTOMATIC MODE OPERATION
Leave 2”
Seal
Space
Vacuum Port
WARNING!
Before cleaning, assembling or disassembling the
Vacuum Sealer, make sure the Vacuum Sealer is OFF and the PLUG IS
REMOVED FROM THE OUTLET/POWER SOURCE!
NOTE: The Vacuum Sealer is ONLY intended to be used with VACUUM BAGS. For
best results, only use the recommended vacuum bags. DO NOT USE HOUSEHOLD
BAGS! Any other uses of the Vacuum Sealer, other than the uses described in this
booklet, could potentially damage the appliance and void the warranty!