In stallati on, How to install – FRIGIDAIRE 819042236-01 User Manual
Page 2
Attention! The text in this document has been recognized automatically. To view the original document, you can use the "Original mode".
IN STALLATI ON
HOW TO INSTALL
1. Identify the existing wall sleeve before installing
the unitfrom the listed below.
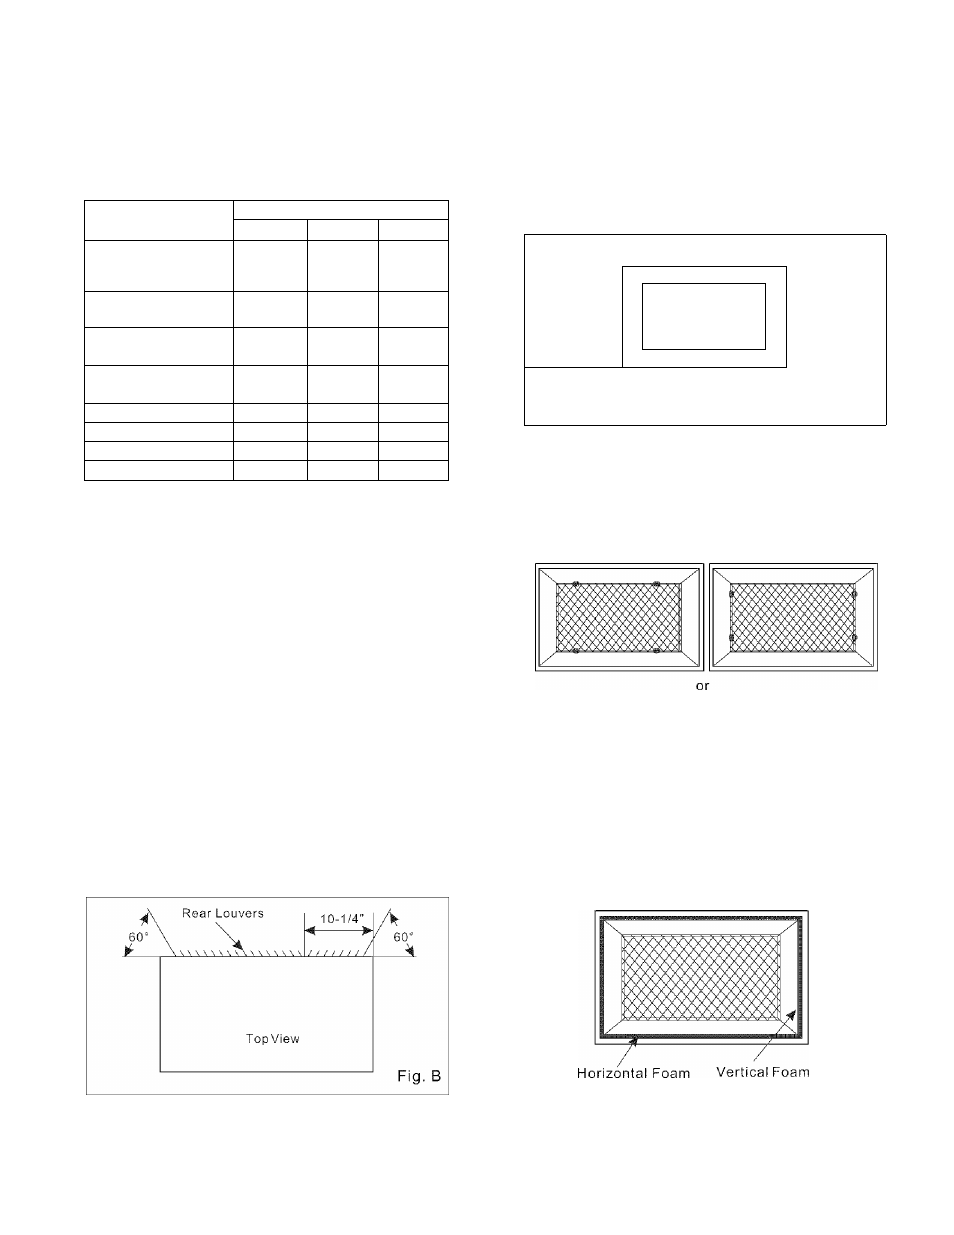
Brand
Wall SleeveDimensions(inches)
Width
Height
Depth
White-Westing house
Frigidaire
Carrier(52F series)
25-1/2
15-1/4
16, 17-1/2
General Electric
/Hotpoint
26
15-5/8
16-7/8
Whirlpool
25-7/8
16-1/2
17-1/8
or 23
Fedders/Emerson
27
16-3/4
16-3/4
or 19-3/4
Sears/Kenmore
25-7/8
15-17/32
16-23/32
Carrier(51 S series)
25-3/4
16-7/8
18-5/8
Emerson/Fedders
26-3/4
15-3/4
15
Friedrich
27
16-3/4
16-3/4
5. If the wall sleeve already has a reargrille, skip to
step 7. If the wall sleeve does not have a rear grille or
louvered panel, install the plastic grille from the kit.
Cut the plastic mesh to match the sleeve installed.
Place the plastic grille to the inside of the wall sleeve
at the rear flange.
\
y
Place the plastic grille
Fig. C
NOTE: All wall sleeves used to mount the new Air
Conditioner must bein sound structuralcondition and
have a reargrille that securely attaches to sleeve, or
rear flange that serves as a stop for the Air
conditioner.
2.Clean the interior of the sleeve (do not disturb
seals).
3.Repaint the sleeveif needed.
6.Use the 4washers and screwsto secure thegrille to
the wall sleeve.
Fasten the screws
Fig. D
4.Redirect the louversat the backof the wallsleeve to
60 angle as shown in the Fig.B. The use of pliers is
recommended.
/.Remove the backing from the Vertical Foam and
attach thatto the insideright of the sleeve as shown
below.
Remove the backing from the HorizontalFoam and
attach thatto the insidefront of the sleeve as shown
below.
Fig. E