GE 500A187P044 User Manual
Installation electric dryer instructions 44, Before you begin, For your safety
Attention! The text in this document has been recognized automatically. To view the original document, you can use the "Original mode".
Installation
Electric Dryer
Instructions
44
BEFORE YOU BEGIN
Read these instructions completely and carefully.
IMPORTANT
" Save these
instructions for local inspector’s use.
IMPORTANT
“ Observe all
governing codes and ordinances.
• Note to Installer - Be sure to leave these instructions with
the customer.
• Note to Customer - Keep these instructions with your Use
and Care Book for future reference.
• This dryer must be exhausted outdoors.
• Before the old dryer is removed from service or discarded,
remove the dryer door.
• Service information and the wiring diagram are located in
the control console.
• Do not allow children on or in the appliance. Close
supervision of children is necessary when the appliance is
used near children.
FOR YOUR SAFETY:
A
WARNING
• Use only rigid metal or flexible metal 4-in. diameter
ductwork for exhausting to the outdoors. Never
use plastic or other combustible, easy-to-puncture ductwork.
• This appliance must be properly grounded and installed
as described in these instructions.
• Do not install or store appliance in an area where it
will be exposed to water and/or weather
• Install the dryer where the temperature is above 50^F
for satisfactory operation of the dryer control system.
NOTE: Installation and service of this dryer
requires basic mechanical and electrical skills.
It is your responsibility to contact a qualified
installer to make the electrical connections.
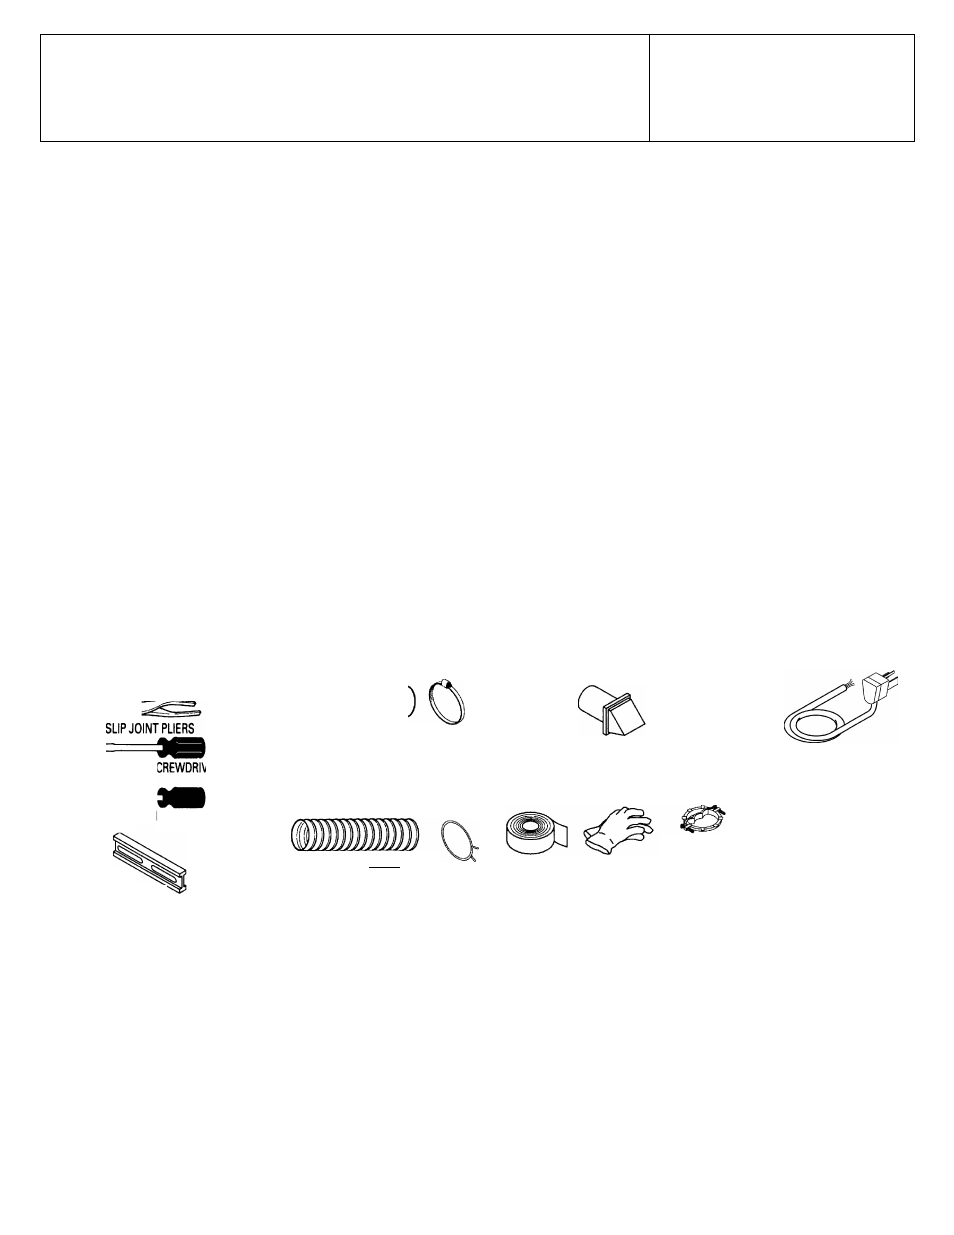
TOOLS YOU
WILL NEED
FLAT BLADE SI 'ER
PHILLIPS SCREWDRIVER
LEVEL
4" DIA. METAL DUCT
(RECOMMENDED)
MATERIALS YOU WILL NEED
4“ DUCT
CLAMPS (2)
OR
4“ SPRING
CLAMPS 12)
4-DIA. METAL
ELBOW
EXHAUST HOOD SAFETY GLASSES
4" DIA. FLEXIBLE METAL DUCT
(IF NEEDED)
DUCT TAPE
GLOVES
3/4- STRAIN RELIEF
UL RECOGNIZED
DRYER POWER
CORD KIT
(NOT PROVIDED
WITH DRYER)
UL RATED 120/240V, 30A
WITH 3 OR 4 PRONGS.
IDENTIFY THE PLUG TYPE
AS PER THE HOUSE
RECEPTACLE BEFORE
PURCHASING LINE CORD.
Step 1 Prepare the Area and Exhaust for Installation of
New Dryer (see section 1).
Step 2 Check and Ensure the Existing External Exhaust is
Clean (see section 1) and Meets Attached Installation
Specifications (see section 3).
Step 3 Remove the Foam Shipping Pads (see section 1).
Step 4 Move the Dryer to the Desired Location.
Step 5 Connect the Power Supply (see section 2).
Step 6 Connect the External Exhaust (see section 4).
Step 7 Level Your Dryer (see section 5).
Step 8 Check the Operation of the Power Supply
and Venting.
Step 9 Place the Owners Manual and the Installation
Instructions in a Location Where They Will Be
Noticed By the Owner.
For Alcove or Closet Installation, see section 6.
For Bathroom or Bedroom Installation, see section 7.
For Mobile or Manufactured Home see, section 8.
For side or bottom exhaust, see section 9.
Document Outline
- TIP: Install your dryer before installing your washer.
- * DO NOT USE AN EXTENSION CORD OR AN ADAPTER PLUG WITH THIS APPLIANCE.
- CONNECTING DRYER USING 3-WIRE CONNECTION
- EXHAUST INFORMATION
- a EXHAUST CONNECTION
- USING FLEXIBLE METAL DUCTS
- 6] ALCOVE OR CLOSET INSTALLATION
- m BATHROOM OR BEDROOM INSTALLATION
- m MOBILE OR MANUFACTURED HOME INSTALLATION
- S DRYER EXHAUST TO RIGHT, LEFT
- OR BOTTOM CABINET
- TAB LOCATION
- ADDING NEW DUCT
- ADDING ELBOW AND DUCT FOR EXHAUST TO LEFT OR RIGHT SIDE OF CABINET
- ADDING ELBOW FOR EXHAUST THROUGH BOTTOM OF CABINET
- ADDING COVER PLATE TO REAR OF CABINET (SIDES AND BOTTOM EXHAUST)
- m CHANGING DIRECTION OF DOOR OPENING
- m SERVICING