Vacation and moving guide, Short vacations (less than 4 weeks), Long vacations (more than 4 weeks) – Whirlpool RT12FC User Manual
Page 6: Moving, Caring for your refrigerator, Awarning
Attention! The text in this document has been recognized automatically. To view the original document, you can use the "Original mode".
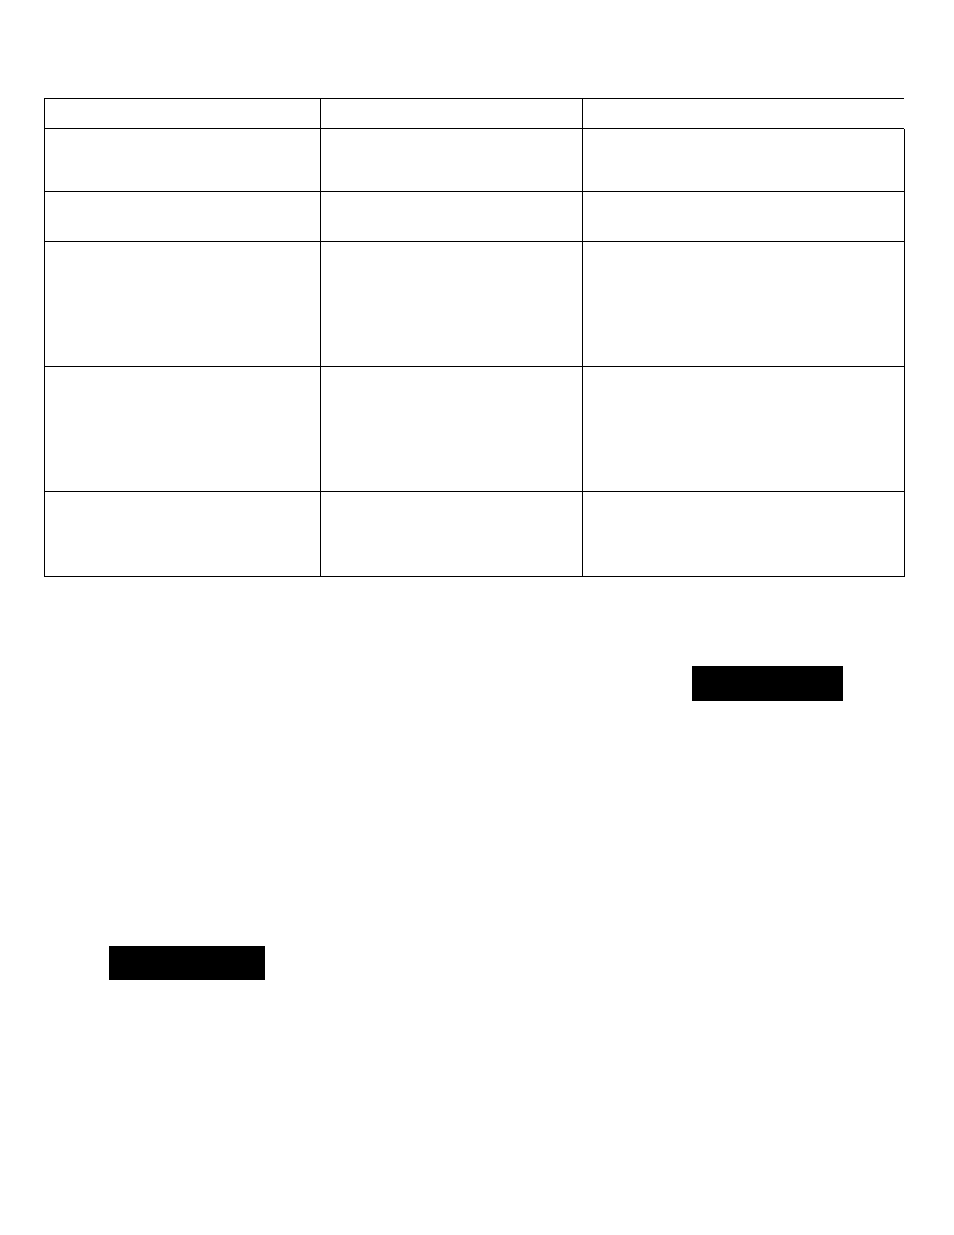
PART
WHAT TO USE
HOW TO CLEAN
Door liners and gaskets
S p o n g e , s o f t c l o t h o r p a p i ' i t o w e l
m i l d d e t e r r j e i i l a n d w a i m w a t e r
•
W a s h w i t h w o t s p o n g e , c l o t h o r p a p e r
t O W I ' l
•
K m s e a n d d r y
Plastics
( c o v e r s a n d p a n e l . s )
S o f t , c l e a n s p o n g e o r s o f t c l o t h ,
m i l d d e t e r g e n t a n d w a r m w a t e r
•
W a s h with w e i s i i o n g c o r c l o L l i
•
R i n s e a n d d r y
Defrost pan
( b e l i m d r e f r i g e r a t o r o n t o p o f t h e
m o t o r )
S p o n g e o r s o f t c l o t h : m i l d
d e l e r g e i U a n d w a r m w a t e r
•
M o v e r e f r i g e r a t o r o u t a w a y f r o m w a l l
•
Do Not remove defrost pan.
•
W a s h d e f r o s t p a n w i t h w e t s p o n g e o r
c l o i n .
■
Rinse and dry.
•
Move refrigerator back into place.
•
Check levelness of refrigerator.
Condenser coils
(behind refrigerator)
Vacuum cleaner with brush
auachmeni.
•
Move refrigerator out away from wall
•
Vacuum dust and lint from condenser
coils at least every other month.
■
Move refrigerator back into place,
leaving 1 inch (2.54 cm) between the
wall and condenser coils.
■
Check levelness of refrigerator.
Floor under refrigerator
Floor cleaners.
•
Move refrigerator out away from wall.
■
Clean the floor.
■
Move refrigerator back into place.
■
Check levelness of refrigerator.
Caring For Your Refrigerator
If electricity goes off
baked goods.
1. Gall the power company.
Ask how long power will be off.
2. Keep freezer closed if service is to
be interrupted 24 hours or less.
This will help food will stay frozen.
3. If service is to be interrupted
longer than 24 hours, do this:
Remove all frozen food and store in
a frozen food locker;
OR
Place 2 lbs. (0.9 kg) of dry ice in
freezer for every cubic foot of
freezer space. This will keep foods
frozen for 2 to 4 days.
AWARNING
Personal Injury Hazard
Wear gloves to protect your hands
from dry ice bums. Failure to do so
could result in dry ice bums.
OR
If dry ice or a food locker is not
available, use or can perishable
food at once.
NOTE: A full freezer stays colder longer
than a partly filled one. A freezer full of
meat stays colder longer than a freezer
Food containing ice crystals may be
safely refrozen, but the quality and flavor
of the food may be affected.
Use refrozen food quickly If the
condition of the food is poor, or you feel
it is unsafe to eat, dispose of it
immediately.
Vacation and moving guide
Short vacations
(less than 4 weeks)
■ Use up perishable foods.
■ Freeze other food items.
Long vacations
(more than 4 weeks)
■ Remove all food.
■ Turn Temperature Control to OFF.
■ Unplug refrigerator.
• Clean, rinse and dry the interior.
■ Keep refrigerator and freezer doors
slightly open by taping wood or
rubber blocks at the top of each
door. This allows air to enter the
refrigerator cind freezer sections
and prevents odors and mold from
building up inside while you're
away.
awarning
Personal Injury Hazard
Do Not allow children to climb on,
play near or crawl inside the
refrigerator when the doors are
blocked open. They may become
injured or trapped.
• To restart refrigerator when you
return, see page 3 for resetting
control.
Moving
• Remove all food.
■ Pack frozen foods in dry ice.
• Turn Temperature Control to OFF.
• Unplug refrigerator.
• Clean, rinse and dry the interior.
■ Take out all removable parts.
■ Wrap removable parts in paper and
tape them all together. Store inside
refrigerator.
« Screw in leveling legs.
• Tape the doors shut.
• Tape the electric cord to the cabinet
exterior.
• When you reach your new home,
replace the removable parts and
follow steps beginning on page 2