Now start – Whirlpool 60-Hz Models User Manual
Page 3
Attention! The text in this document has been recognized automatically. To view the original document, you can use the "Original mode".
Now start...
With washer in iaundry area.
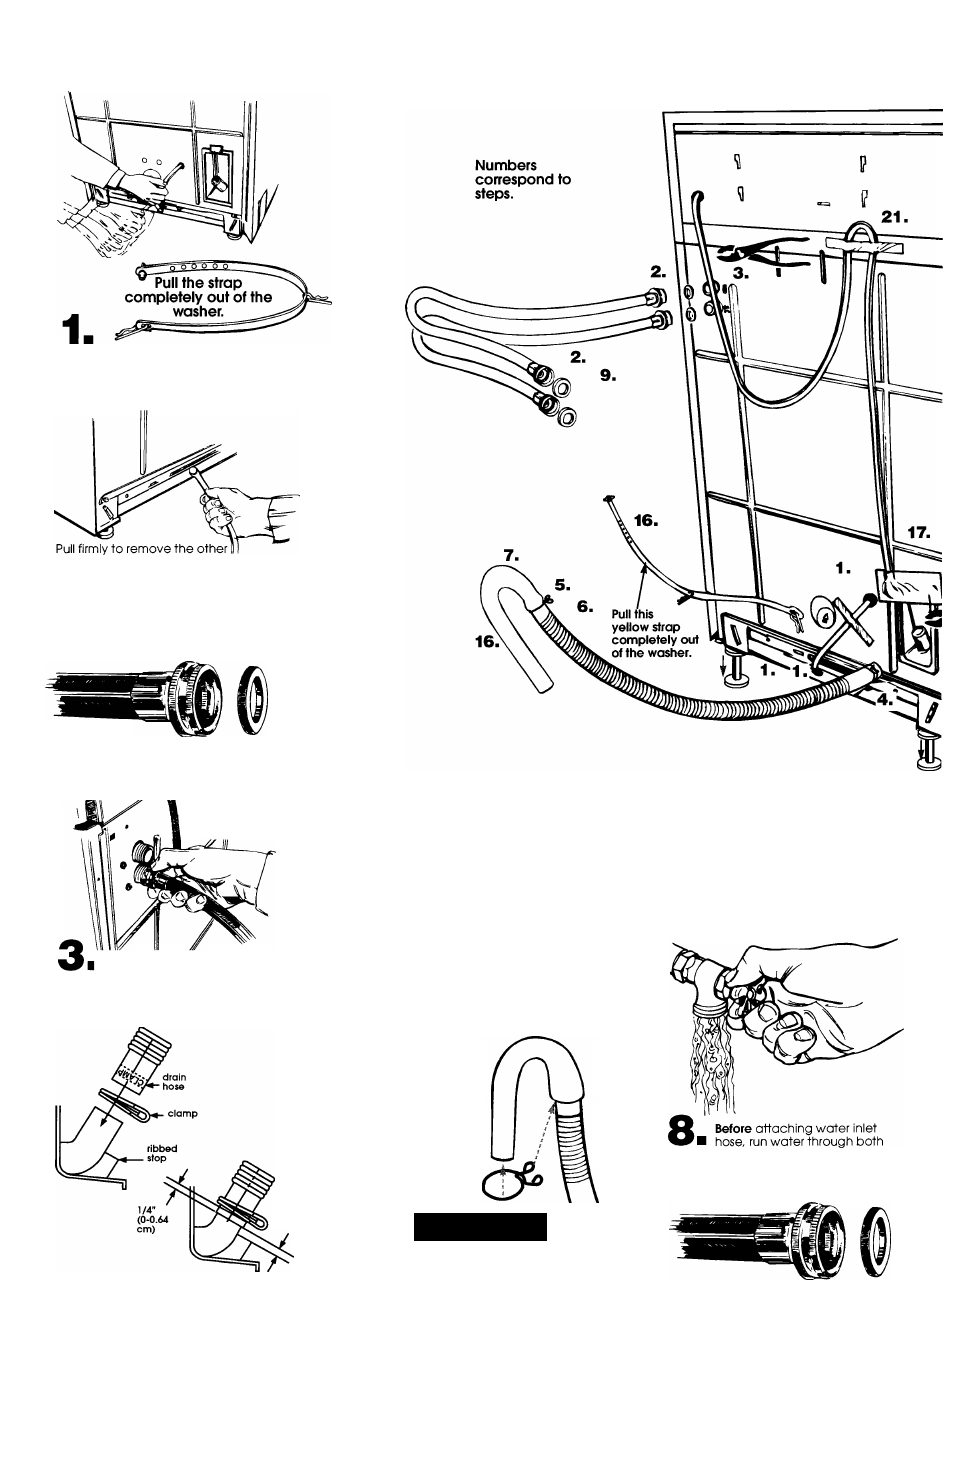
Read, then remove label that covers
drain connector, Pull to completely
remove the shipping strap with 2 cotter
pins from the inside of the washer.
end of shipping strap from the back of
the washer. The shipping strap plug must
be completely removed from the washer
for the self-leveling legs to be released.
Save the shipping strap for use in Step 16.
Use new hoses and washers that came
with your Whirlpool washer.
B
coupling washer
Insert a flat washer into
each
end of the
inlet hoses. Check that washers are firmly
seated in couplings.
Inlets are plastic.
Do not strip or
crossthread.
I
Attach hose to bottom inlet valve
opening first; then second hose to top
inlet. Tighten couplings by hand. Then use
pliers to make an additional two-thirds
turn.
1/4"
(0-0.64
cm)
max.
IMPORTANT: THIS PROCEDURE MUST BE
FOLLOWED TO ASSURE PROPER
INSTALLATION.
4
To prevent the drain hose from
■ coming off or leaking, it must be
installed per the following instructions:
1, Wet the inside end of the drain hose
with tap water.
DO NOT USE ANY
OTHER LUBRICANT.
Panel B
2. Squeeze ears of clamp with pliers to
open and place clamp over the
end of the drain hose.
3. While holding clamp open, work
end of drain hose onto drain
connector until drain hose is within
1/4 inch (0.64 centimeters) of ribbed
stop,
4. Position clamp over the drain hose
area marked "clamp." Release
clamp. Clamp should be 1/4 inch
(0.64 centimeters) from end of drain
hose.
5
Open
■ clamp and
slide over "hook"
end of drain hose
to secure the rigid
and corrugated
sections together.
A
caution
Floor Damage
Slide washer onto cardboard or
hardboard before moving across floor.
Failure to do so may cause damage to
floor covering.
7
.
DO NOT FORCE EXCESS LENGTH OF
DRAIN HOSE DOWN THE STANDPIPE. THIS
COULD CAUSE SIPHONING.
faucets into a bucket. This will get rid of
particles in the water lines that might clog
hoses. Mark which is the hot water faucet.
6
Move washer close to final
■ position. Put "hook" end of drain
hose into laundry tub or standpipe.
Check for proper length of drain hose.
coupling washer
9
Attach bottom hose (inlet marked
■ "H") to hot water faucet. Attach
top hose (inlet marked "C") to cold water
faucet. Tighten couplings to faucet by
hand; then use pliers to make final two-
thirds turn.