L.p. gas conversion, Jk warning – Whirlpool FGP300BL0 User Manual
Page 6
Attention! The text in this document has been recognized automatically. To view the original document, you can use the "Original mode".
19
:
If burners need adjusting for
proper flame, adjust the air
shutter to the widest opening
that will not cause the flame to
lift or blow off of the burner,
Repeat
as
necessary with each burner
20
Push in and turn the control knob to the
"LITE" position and then to the low
position. The low flame should be a
minimum, steady, blue flame. The
burner is properly adjusted when the
low flame remains steady and the
burner does not go out.
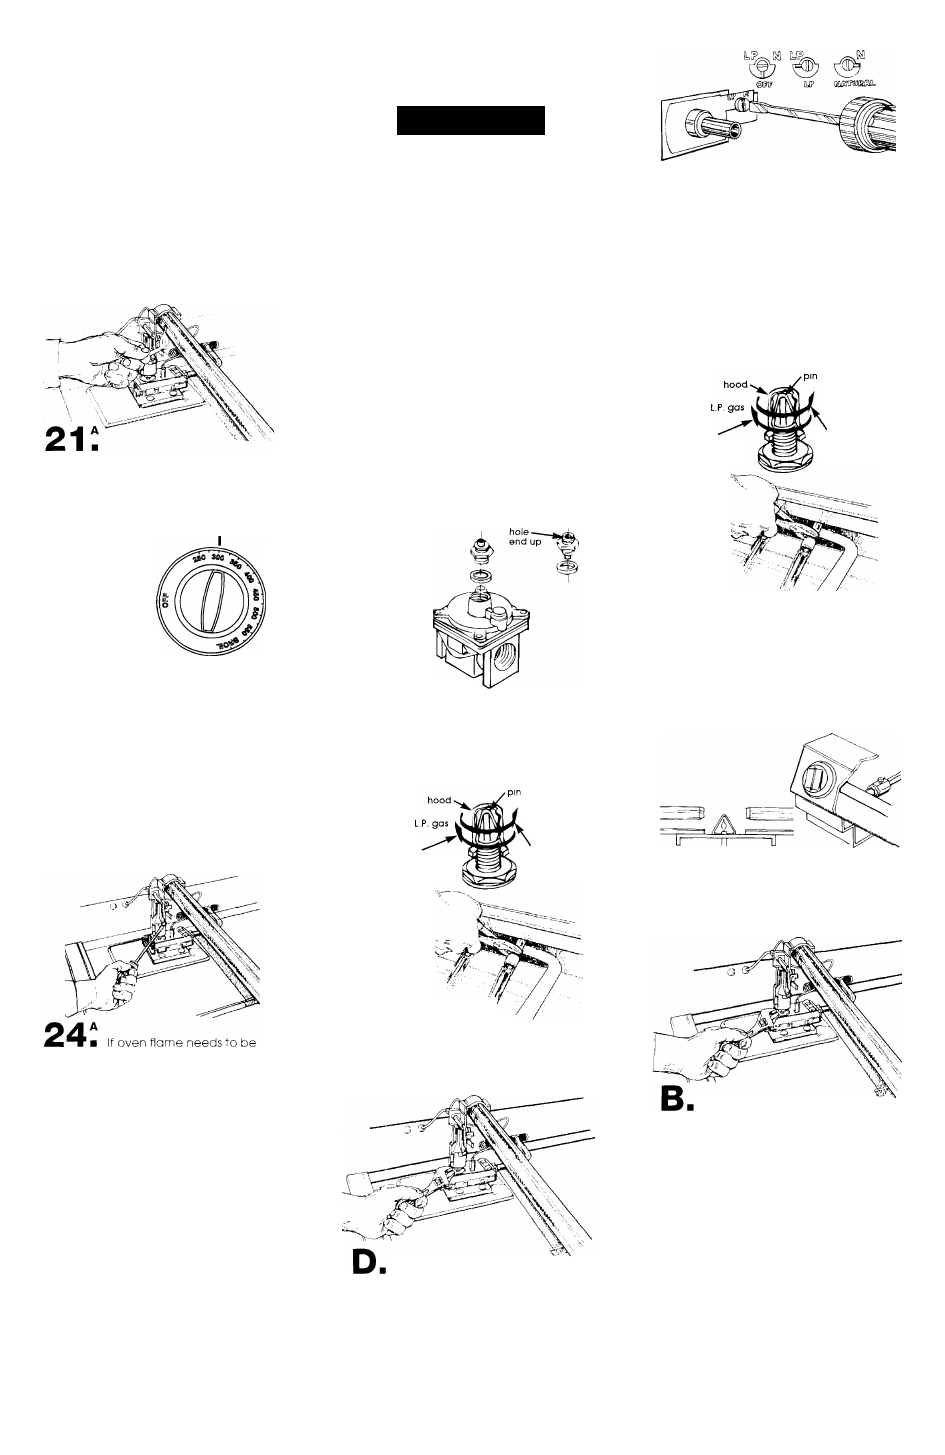
Make sure the oven control knob is in
the "OFF" position. Remove the oven
rack and oven bottom. Hold a lighted
match to the opening in the top of the
pilot at the rear of the oven burner. No
pilot adjustments are required.
22
Check the
operation of the
oven burner. Push in
and turn the oven
control knob at 300°F, The oven burner
should light in 50 to 60 seconds. This
delay is normal. The oven safety valve
requires a certain time before it wil
open and allow the
gas
to flow.
5
OA
m
Check the oven burner for
proper flame. Cpen the oven door and
broiler drawer. The flame should be 1 /2"
long with an inner cone of bluish-green,
and outer mantle of dark blue and
should be clean and soft in character.
No yellow tips, blowing or lifting of the
flame should occur.
adjusted, turn oven off. Loosen screw
and adjust air shutter. Turn oven back
on and check flame. Repeat as
needed until proper
flame
appears.
Tighten screw. Replace oven bottom,
oven rack. Close oven door and broiler
drawer.
You have just finished instaiiing
your new range. To get the
most efficient use from your
new range, read your Use &
Care Guide. Keep Instaliation
instructions and Guide ciose to
range for easy reference. The
instructions wiii make
reinstalling your range in
another home as easy as the
first installation.
L.P. gas
conversion
Jk WARNING
Fire Hazard
•
Locate gas supply valve between
pressure regulator and gas valve.
Shut oft gas supply valve in range
before converting to L.P. gas.
• Make all maintop and oven burner
conversions before turning gas
supply valve back on.
Failure to follow these instructions
could result in fire, explosion or other
personal injury.
Converting to L.P. gas
The serial rating plate, located under
the mc^intop, specifies the type of gas
this range was set to use. Conversion
shoulc be done by a qualified installer.
Complete installation Steps 1-12,
Panel C, before converting your range
to L.P. gas. Cpen oven door and broiler
drawer. Remove oven racks and oven
bottom. Shut off gas supply valve in
range Remove burner grates and
carefully lift up or remove maintop.
Natural
L.P,
B
Pressure regulator:
Use a wrench to unscrew the cap from
the too by turning counterclockwise
Turn ttie cap over so the hole end is up.
Replace the cap and gasket on the
regulator
DO NOT REMOVE THE
PRESSURE REGULATOR.
Natural
gas
decreases gas
decreases flame size
Increases gas
increases flame size
c.
Cooktop burners:
Turn the orifice hoods down
snug onto pins (approximately 2 to 2-1/2
turns)
DO NOT OVERTIGHTEN.
The
burne' flames cannof be properly
adjusted if this conversion is not made
Oven burner:
Turn tfie orifice hood down
snug onfo pin (approximately 2 to 2-1 /2
turns )
DO NOT OVERTIGHTEN.
The burner
flame cannot be properly adjusted if this
conversion is not made.
m
Oven thermostat:
Remove
thermostat knob, pulling straight off. Use
a small screwdriver to rotate the key to
L.P. Replace thermostat knob.
■ ■ After the burners have been
converted to L.P. gas usage, complete
Steps 13-15, Panel C.
Adjusting for proper flame
Natural
gas
decreases gas
decreases flame size
increases gas
Increases flame size
Cooktop burners:
Adjust the air shutters for proper flame
by sliding the air shutter to close or open
the shutter as needed. See Panels C
and
D, Steps 16-19 for electronic ignition
and Panels D and E, Steps 16A-20A for
standing pilot. L.P, gas has a slightly
yellow tip
Oh
top of burner flames in
addition to the other proper
characteristics.
Cooktop burners with standing pilots
require adjustment of pilot flame to 1 /4"
high. The adjustment control is located
on the manifold pipe or at the pilot
flame base depending on the model.
Oven burner:
Adjust the air shutters as needed for
proper flame. See Panel D, Steps 20-22
electronic ignition and Panel E, Steps
21A-24A for standing pilot.
Replace oven bottom and oven
racks. Reinstall the maintop and burner
grates. Close oven door and broiler
drawer.
Panel E