AAF International ArrestAll User Manual
Page 5
5
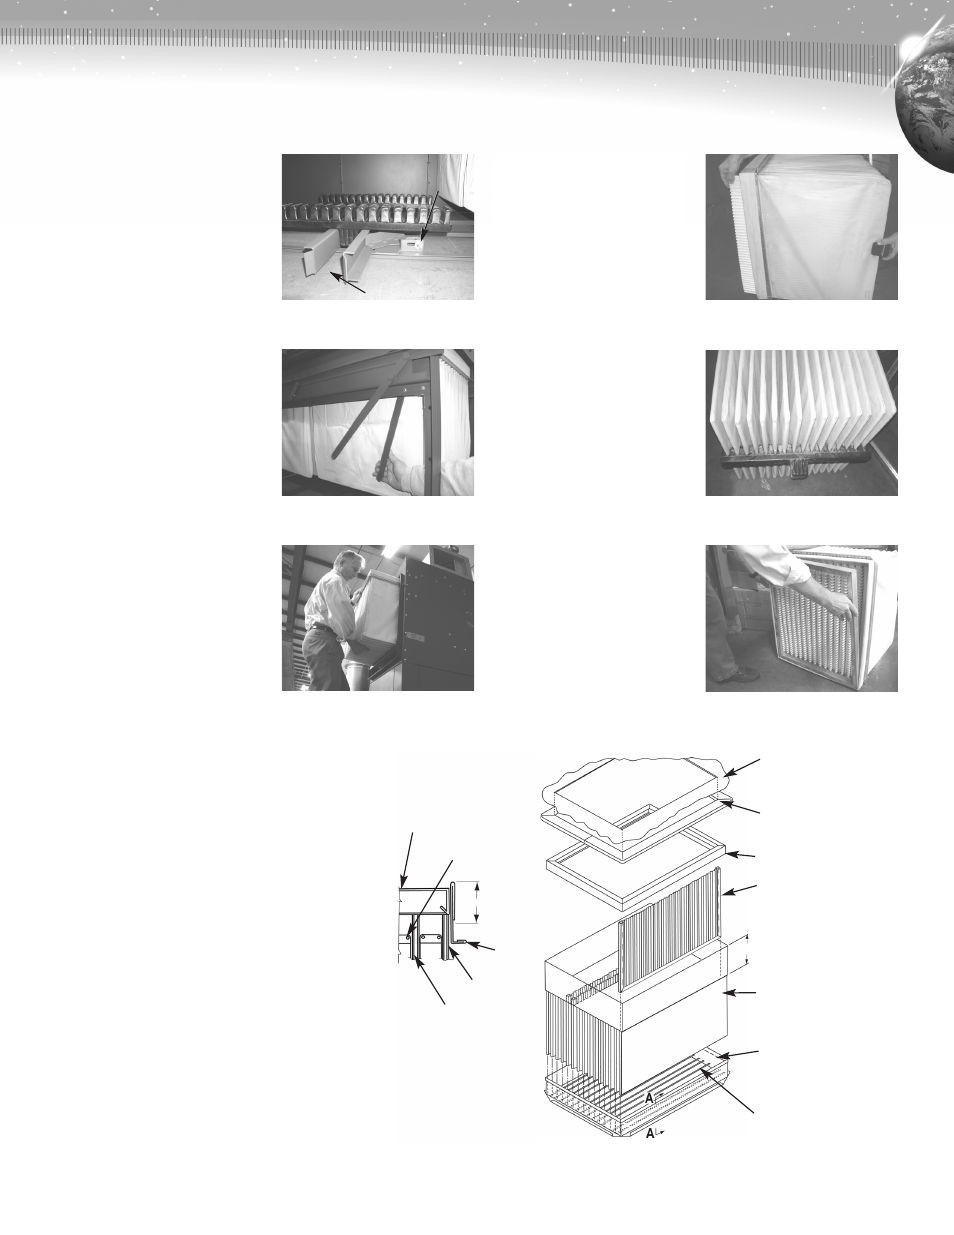
6.3 Filter Cartridge
Change-Out (Figure 9)
1. Open cartridge access door.
(Door may be lifted off for
easier access).
2. Loosen the shaker comb
adjustment bolt and pry apart
the shaker comb locking
channel (Picture 1).
3. Release the cartridge locking
levers (2 per cartridge) by
pushing each toward the
center of the unit (Picture 2).
4. Remove the complete
cartridge assembly from
the unit (Picture 3).
5. Inspect gasket on septum for
damage. It is recommended
that the gasket be replaced
whenever new cartridges are
installed. Glue the gasket to
the underside of the septum
around the edges of the
opening. The gasket splice
should be located to the front
of the unit.
6. Remove the shaker
comb,retainer, and insert
assemblies from the
old cartridge assembly.
Inspect for damage. Do not
throw these items away.
You will need them to
assemble the new cartridge.
7. Remove the old
pocket assembly from
the frame assembly.
Discard the old pocket
assembly.
8. Assemble the new cartridge
as shown in Figure 9 using
the existing frame and
pocket inserts.
9. Assemble the shaker comb
to the bottom center of the
cartridge assembly. Make
sure each pocket with insert
is set into the shaker comb
finger (Pictures 4 & 5).
10.After the pockets are set into
the shaker comb, install the
retainer on top of the inserts
(Picture 6).
11. Install the cartridge assembly
into the ArrestAll by reversing
steps 1 through 4.
Figure 9. Cartridge Installation
Septum
Gasket
Insert
Assembly
Pocket Collar
Assembly
Frame
Assembly
Support
Wire
Fold Collar
Over Approx. 2 in.
Frame
Assembly
Pocket
Assembly
Insert
Assembly
Support Wire
Retainer
Section ‘A-A’
Installed Position
Wide Spaced
Retainer
Picture 1
Picture 2
Picture 3
Picture 4
Picture 5
Picture 6
Shaker Comb
Adjusting Bolt
Locking Channel