Figure 5, Figure 6 – Cub Cadet CLT-542H User Manual
Page 10
10
ATTACHING THE SEAT
Seat styles vary by tractor model and there are two
different styles available:
•
Quick Adjustment
•
Knob Adjustment
Refer to Figure 3 and Figure 4 to identify your tractor’s
seat style and follow applicable instructions.
NOTE:
For shipping reasons, seats are either
fastened to the tractor seat’s pivot bracket with a plastic
tie, or mounted backward to the pivot bracket. In either
case, free the seat from its shipping position and
remove the two hex screws (or knobs, on models so
equipped) from the bottom of seat before proceeding
with applicable instructions below
.
Quick Adjustment Seat
NOTE:
If your seat was shipped mounted backwards
on the seat pivot bracket, pull out the tab found on the
seat stop and hold it open while sliding the seat off the
seat pivot bracket. See Figure 3.
1.
Line up the plastic seat spacers with the slots in
seat pivot bracket.
2.
Slide seat in until front seat spacer engages the
seat stop.See Figure 3.
WARNING:
Before operating this machine,
make sure the seat is engaged in the seat
stop, stand behind the machine and pull back
on seat until fully engaged into stop
.
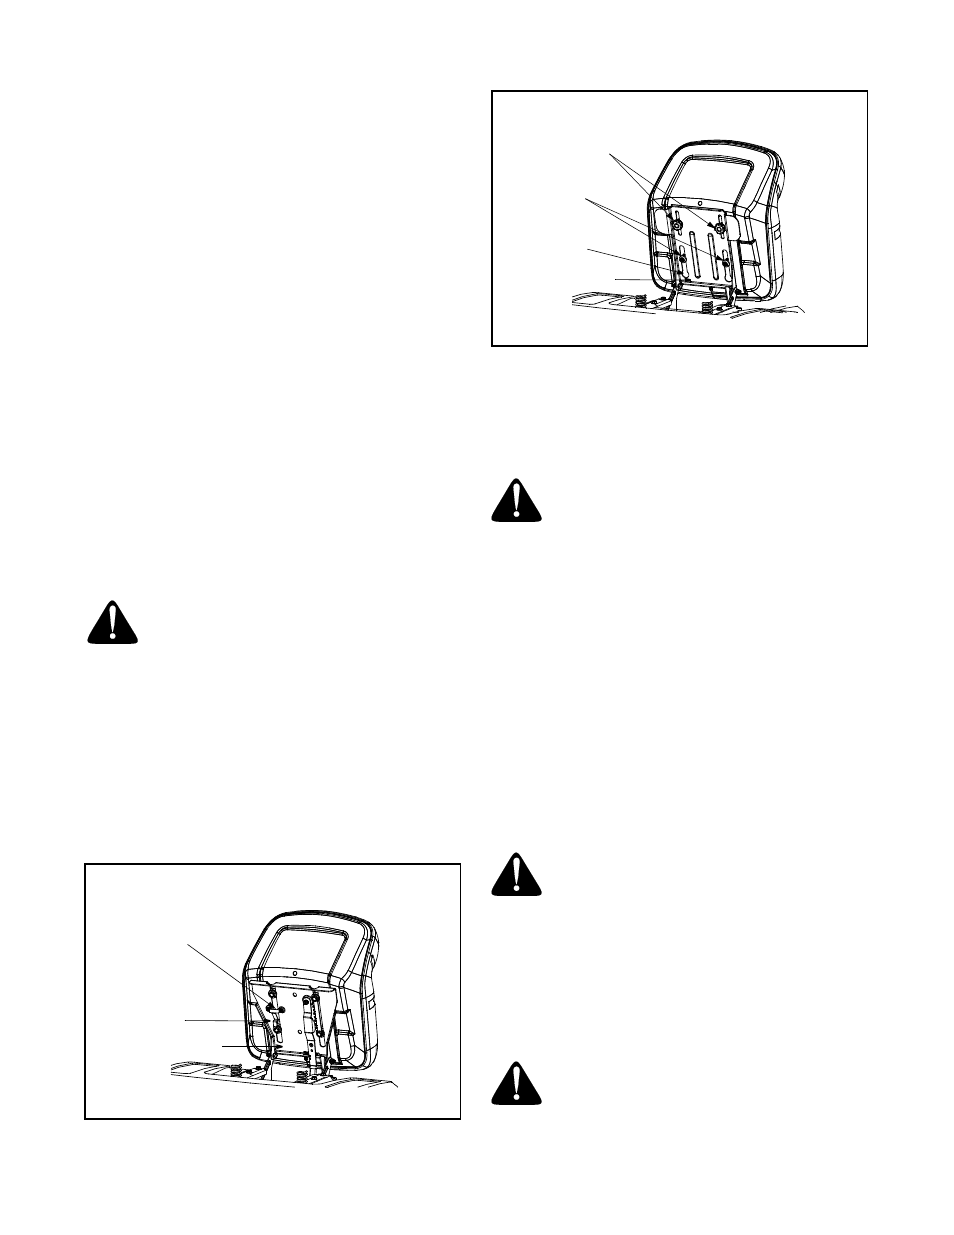
Knob Adjustment Seat
1.
Position the shoulder screws (found on the base of
the seat) inside the slot openings in the seat pivot
bracket. See Figure 4.
2.
Slide the seat slightly rearward in the seat pivot
bracket, lining up the rear slots in the pivot bracket
with the remaining two holes in the seat’s base.
3.
Select desired position for the seat, and secure with
the two knobs removed earlier. See Figure 4.
Figure 3
Figure 4
GAS AND OIL FILL-UP
The gasoline tank is located under the hood and has a
capacity of either two or three gallons. Do not overfill.
WARNING:
Use extreme care when
handling gasoline. Gasoline is extremely
flammable and the vapors are explosive.
Never fuel machine indoors or while the
engine is hot or running. Extinguish
cigarettes, cigars, pipes, and other sources of
ignition.
Service the engine with gasoline and oil as
instructed in the separate engine manual packed
with your tractor. Read instructions carefully.
IMPORTANT:
Your tractor is shipped with oil;
however, you MUST check the oil level before
operating. Be careful not to overfill. Overfilling with oil
may cause the engine to smoke. This will result in poor
engine performance and could cause permanent
engine damage.
SHIPPING BRACE REMOVAL
WARNING:
Make sure the riding mower’s
engine is off, set the parking brake and
remove the ignition key before removing the
shipping brace
.
•
Locate the shipping brace and warning tag found
on the right side of the cutting deck. See Figure 5.
•
While holding the discharge chute with your left
hand, remove the shipping brace with your right
hand by grasping it between your thumb and index
finger and rotating it clockwise.
WARNING:
The shipping brace, used for
packaging purposes only, must be removed
and discarded before operating your riding
mower.
Quick Adjustment
Seat Stop
Tab
Pivot Bracket
Knob Adjustment
Knobs
Pivot Bracket
Shoulder Screws
Opening in Slot