Steps, 6installation, Caution before installation – Bio Bidet BLISS Premier Class Bidet Seat User Manual
Page 10
CAUTION BEFORE INSTALLATION
Do not plug in before installation.
If you need an electric power system or extension, please consult a qualified electrician.
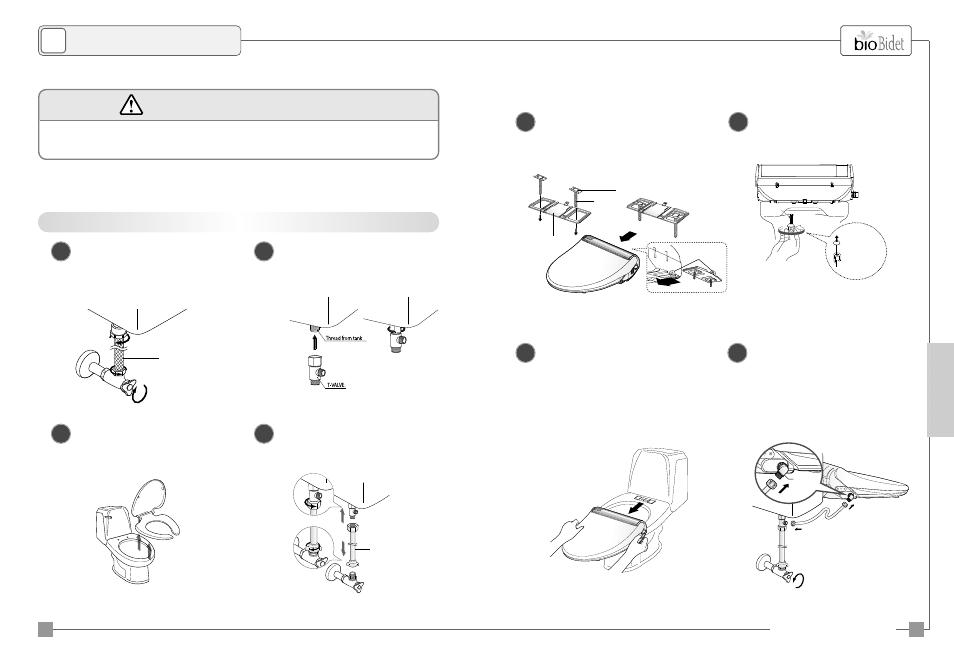
STEPS
Shut off the water supply shut off valve.
Drain the toilet tank completely.
Then remove the existing fill valve water supply hose.
Flexible Tube
Water supply hose
(for toilet flush water tank)
1
Connect T-Valve.
Remove existing supply hose connected to the toilet tank.
Make sure not to damage the water supply hose
Install T-Valve at the thread from tank.
2
Removing the existing seat and lid.
Remove mounting bolts to release existing
toilet seat from toilet.
Check for any water leaks.
Check for any water leaks.
3
Connect water supply hose to
the T-Valve.
4
Turn Off Water.
Catch plate
Place the plate and guides over each mounting hole.
Insert the mounting bolts through the plate and
mounting holes.
5
1. Slide this product onto the catch plate
centering the unit with the guide arrows on the Base.
2. You will hear a click once this product is securely
mounted to the catch plate.
3. This product will feel a little loose on the toilet bowl.
Adjust the fit from front to back and side to side for balance.
4. Tighten the nuts on both bolts securely.
7
Check for any water leaks.
8
Slide cone packing and washers onto the bolts
then fasten to securely mount bidet seat to toilet.
6
Installation Catch Plate.
Bolt and Nut Assembly.
Assembly.
Connect the flexible tube from side of
T-Valve to this product,
Open the Angle Stop valve to fill water.
Cone Packing
Nut
Bolt Guide
Bolt
Installation Manual and Operating Instructions
18
19
6
Installation
Central mounting
groove
Bolt
BACK
INST
ALLA
TION
L-Valve