3 specifications, 1 electrical specifications, 2 physical specifications – Windy Nation P30L LCD 30A Solar Charge Controller User Manual
Page 4: 2 installation, 1 electrostatic (esd) precautions, 2 mounting, Specifications, Electrical specifications, Physical specifications, Installation
P30L User Manual
Revision 1.0
1.3 S
PECIFICATIONS
1.3.1
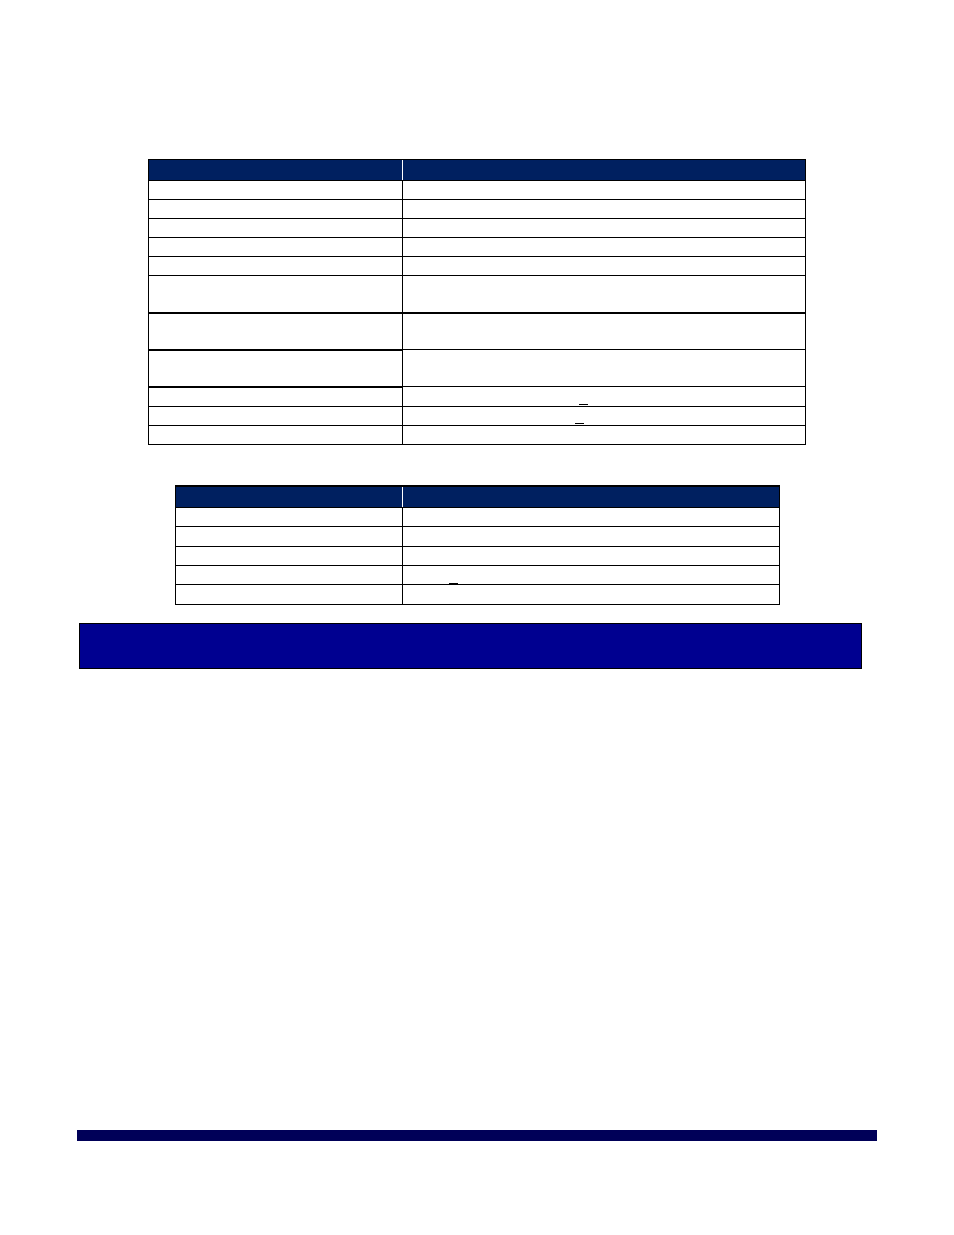
Electrical Specifications
Parameter
CHC-LCD-30
Rated Charge Current
30 Amps
Rated Load Current
30 Amps
Typical Idle Consumption
At idle < 5mA
Maximum Solar Input Voltage
48V DC
Rated Working Voltage
12V DC or 24V DC Battery Systems
Float Charging Voltage
(adjustable)
13.8V DC 27.6V DC
Low Voltage Protection
(adjustable)
10.7V DC 21.4V DC
Low Voltage Recovery
(adjustable)
12.5V DC 25.0V DC
No Load Loss
<30mA
Loop Voltage Drop
<170mV
Temperature Compensation
-4.0 mV/Cell/
o
C
1.3.2
Physical Specifications
Parameter
Value
Dimension (H x W x D)
3.54” (90mm) x 7.40” (188mm) x 1.89” (48mm)
Unit Weight
12.7 oz. (360g)
Operating Temperature
14
o
F to 140
o
F (-10
o
C to 60
o
C)
Operating Humidity
<90% relative humidity (non-condensing)
Wire Size
Up to 16mm
2
(7AWG)
2 INSTALLATION
Insure all terminating connections are clean and tight to prevent arcing and overheating.
The controller must be installed in an area that satisfies all of the following conditions:
1. Dry: Avoid any location where water can contact the controller
2. Cool: Ambient air temperature between 30°F and 105°F (0°C and 40°C)
3. Ventilated: Allow at least 4 in (10 cm) of clearance above and below and at least 1 in (25 mm) on
each side for proper air flow.
2.1 E
LECTROSTATIC
(ESD)
P
RECAUTIONS
All electronic circuits may be damaged by static electricity. To minimize the likelihood of electrostatic
damage, discharge yourself by touching an electrical ground (e.g.: copper pipe) prior to handling the unit and
avoid touching components on the circuit boards. The risk of electrostatic damage is highest when relative
humidity is below 40%.
2.2 M
OUNTING
Mounting is optional; however, the environment must be dry and protected from water.
1. The controller can be mounted on a vertical or horizontal surface. If mounted vertically, the unit
should be oriented such that neither end is at the top so foreign material cannot settle into the
unit.
2. Install four user-supplied fasteners through the four mounting slots and into the mounting
surface.
3. Tighten all the fasteners to ensure the controller cannot slide in any direction.
Page 4 of 16
windy
nation
01/20/2014