Maintenance, Engine, Changing the engine oil – Cub Cadet S6031 User Manual
Page 28: Changing the lpg tanks
28
s
ectiOn
6— M
aintenance
& a
djustMents
Maintenance
WARNING!
Before performing any maintenance or
repairs, disengage the PTO, move the speed control
pedals to the neutral position, engage the parking
brake, stop the engine and remove the key to
prevent unintended starting.
Engine
Contact Cub Cadet Customer Service for engine issues. Refer to
page 2 for more information.
Refer to the Kawasaki Owner’s Manual for all engine maintenance
intervals, procedures, specifications and instructions.
NOTE: Maintenance, repair, or replacement of the emission control
devices and systems which are being done at owner’s expense may
be performed by any engine repair establishment or individual.
Warranty repairs must be performed by a Cub Cadet Dealer.
Changing the Engine Oil
WARNING
! If the engine has been recently run, the
engine, muffler and surrounding metal surfaces will
be hot and can cause burns to the skin. Exercise
caution to avoid burns.
Maintain oil level as instructed in engine manual. Change the
oil and filter after the first five hours. The oil filter should be
changed at every oil change interval. Be careful not to spill oil on
any of the belts.
To complete an oil change, proceed as follows:
Run the engine for a short time to warm the engine oil. The
1.
oil will flow more freely and carry away more impurities.
Use care to avoid burns from hot oil.
Locate the oil drain hose on the engine.
2.
Route the free end of the oil drain hose toward an
3.
appropriate oil collection container with at least a 2.5 quart
capacity, to collect the used oil. Remove the oil fill cap/
dipstick from the oil fill tube.
While holding the free end of the oil drain hose over the oil
4.
collection container, unscrew the square-head hose plug
from the end of the hose. See Fig. 6-1. Drain the engine oil
into the collection container.
After draining the oil, wipe any residual oil from the oil
5.
drain hose. Thread the square head plug into the drain
hose fitting and fully tighten the plug.
Refill the engine with new oil. Refer to the Kawasaki
6.
Owner’s Manual for information regarding the volume and
weight of engine oil.
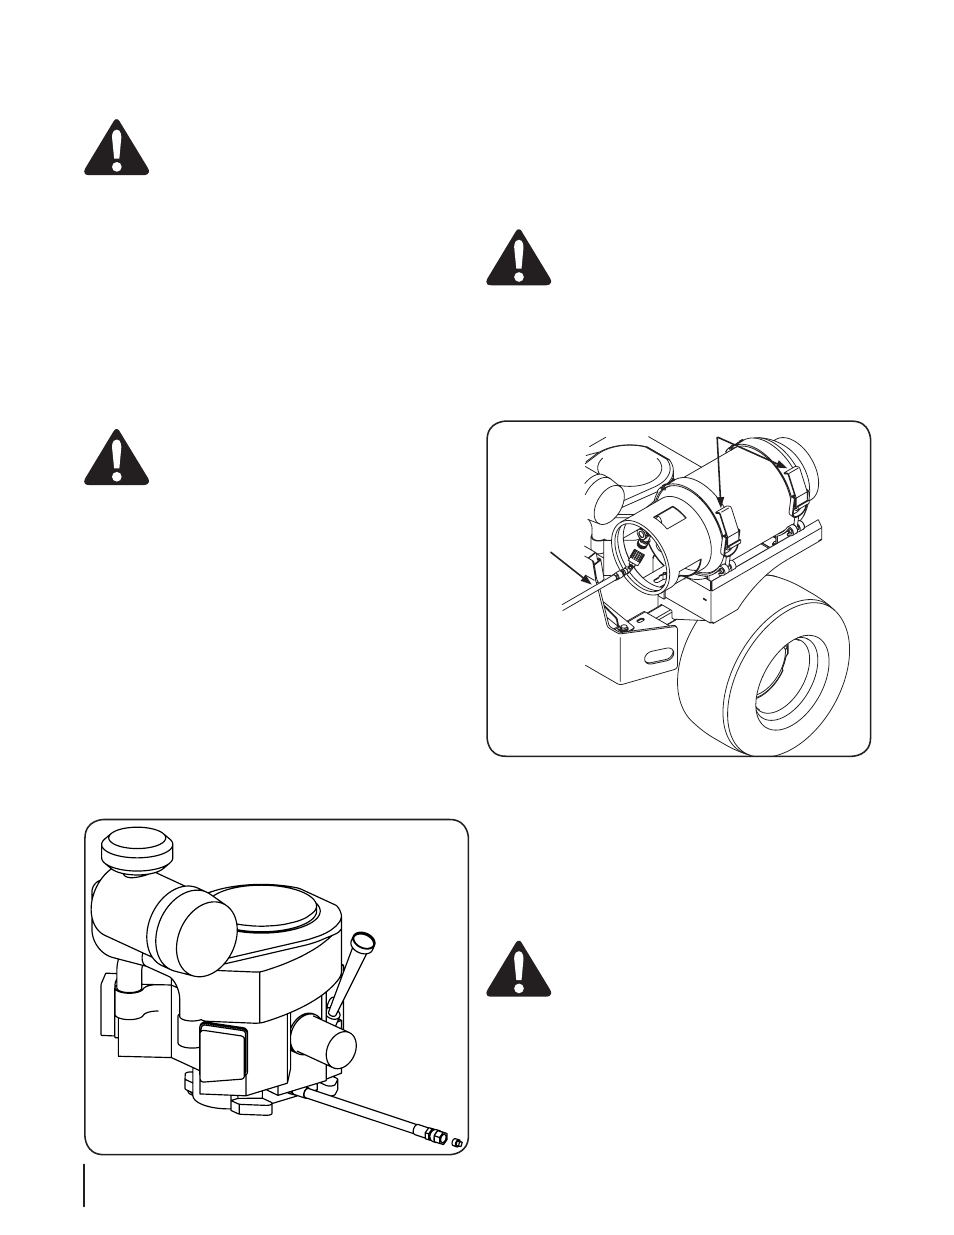
Changing the LPG Tanks
WARNING
! If the engine has been recently run, the
engine, muffler and surrounding metal surfaces will
be hot and can cause burns to the skin. Exercise
caution to avoid burns.
To change or remove the LPG tanks proceed as follows:
Make sure the tractor is off and the key is removed from the
1.
ignition.
Ensure that the fuel supply valve is turned off.
2.
Remove the regulator hose from the LPG tank by twisting it
3.
clockwise. See Fig. 6-2.
NOTE: The hose has left-handed threads to prevent
improper usage.
Release the two (2) straps that secure the cylinder to the
4.
machine. See Fig. 6-2.
Carefully lift cylinder straight up to remove from machine.
5.
Transport tank to an authorized LPG fueling station for
6.
refueling.
DANGER!
An overfilled cylinder can cause a fire or
explosion.
If exchanging tanks, be sure to use cylinders that contain
7.
LPG classified as HD-5 by national Gas Processors
Association (nGPA) and cylinders that are designed &
patented specifically for lawn care use as a vapor-delivery
system.
NOTE: See Initial LPG Tank Fill-Up in the Assembly & Set-Up
section for information on new, previously un-filled tanks.
Figure 6-1
Regulator
Hose
Straps
Figure 6-2