Front panel controls, Standby/on, Phones – Cambridge Audio Azur 540R V3 User Manual
Page 6: Tuning, Mode/store, Stereo modes, Dolby digital ex / dts es, Pro logic ii / neo:6, Input mode, Video 1
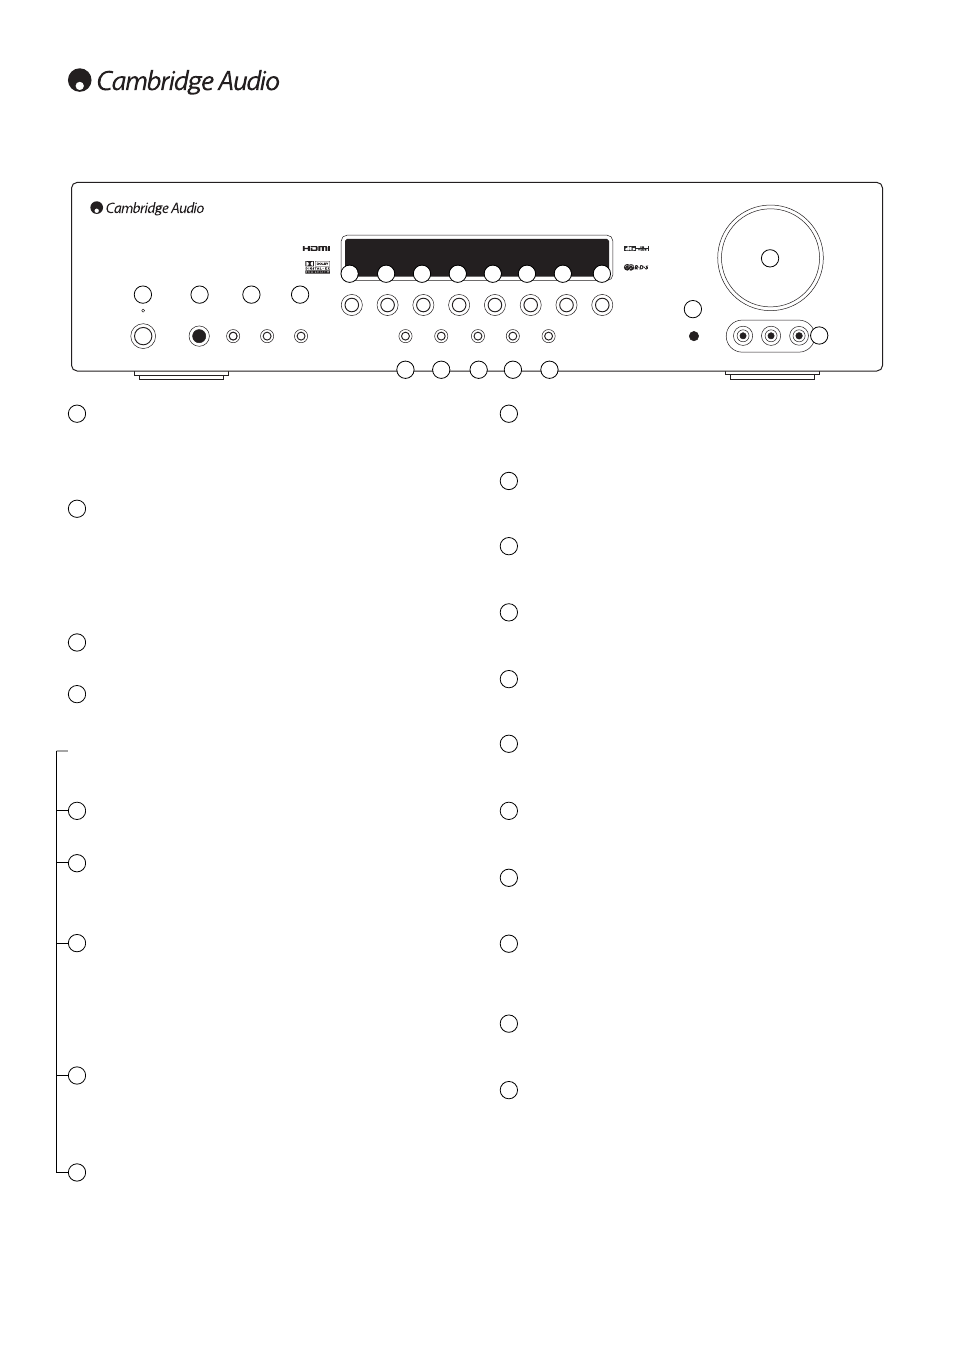
6
Front panel controls
Volume
Phones
Tuning
Mode/Store
DVD
Video 1
Dolby Digital EX/
DTS ES
DSP
Pro Logic II/
Neo 6
Input
Mode
Video 3 inputs
Video
Left
Right
Stereo
Modes
Video 2
Video 3
Tuner FM/AM Tape/MD/CDR
CD/Aux
6.1 Direct
–
+
Standby / On
azur
540R
AV Receiver
1
2
3
4
5
6
7
8
9
10
11
12
13
14
15
16
17
18
19
20
Standby/On
Switches the unit between Standby mode (indicated by dim power LED)
and On (indicated by bright power LED). Standby is a low power mode
where the power consumption is less than 10 Watts. The unit should be
left in Standby mode when not in use.
Phones
Allows for the connection of stereo headphones with a 6.35mm/¼" Jack
plug. Headphones with an impedance of between 32 and 600 ohms are
recommended.
Note: Plugging in headphones will automatically mute the main and pre-
amp outputs and select a 2-channel stereo down-mix to be created for
headphone use.
Tuning +/-
Used to tune FM/AM frequencies and skip presets in Tuner mode.
Mode/Store
Press to cycle between Tuner modes (refer to the ‘Operating
instructions’ section of this manual for more information).
Note: The 540R v3 remembers the audio and video input type and
processing mode for each individual source input. These are recalled
each time a source is selected.
Stereo Modes
Press to listen to a source in either Stereo or Stereo + Sub modes.
Dolby Digital EX / DTS ES
Press to select Dolby Digital or DTS surround modes (with suitably
encoded digital source material). These modes can only be decoded
from digital audio sources (via Coaxial or Optical inputs).
Pro Logic II / Neo:6
Press to select between various Pro Logic II/Neo:6 effects for matrix
encoded analog or digital material or for post-processing DD/DTS
material.
Note: The 540R v3 is unable to auto-detect this kind of source material
as it does not include embedded encoding type flags so manual
selection is required.
DSP
The 540R v3 can create a surround sound effect even from non-
encoded material by Digital Signal Processing (DSP). Press this button to
choose one of the following surround sound effects: THEATER, HALL,
MOVIE, MUSIC or ROOM.
Input Mode
Press this button to toggle between analog or optical/coaxial digital
input types for the currently selected source. The 540R v3 remembers
the input type selected for each source when you return to that source.
1
2
3
4
5
6
7
8
9
DVD
Press to select the DVD source equipment for output through the 540R
v3.
Video 1
Press to select the source equipment connected to Video 1 for output
through the 540R v3.
Video 2
Press to select the source equipment connected to Video 2 for output
through the 540R v3.
Video 3
Press to select a video camera recorder/video games console
connected to the Video 3 input sockets.
Tuner FM/AM
Press to select the tuner for output through the 540R v3. Once in Tuner
mode also use this button to switch between FM and AM modes.
Tape/MD/CDR
Press to select the recording device connected to the Tape/MD/CDR
input for output through the 540R v3.
CD/Aux
Press to select the CD or other source equipment connected to CD/Aux
on the rear panel for output through the 540R v3.
6.1 Direct
Press to select a 6.1 or 5.1 source (DVD-A or SACD player etc) connected
to the 6.1 Direct In sockets.
Infrared sensor
Receives IR commands from the supplied Azur remote control. A clear
unobstructed line of sight between the remote control and the sensor is
required.
Volume
Use to increase/decrease the level of the sound from the outputs of the
540R v3.
Video 3 input sockets
Allows a video camera recorder/video games console to be connected
and selected by the Video 3 source button.
10
11
12
13
14
15
16
17
18
19
20