CLIFFORD 50x User Manual
Page 21
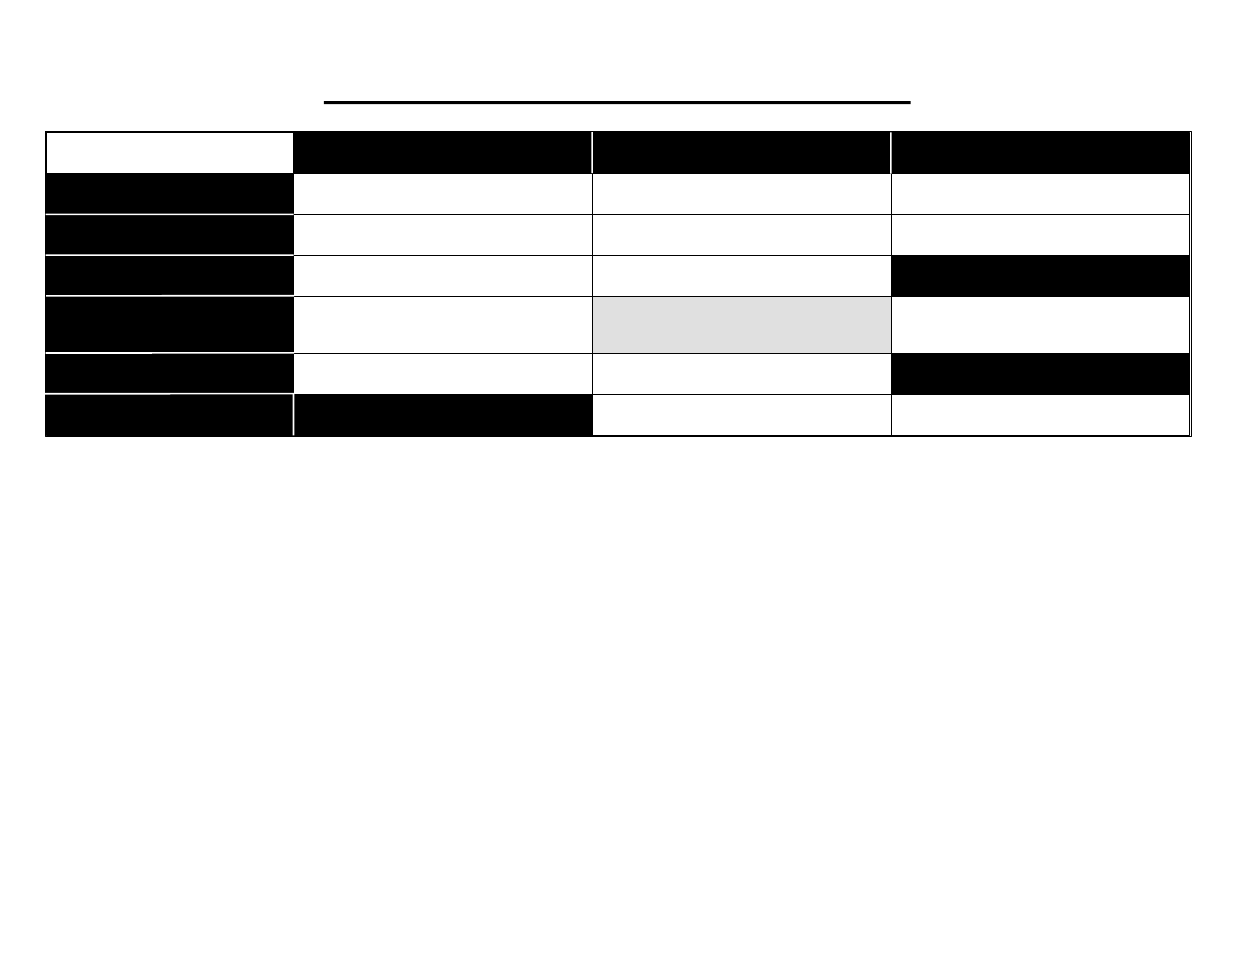
Ta ble of user- selectable fea tures: 1 chirp = OFF, two chirps = ON.
Fea ture Se lect
Col umn 1
1st latched
Col umn 2
2nd latched
Col umn 3
3rd latched
Row 1
1st mo men tary
Add new re mote to chan nel 1
NOTE 1
AutoLock on/off
AutoArming: on/off
Row 2
2nd mo men tary
Add new re mote to chan nel 2
NOTE 2
Aut oUn Lock on/off
AutoArm & Lock: on/off
Row 3
3rd mo men tary
Add new re mote to chan nel 3
NOTE 3
FACT: on/off
NOT USED
Row 4
4th mo men tary
Add new re mote to chan nel 4
NOTE 4
AutoAc ti vate timed chan nel 4 ac ces sory
upon re mote arm ing: on/off
this fea ture is for in stallers only
✱
Set ac ces sory timer du ra tion:
1sec - 2min (30sec)
NOTE 6
Row 5
5th mo men tary
Erase all chan nels
NOTE 5
Qui etChirps: on/off
NOT USED
Row 6
6th mo men tary
NOT USED
Long- term chirp si lenc ing: on/off
Set a new se cret valet code
NOTE 7
✱ WARNING: If you have remote window and sunroof closure, DO NOT CHANGE THIS SETTING: it requires installer-only adjustment. Changing the duration may cause damage.
DO NOT alter the installer-only setting in the grey cell. There is also an installer-only column 5, so if you accidentally select an installer-only feature, turn off the ignition and start again.
n
NOTE 1:
Transmit channel 1 (or other channel of your choosing) of the new
remote control. You will hear one chirp to confirm programming of channel 1.
n
NOTE 2:
Transmit channel 2 (or other channel of your choosing) of the new
remote control. You will hear two chirps to confirm programming of channel 2.
n
NOTE 3:
Transmit channel 3 (or other channel of your choosing) of the new
remote control. You will hear three chirps to confirm programming of channel 3.
n
NOTE 4:
Transmit channel 4 (or other channel of your choosing) of the new
remote control. You will hear four chirps to confirm programming of channel
4.
n
NOTE 5:
When you hear one chirp, all remotes will have been erased from the
system memory. You must now add the new and/or existing remote controls to
the system (i.e., program channels 1–4 of each remote that will be used with
your Concept 50x).
n
NOTE 6:
The accessory timer starts as soon as you select this feature. When the
duration you wish has been reached, press button 1 on the remote control. You
will hear two chirps to confirm the new accessory timer duration.
n
NOTE 7:
Immediately flip the switch to its latched position, then:
a. Enter the new code that you wish to use. The system will sound the same
number of chirps as the digit you choose when you move the switch to the
latched side (e.g., if the first digit is 4, you’ll hear four chirps when you
press the latched side).
b. Make sure to return the switch to its centre position when complete.
c. Wait 3 seconds until you hear 2 chirps, indicating the new code has been
accepted.
d. Turn the ignition off. You’ll hear 3 chirps to confirm program mode exit
and the LED will turn off.
e. VERY IMPORTANT:
You must immediately test your new secret
valet code: Turn the ignition on, enter your new code, then flip the switch
to its latched position. The LED will illuminate. If it does not, the new code
you programmed and the one you just entered do not match. The system
has reverted to the previous code.
19
20
© Copyright Clifford Electronics, Inc., 1997 31-161D/C5xUKOM/198