Assembly of the fuel tank onto the chassis 39, Assembly of the radio tray 40, No.9 – OFNA Racing DM-1 Pro User Manual
Page 20: No.3 no.11
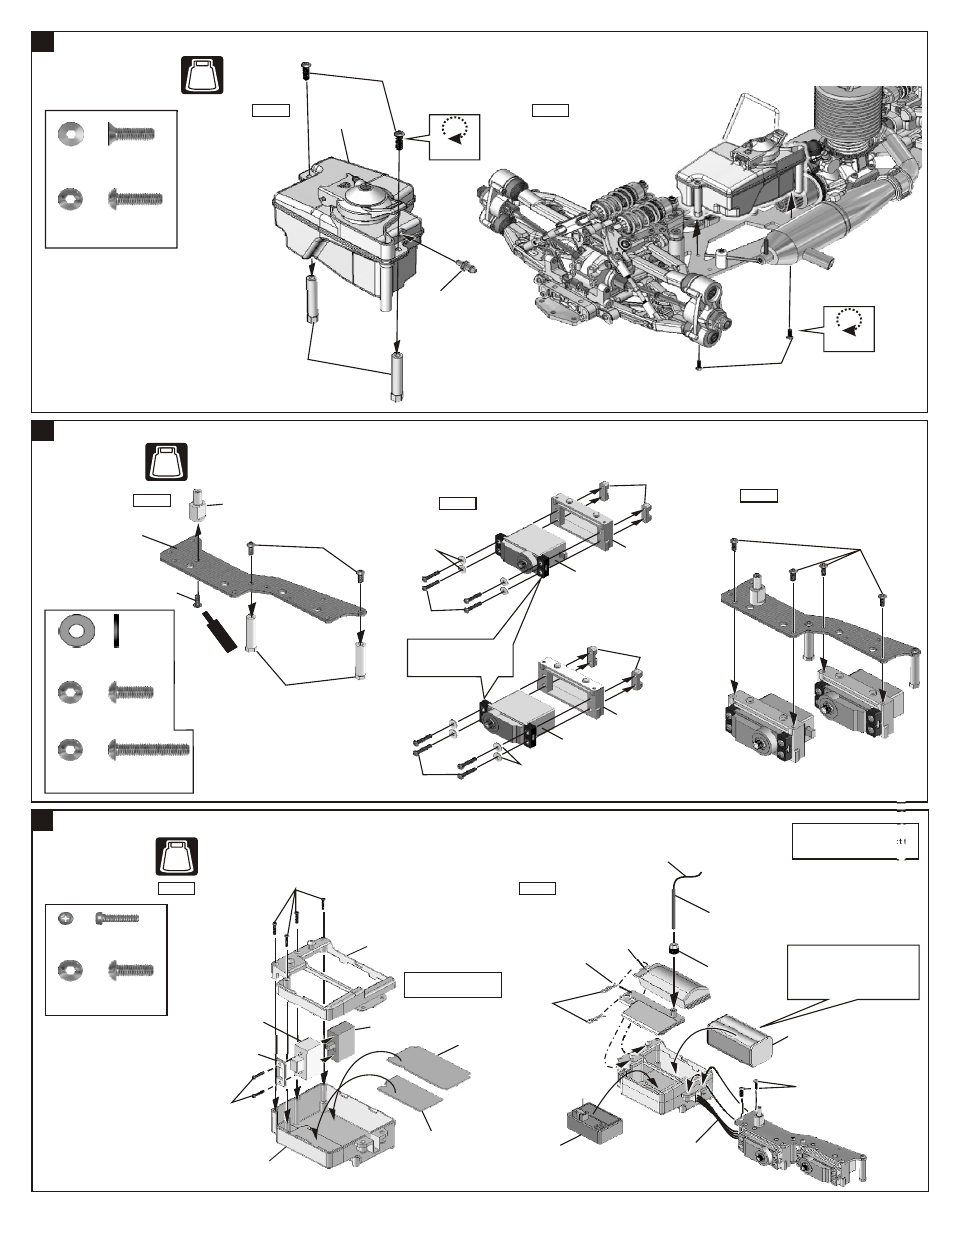
Step 1
ASSEMBLY OF THE FUEL TANK ONTO THE CHASSIS
39
Step 1
Step 2
41
ASSEMBLY OF THE RADIO TRAY AND RECEIVER BOX
14
40
3x10mm
Flat Head Hex
Screw
94003
3x10mm
Hex Screw
.....x2
.....x2
94019
3x10mm
Flat Head
Hex Screw
3x10mm
Hex Screw
40543
Fuel Tank
40539
Fuel Tank
Post
Pressure Nipple
94002
3X8mm
Hex Screw
*Use the screw provided
with your switch
*Connect the switch
wire to receiver.
40541
Switch holder
2X8mm
Screw
.....X4
2X8mm
Screw
10280
Switch Cover
Switch
40541
Receiver Box
40541
Receiver Box
Step 2
40642
Antenna Pipe
Fixing Nut
40541
Receiver Box
Cover
37410
Clips
40541
Receiver Box
Cover
*Put the servo wire into
receiver box and connect to
receiver.
30560
Antenna Pipe
Antenna
3X8mm
Hex Screw
94002
3X8mm
Hex Screw
.....X2
Battery
Receiver
*Use the original battery case
or rechargeable hump pack
battery.
*Connect battery wire to switch.
Put the protector rubber
onto your servo.
Step 1
Step 3
ASSEMBLY OF THE RADIO TRAY
40
.....X7
Step 2
40541
Radio Tray
Post
( Plastic )
3x8mm
Hex Screw
3x8mm
Hex Screw
3x8mm
Hex Screw
34026
Servo Washer
34026
Servo Mount
3x16mm
Hex Screw
.....X8
94040
3x8mm
Washer
40715
Alum. Throttle
Pivot Post
3x8mm
Washer
3x8mm
Washer
.....X8
94005
3x16mm
Hex Screw
BAG
NO.9
BAG
Steering Servo
Throttle Servo
40580
Protective Foam
for Receiver Box
40580
Protective Foam
for Receiver Box
NO.9
BAG
NO.3
NO.11
34026
Servo Washer
34026
Servo Mount
3x16mm
Hex Screw
Servo Wire
S
cr
ew
C
em
t
en
Do Not
Over Tighten
Do Not
Over Tighten
40730
Graphite
Radio Tray