Ho wt od is as se mb le an dc le an : wa rn in g, Cómo desarmar y limpiar, How to disassemble and clean: warning – Continental Electric CE22881 User Manual
Page 9
we
ll
aw
ay
fro
mt
he
bla
de
s.
kn
ife
wil
lc
on
tin
ue
to
op
era
te
.C
utt
in
gm
oti
on
wil
ls
to
pw
he
nt
he
on
/o
ff
bu
tto
n
is
re
le
as
ed
.
ele
ctr
ic
kn
ife
,u
np
lu
gc
ord
fro
mp
ow
er
ou
tle
t.
HO
WT
OD
IS
AS
SE
MB
LE
AN
DC
LE
AN
:
WA
RN
IN
G:
Th
eb
la
de
so
ft
he
un
it
are
sh
arp
!H
an
dle
wit
he
xtr
em
ec
are
.
Alw
ay
su
st
he
pro
te
cti
ve
sle
ev
ep
ro
vid
ed
wh
en
ha
nd
lin
gt
he
bla
de
s.
Do
no
tf
it
or
re
mo
ve
bla
de
sw
hil
st
th
ek
nif
ei
sc
on
ne
cte
dt
ot
he
po
we
ro
utl
et.
Do
no
ta
llo
w
ch
ild
re
nt
oo
pe
ra
te
th
ea
pp
lia
nc
e.
Un
plu
gc
ord
fro
mt
he
po
we
ro
utl
et.
Fir
mly
pre
ss
bla
de
sr
ele
as
eb
utt
on
.G
ra
sp
bla
de
sf
ro
mt
op
du
ll
ed
ge
ne
ar
pla
sti
c
Gu
ard
an
dc
are
fu
lly
pu
ll
un
til
bla
de
sr
ele
as
e.
Ca
re
fu
lly
se
pa
ra
te
bla
de
sb
ys
lid
in
gt
he
ma
pa
rt
to
dis
en
ga
ge
riv
et
fro
mk
ey
ho
le
.
No
wr
em
ov
et
he
pro
te
cti
ve
sle
ev
ef
ro
mt
he
bla
de
s.
3.
In
se
rt
th
ep
lu
gi
nto
a1
20
vo
lt
(A
Co
nly
)p
ow
er
ou
tle
ta
nd
en
su
re
th
ec
ord
is
4.
Ho
ld
in
gt
he
kn
ife
wit
ho
ne
ha
nd
,d
ep
re
ss
th
ed
ou
ble
on
/o
ff
bu
tto
ns
ot
ha
tt
he
5.
To
sto
pb
la
de
sm
ov
em
en
t,
re
le
as
eo
n/
off
bu
tto
n.
Wh
en
fin
is
he
dw
ith
th
e
6.
ON
/ O
FF
1.
2.
3.
3
3. Ahora retire la manga protectora de las cuchillas.
4. Conecte a un tomacorriente de 120V (solamente de corriente AC) ase-
gurándose de que el cordón quede lejos de las cuchillas.
5. Sujetando el cuchillo con una mano, presione el botón de encendido ON/
OFF para ponerlo a funcionar. La operación de cortado se detendrá cuando
se suelte el botón de encendido ON/OFF.
6. Para detener el movimiento de las cuchillas, suelte el botón ON/OFF. Una
vez de terminar de utilizar el cuchillo, proceda a desenchufar.
CÓMO DESARMAR Y LIMPIAR
Advertencia: ¡Las cuchillas son afiladas! Manipúlelas con sumo cuidado.
Siempre utilice la manga protectora para manipular las cuchillas. No coloque
ni retire las cuchillas mientras el aparato se encuentre enchufado. No permita
que los niños utilicen este electrodoméstico.
1. Desenchufe el electrodoméstico.
2. Presione firmemente el botón para soltar las cuchillas. Sujete las cuchillas
del borde romo en la parte cercana al protector de plástico y con cuidado tire
de las cuchillas hasta liberarlas.
3. Con cuidado separe las cuchillas deslizándolas para desencajar el rem-
ache del agujero.
well away from the blades.
knife will continue to operate. Cutting motion will stop when the on / off button
is released.
electric knife, unplug cord from power outlet.
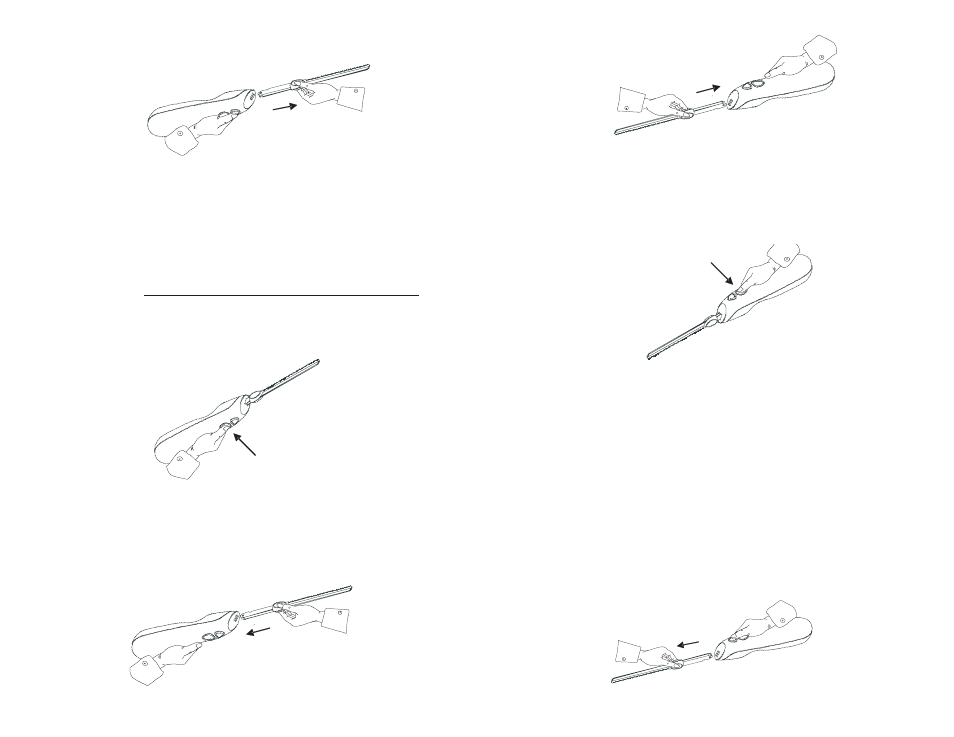
HOW TO DISASSEMBLE AND CLEAN:
WARNING:
The blades of the unit are sharp! Handle with extreme care.
Always us the protective sleeve provided when handling the blades. Do not fit or
remove blades whilst the knife is connected to the power outlet. Do not allow
children to operate the appliance.
Unplug cord from the power outlet.
Firmly press blades release button. Grasp blades from top dull edge near plastic
Guard and carefully pull until blades release.
Carefully separate blades by sliding them apart to disengage rivet from keyhole.
Now remove the protective sleeve from the blades.
3.
Insert the plug into a 120 volt (AC only) power outlet and ensure the cord is
4.
Holding the knife with one hand, depress the double on / off button so that the
5.
To stop blades movement, release on / off button. When finished with the
6.
ON/OFF
1.
2.
3.
3
well away from the blades.
knife will continue to operate. Cutting motion will stop when the on / off button
is released.
electric knife, unplug cord from power outlet.
HOW TO DISASSEMBLE AND CLEAN:
WARNING:
The blades of the unit are sharp! Handle with extreme care.
Always us the protective sleeve provided when handling the blades. Do not fit or
remove blades whilst the knife is connected to the power outlet. Do not allow
children to operate the appliance.
Unplug cord from the power outlet.
Firmly press blades release button. Grasp blades from top dull edge near plastic
Guard and carefully pull until blades release.
Carefully separate blades by sliding them apart to disengage rivet from keyhole.
Now remove the protective sleeve from the blades.
3.
Insert the plug into a 120 volt (AC only) power outlet and ensure the cord is
4.
Holding the knife with one hand, depress the double on / off button so that the
5.
To stop blades movement, release on / off button. When finished with the
6.
ON/OFF
1.
2.
3.
3