Continental Electric CE22881 User Manual
Page 3
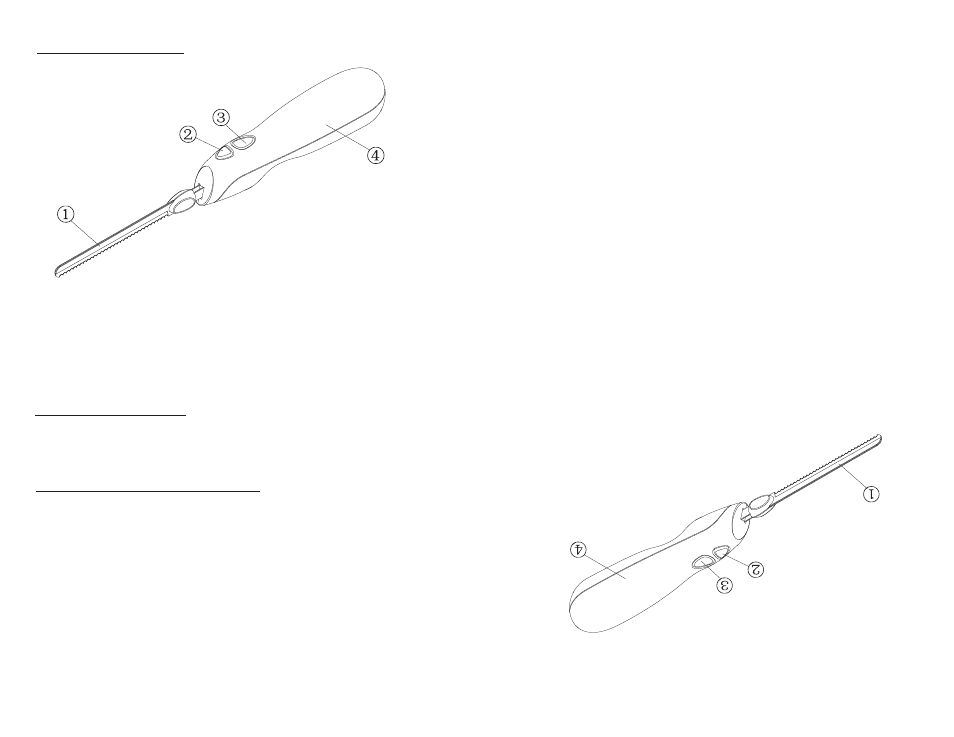
PART IDENTIFICATION:
1. Ground stainless steel blades
2. Blade releasing switch
3. ON/OFF button
4. Handle
WARNING: THIS PRODUCT IS NOT INTENDED FOR
USE BY CHILDREN.
BEFORE FIRST USE:
Wash detached blades in hot, soapy water. Rinse, and then dry thoroughly. Handle
knife blades with care, as they are extremely sharp.
HOW TO ASSEMBLE AND USE:
CAUTION:
Be sure cord is not connected to power outlet when removing or
inserting blades and / or when knife is not in use. The blades are extremely sharp.
Always handle blades by dull edge (side opposite the cutting edge) or by the
protective sleeve.
up blades by the protective sleeve. Slide the rivet on one blade into the keyhole
slot of the other blade until they are locked together.
Always use both blades when operating the knife. If blades are separated, pick
1.
knife, and push into position until a click is heard. It will be found that pushing
the blades by the finger grips will facilitate fitting.
Keep the protective sleeve on the blades, carefully insert the free ends into the
2.
2
no encajara, póngase en contacto con un electricista calificado. No intente
modificar el enchufe de ninguna manera.
IDENTIFICACIÓN DE PARTES
1.
Cuchillas de acero inoxidable
2.
Botón para soltar las cuchillas
3.
Botón de encendido ON/OFF
4.
Mango
ADVERTENCIA: ESTE PRODUCTO NO HA
SIDO DISEÑADO
PARA
SER UTILIZADO POR NIÑOS
ANTES DEL PRIMER USO
Lave las cuchillas en agua caliente jabonosa. Enjuáguelas y luego séquelas
totalmente. Manipule las cuchillas con cuidado ya que son muy afiladas.
CÓMO ARMAR
Y UTILIZAR
Precaución: Asegúrese de que el aparato no se encuentre enchufado al
momento de retirar o colocar las cuchillas y/o cuando el cuchillo no se esté
utilizando. Las cuchillas son muy afiladas. Manipule las cuchillas por el lado
romo (el lado opuesto al borde para cortar) o utilice la manga protectora.
1. Siempre utilice ambas cuchillas al momento de usar el cuchillo. Si las
cuchillas se separaran, manipule las cuchillas utilizando la manga protectora.
Deslice y encaje el remache de una cuchilla dentro del agujero o ranura de la
otra cuchilla hasta que queden bien aseguradas.
2. Mantenga la manga protectora sobre las cuchillas. Con cuidado inserte el
extremo que se encuentra libre dentro del cuchillo. Presione hasta encajar.
Empuje las cuchillas sujetando con los dedos para facilitar su encaje.
PA
RT
ID
EN
TIF
IC
AT
IO
N:
1.
Gro
un
ds
ta
in
le
ss
ste
el
bla
de
s
2.
Bla
de
re
le
as
in
gs
wit
ch
3.
ON
/O
FF
bu
tto
n
4.
Ha
nd
le
WA
RN
IN
G:
TH
IS
PR
OD
UC
TI
SN
OT
IN
TE
ND
ED
FO
R
US
EB
YC
HI
LD
RE
N.
BE
FO
RE
FI
RS
TU
SE
:
Wa
sh
de
ta
ch
ed
bla
de
si
nh
ot,
so
ap
yw
ate
r.
Rin
se
,a
nd
th
en
dry
th
oro
ug
hly
.H
an
dle
kn
ife
bla
de
sw
ith
ca
re
,a
st
he
ya
re
ex
tre
me
ly
sh
arp
.
HO
WT
OA
SS
EM
BL
EA
ND
US
E:
CA
UT
IO
N:
Be
su
re
co
rd
is
no
tc
on
ne
cte
dt
op
ow
er
ou
tle
tw
he
nr
em
ov
in
go
r
in
se
rti
ng
bla
de
sa
nd
/o
rw
he
nk
nif
ei
sn
ot
in
us
e.
Th
eb
la
de
sa
re
ex
tre
me
ly
sh
arp
.
Alw
ay
sh
an
dle
bla
de
sb
yd
ull
ed
ge
(s
id
eo
pp
os
ite
th
ec
utt
in
ge
dg
e)
or
by
th
e
pro
te
cti
ve
sle
ev
e.
up
bla
de
sb
yt
he
pro
te
cti
ve
sle
ev
e.
Sli
de
th
er
iv
et
on
on
eb
la
de
in
to
th
ek
ey
ho
le
slo
to
ft
he
oth
er
bla
de
un
til
th
ey
are
lo
ck
ed
to
ge
th
er.
Alw
ay
su
se
bo
th
bla
de
sw
he
no
pe
ra
tin
gt
he
kn
ife
.I
fb
la
de
sa
re
se
pa
ra
te
d,
pic
k
1.
kn
ife
,a
nd
pu
sh
in
to
po
sit
io
nu
nti
la
cli
ck
is
he
ard
.I
tw
ill
be
fo
un
dt
ha
tp
us
hin
g
th
eb
la
de
sb
yt
he
fin
ge
rg
rip
sw
ill
fa
cil
ita
te
fit
tin
g.
Ke
ep
th
ep
ro
te
cti
ve
sle
ev
eo
nt
he
bla
de
s,
ca
re
fu
lly
in
se
rt
th
ef
re
ee
nd
si
nto
th
e
2.
2