Assembly, Warning – Ryobi 4070333 User Manual
Page 4
4
ASSEMBLY
Fig. 1
WARNING:
The table saw should never be connected to a power
supply when you are assembling or disassembling
parts. Disconnecting the table saw will prevent acci-
dental starting that could cause serious personal
injury.
PREPARING THE ZERO CLEARANCE
THROAT PLATE FOR USE WITH A
STANDARD BLADE
To prepare the zero clearance throat plate for use with
a standard blade, cut an opening for the blade guard,
install the
throat plate, and then make the zero clearance
cut.
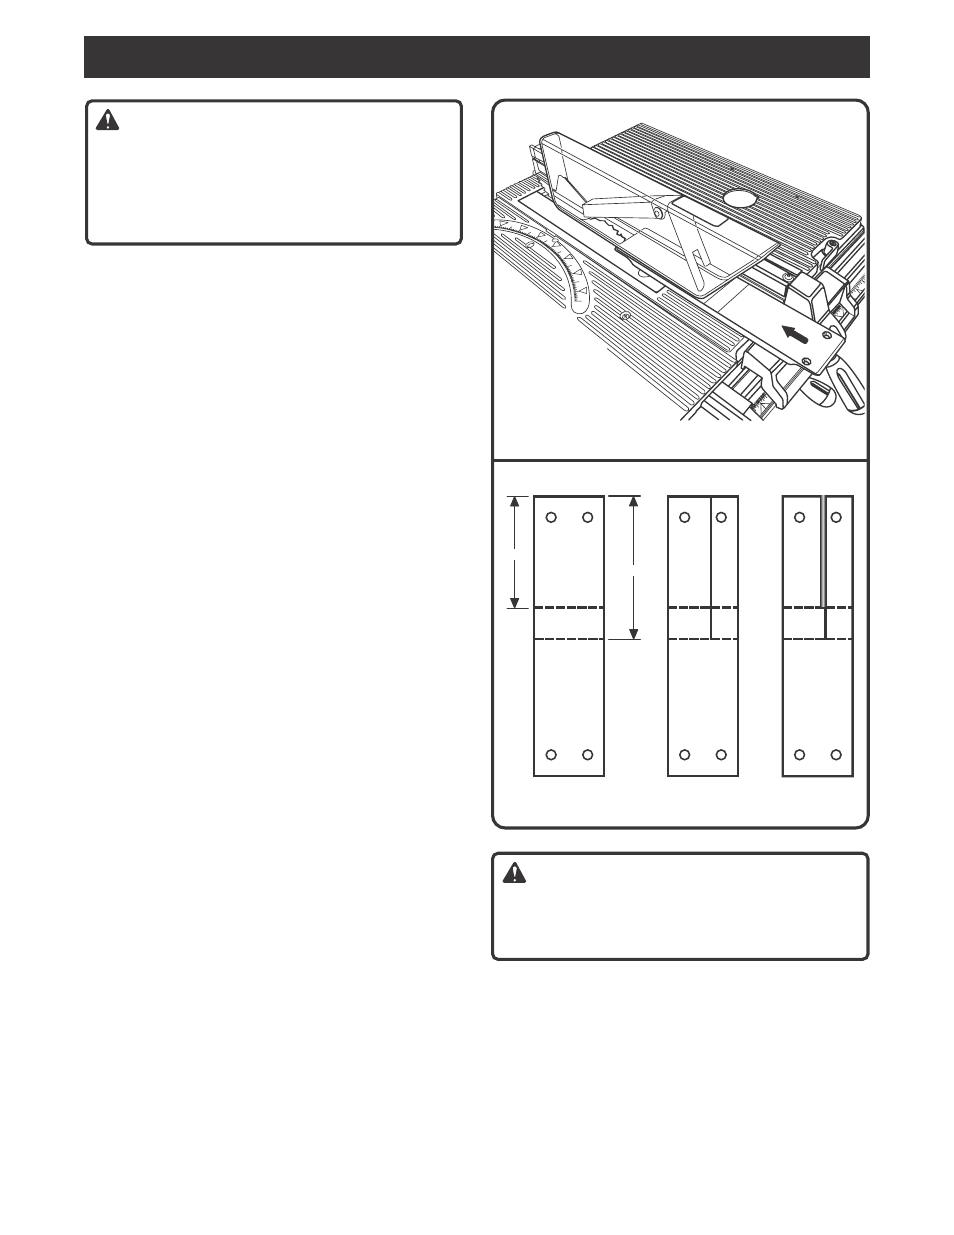
TO CUT AN OPENING FOR THE BLADE GUARD
Figures 1 and 2
Follow these directions to cut an opening for the blade
guard.
■ Set up the original throat plate and properly install
the blade guard assembly on the table saw. Refer to
the table saw operator’s manual.
■ Position the new throat plate on the saw in front of
the blade guard with the crescent-shaped opening to
the right.
■ Measure from the rear of the throat plate, and mark
lines at 6-1/8 in. and 7-1/8 in.
■ Raise the saw blade to a height of 1 in. and position
it to 90° by setting the blade bevel adjustment to 0°.
■ Adjust the rip fence to the right edge of the original
throat plate and lock it firmly in place.
■ Assure the riving knife portion of the blade guard
assembly is aligned directly with the blade.
■ Plug the saw into a power source.
■ Insert the key plate and start the saw.
■ Guide the new throat plate along the left edge of the
rip fence.
■ Make a rip cut from the rear to the mark at 7-1/8 in.
■ Turn the saw off and allow the blade to fully stop
before removing the throat plate from the front.
■ Adjust the rip fence 5/8 in. to the right edge of the
original throat plate and firmly lock in place.
■ Release the blade tilt lock lever and adjust the saw
to a 22-1/2°
bevel.
■ Lock the blade tilt lever.
■ Start the saw.
■ Guide the throat plate again along the left edge of
rip fence.
■ Make a bevel rip cut from the rear to the mark at
6-1/8 in.
WARNING:
Keep hands away from rotating blade during cut.
Failure to heed this warning could result in serious
personal injury.
■ Turn the saw off and allow the blade to fully stop
before removing the throat plate from the front.
■ Remove any remaining material that may still be
attached between the two cuts.
Fig. 2
6 1/8"
7 1/8"