Step 2, Step 3, Install wall transmitter – Petsafe Innotek Contain ‘n’ Train In-Ground Fence User Manual
Page 4
7
6
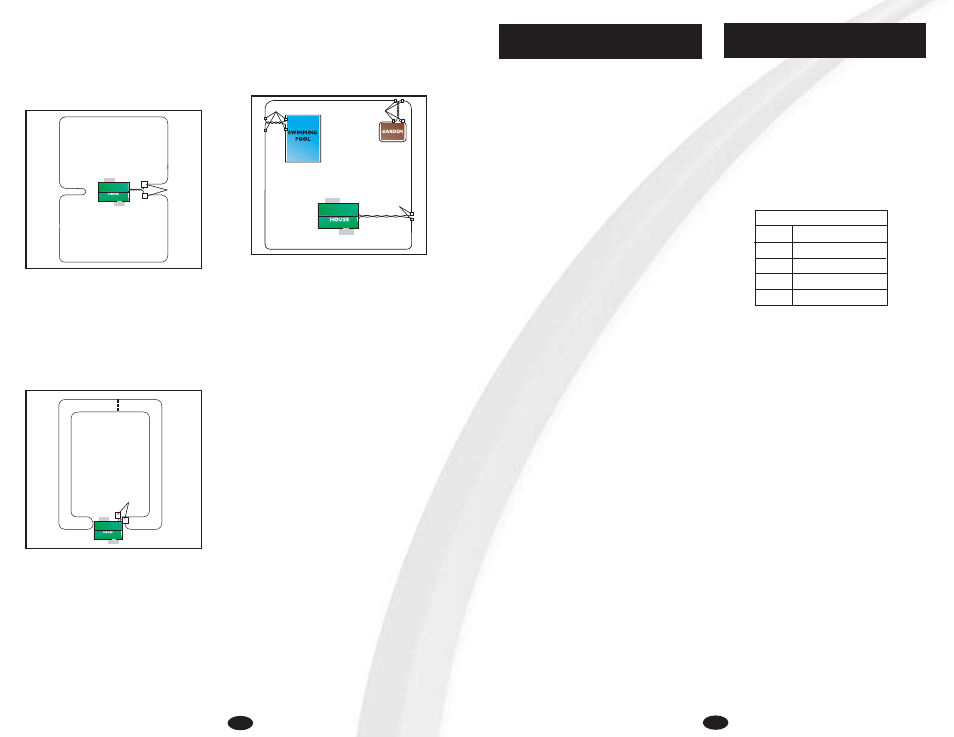
Hourglass Loop
Allows your dog to be contained in either the front or back
yard but not around the side of the house. When the wire
runs parallel to itself, as it goes toward the side of the
house, be sure the wires don’t come within 6’ feet of one
another to avoid canceling the signal.
Double Loop
Confines your dog to the backyard only. The wire needs to
run around the backyard, using the house as a natural bar-
rier and doubling back to the transmitter to finish the com-
plete loop. When doubling back, make sure that there is at
least 6’ between the lines to avoid canceling the signal.
Customized Loops
You can create off limit areas, such as pools and gardens
by encircling the area with wire. Run twisted wire from the
fence loop to the encircled area and splice the ends
together.
1. Select a Location
Select an indoor, dry location to hang the wall-mount
transmitter. You will need a standard 110v grounded
outlet within 5 feet for power. Most people find the
inside of a exterior wall of a garage or basement works
well. You will need easy access to run the containment
wire outside.
2. Hang transmitter on wall
Using the screw holes on the side of the transmitter as
a template, mark location of holes with a pencil. Make
sure the transmitter hangs straight and install using
supplied screws.
3. Provide for wire access to outside
You will need to get the wire from the transmitter to
outside where the containment loop will run. This can
be done through a window or you can drill a 1/4” hole
at the base of the wall to pass the wire through. After
final installation and testing is complete you can caulk
the hole to prevent water and insects from entering.
With the transmitter installed and the hole drilled for the
wire, you can position the boundary wire that will form
your fence. DO NOT bury the wire until you are sure that
the system is running properly.
1. Amount of wire.
Your system includes 500 feet of boundary wire. The
SD-2050 includes 100 feet of pre-twisted wire. For larger
areas, boundary kits with wire and splices, as well as
convenient pre-twisted wire are available from your retail-
er or call at 1-800-826-5527. Here are some examples of
wire coverage area:
2. Placing the wire
The wire must make a continuous loop from the transmit-
ter and back again. The signal is transmitted from one ter-
minal at the transmitter around the loop and back to the
transmitter again. Keep in the mind that you will want an
8’ - 12’ containment signal field from you wire, so don’t
run the wire too close to the house and make passage-
ways too narrow for your dog to pass.
3. Twisted Wire
Twisted wire cancels the radio signal coming from your
transmitter. This enables proper installation and your dog
can cross over the wire in the safe part of the yard. Where
there is single wire, the fence is active and your dog will be
unable to pass. Your kit may have come with FasTrak pre-
twisted wire or you can purchase it as a separate kit by
calling 1-800-826-5527. You can twist your own wire by
cutting two equal lengths of wire supplied and twisting
them together. Anchor one end of the wires to something
secure and insert the other end in a drill. Pull wire taught.
The drill enables you to twist the wire quickly. You will need
at least 12 twists per foot to effectively cancel the radio
signal.
.
4. Rounding Corners
Use gradual turns at the corners with a minimum of
2.5 foot radius. This will produce a more consistent
containment field.
Hourglass Design
Customized Design
Double Loop
splice
6 ft.
splices
splices
splices
Step 2
Install wall Transmitter
splice
Step 3
Layout fence wire
Acres
Linear Feet Needed
1
850
2
1200
3
1500
4
1700
5
1900