Gastroback 46007 Design Vacuum Sealer Plus User Manual
Page 7
33
32
3.
Place the open end of the bag in the middle of the sealing
gasket. If you wish to generate a vacuum, the bag must reach
into the vacuum chamber (picture f).
TiP: Ensure that no food particles, liquids, or grease are in
the sealing section of the bag. Otherwise the seam could be
leaking.
4.
Close the lid and press the lid down at the marked lines (pic-
ture g). Ensure that the lid is securely locked and the lock has
engaged (you will hear a clicking sound when the lid snaps
shut). The appliance is now ready for use.
5.
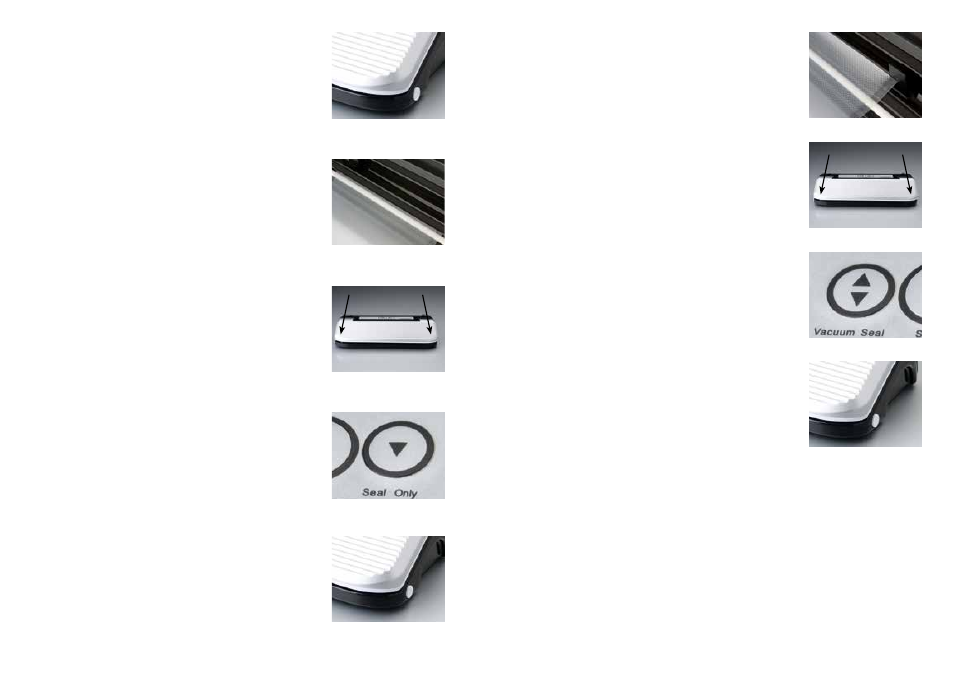
Press the Vacuum Seal button (picture H). The vacuum pump
indicator illuminates in green. The vacuum pump is audibly
working and the foil clings to the content of the bag. As soon
as the vacuum procedure is finished the sealing indicator illu-
minates in red. The complete process is finished as soon as
both indicators switch off.
6.
Press the lock release buttons on either side of the appliance
to open the lid and take out the bag (picture i).
imPorTanT: The sealing band could get hot after repeated
sealing processes. Do not touch the sealing band with any parts
of your body or heat-sensitive items immediately after sealing.
7.
Check if the seam is even and smooth. The bag is sealed pro-
perly, if there is a smooth line with no interruption and crease
on the seam. If in doubt, just place another seal near the first
one. For this, use the Seal Only button.
noTe: If the desired vacuum is not reached, the vacuum system
will shut down automatically after 30 seconds without entering
the sealing process. In this case, check whether the bag has a
leak, or the bag was not placed properly. The appliance is not
intended for continuous operation. Please wait for approximate-
ly 30 seconds with the lid open, before starting a new sealing
process.
8.
If there are any liquids (e.g. condensate) or parts of the food in the dripping tray, clean
the dripping tray, before starting the vacuum pump again. For this, you can take out the
dripping tray.
9.
Unplug the appliance, when you have finished operating.
How to Vacuum seal a container
Suitable vacuum containers are available on the market.
warning:
Only use special containers suited for vacuum packing. Always check the
container carefully for any damage (cracks or scratches) before vacuum sealing. Damaged
or unsuitable container (glass or plastic) cannot resist the pressure and could implode,
causing severe injuries. Do not consume any food that has been in a damaged container.
Splinters in the food could cause severe injuries.
2.
Get the appliance ready for use as described in ›Getting the
Appliance Ready for Use‹. Press the lock release buttons on
both sides of the appliance to open the lid (picture a).
3.
Ensure the gaskets (foam rubber seal, sealing gasket) are
clean and no foreign substances stick on the sealing band.
Ensure that the dripping tray is inserted properly.
4.
Place one open end of the foil on the white sealing gasket
(picture B). The end of the foil does not need to extend over
the black foam rubber seal into the vacuum chamber, because
there is no need to operate the vacuum pump for sealing the
bottom of the bag.
noTe: To get an air-tight seam, the foil must be completely
clean and dry, and lay smooth and unlined on the sealing
gasket.
5.
Close the lid and press the lid down on the marked lines (pic-
ture c). Ensure that the lid is securely locked and the lock has
engaged at both sides (you will hear a clicking sound when
the lid snaps shut). The appliance is now ready for use.
6.
Press the Seal Only button (picture D). The appliance starts
to operate, and the red sealing indicator illuminates. If the
bottom of the bag is sealed the indicator switches off.
TiP: If the sealing indicator does not lit after pressing the Seal
Only button, check whether the lid is closed properly.
7.
Press the lock release buttons on both sides of the appliance
to open the lid (picture e) and take out the foil.
imPorTanT: The sealing band could get hot after repeated
sealing processes. Do not touch the sealing band with an parts
of your body or heat-sensitive items immediately after sealing.
8.
Check if the seam is even and smooth. The bottom of the bag
is sealed properly, if there is a smooth line with no interruption
and crease on the seam. If in doubt, just place another seal
near the first one.
How to Vacuum-Pack in a Plastic Bag/foil
1.
After sealing the bottom of the bag and ensuring that the seam
is air-tight, you can fill the bag. For this, observe the hints and
tips, given in section ›Tipps for Best Results‹.
TiP: Do not overload the plastic bag. Leave approximately 8
cm of free space above the food. Otherwise the appliance can-
not generate a vacuum. Pre-freeze moist food before vacuum
packing. This way no liquids can get sucked into the appliance
and the food will not get squashed.
2.
Check the proper installation of the dripping tray. The brim of
the dripping tray may not protrude the foam rubber seal of the
vacuum chamber.
picture A
picture B
picture D
picture E
picture C
picture F
picture G
picture I
picture H