Disassembling, Care and cleaning – Gastroback 41401 Mincer User Manual
Page 6
Disassembling
WARNING: To avoid injury and damages of the appliance turn the appliance OFF
and then wait for approx. 6 seconds to be certain that the motor is no longer
running. Always pull the plug before you start disassembling or cleaning
the appliance.
1. Switch off the mincer and disconnect the power supply cable
from the mains. Check that the motor has completely stopped.
2. Detach the mincer head from the motor block.
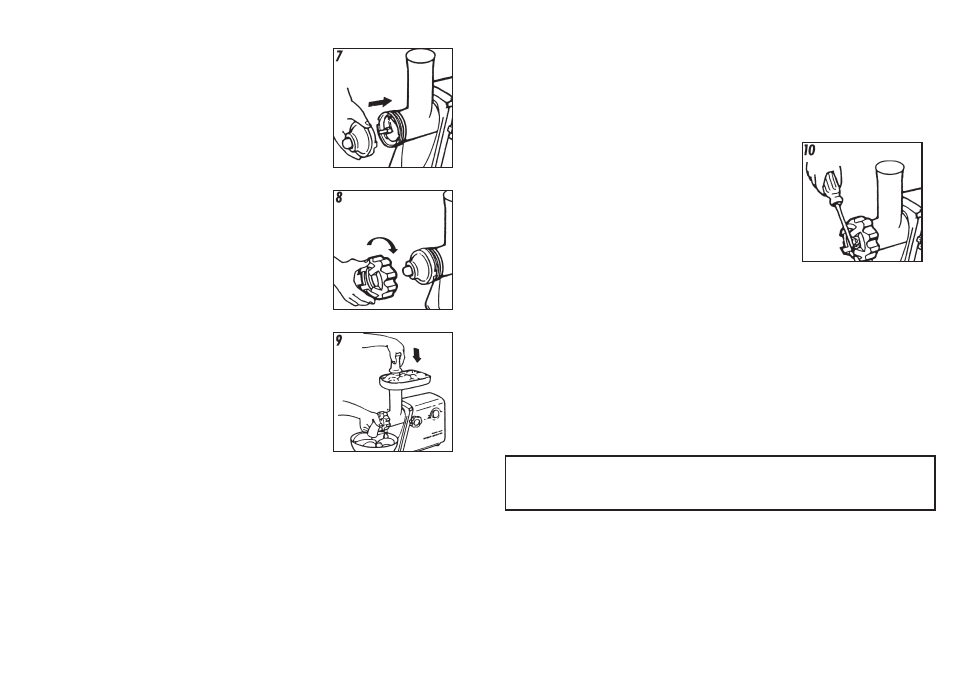
3. Unscrew the closing ring turning it counterclockwise.
TIP: If the closing ring is screwed on to tight you can use a
screwdriver as shown in the picture 10.
4. Remove the mincer plate. If necessary insert a knife or screw-
driver between the mincer plate and the mincer head to pry out the mincer plate.
5. Remove the crossed-blade knife and pull out the worm or if you used the chopper attachment
remove them.
TIP: If the tools are stucked knock the mincer carefully on a stable cutting board. The mincer
plate should be facing up.
ATTENTION: Be careful not to damage your bench top, the cutting board or the mincer.
6. Remove meat residues.
Operate as described:
ATTENTION: Never put the appliance or parts of the appliance
in the dishwasher or use abrasives for cleaning! This will cause
discoloration and corrosion.
7. Wash all parts thoroughly in hot soapy water. Do not use aggressive detergents. The parts
are not suitable for dishwasher. Soak parts with desiccated food leftovers a few minutes in
warm soapy water and use a nylon cleaning brush or cleaning sponge for cleaning. Rinse
all parts with running water and dry them accurately.
WARNING: Ensure that the switch and cable do not come into contact with water!
Should this inadvertently happen, all parts must be completely dry before the appliance is used
again. Never let water or other liquids run into the motorblock. Never clean the line cord
or the appliance in the dishwasher, poor liquids over the appliance or douse or dip it in water
or other liquids. In case that water or other liquids ran into the appliance while operating turn
IMPORTANT: Never assemble the appliance with the
chopper attachment AND the crossed-blade knife with the
mincer plate
a. Assemble the mincer head in the opening of the drive shaft.
Place the worm inside the mincer head (operate according to
the instructions ´Assembling` the appliance. see fig. 1 and 2).
b. Place the chopper attachment A on the axis of the worm.
The slim end has to face the front (see fig. 7). Turn the chopper
attachment a little bit while pushing it into the mincer head.
c. Place the chopper attachment B on top of the chopper
attachment A. The wide opening of the chopper attachment B
should be facing the chopper attachment A. The chopper
attachment B has a gap on the outside edge which should slide
over the guiding pin on the inside of the mincer head (see fig. 8).
d. Attach the closing ring to the mincer head and screw it on
tight with your hands.
5. Process the wrapping mixture in the mincer with the attached
chopper attachments (see fig. 9). The finished product will be one
long wrapping. Cut the wrapping into convenient seize.
6. Freeze the wrapping shortly.
7. Fill the wrapping with the filling mixture.
8. Fry the wraps with some olive oil until it has the favored
browning.
Care and cleaning
WARNING: Never hold your face or other body parts over the feed funnel when the motor
is running because little pieces of food could be thrown out of the feed funnel. Never put
foreign substance or hard objects into the feed funnel.
Before the mincer is used for the first time, all parts – with the exception of the motor block –
must be thoroughly cleaned in warm soapy water.
11
10