Dual tone configuration – Code 3 Banshee User Manual
Page 4
4
Dual Tone Configuration
The Dual Tone feature can be used with a Z3 Siren system or with most industry standard siren systems. If the primary siren is generating a tone,
the Banshee can generate an unsynchronized secondary tone. When used with a Z3, the Dual Tone feature will be activated automatically. When
used as a Universal Dual Tone, the Dual Tone input must be activated to turn on this feature. There is a 1 second delay when the Dual Tone feature
is activated. This allows the user to hear that the primary siren is operating properly, then to hear the Banshee turn on the Dual Tone. If the primary
stops generating a tone, the Banshee will immediately stop generating a tone and reset the 1 second delay. See the appropriate sections for
configuring the Banshee Dual Tone operation.
Z3 Dual Tone Operation - The Banshee can be connected with a CAT5 Cable to the AMP-2 port on the Z3 or to any port on the Z3 HUB. The Dual
Tone input does not need to be connected when the Banshee is used with a Z3. The Dual Tone feature will operate automatically when one of the
three siren tone buttons on the Z3 Control Head are active (WAIL, YELP, ALT TONE) and the Z3 is generating a tone. The Banshee can generate
one of eight tones for each of the three Z3 Control Head tone buttons. This allows the Banshee to generate a different tone for each Z3 Control
Head tone button. See the appropriate section to configure for the WAIL, YELP or ALT TONE buttons.
The available tones for each Z3 Control Head tone buttons are:
- Wail.
- Yelp.
- Hyper-Yelp 1.
- Hyper-Yelp 2.
- Hi-Lo 1.
- Hi-Lo 2.
- Hyper-Lo 1.
- Hyper-Lo 2.
Note: see Specifications for details of each tone.
Z3 Dual Tone Operation (WAIL)
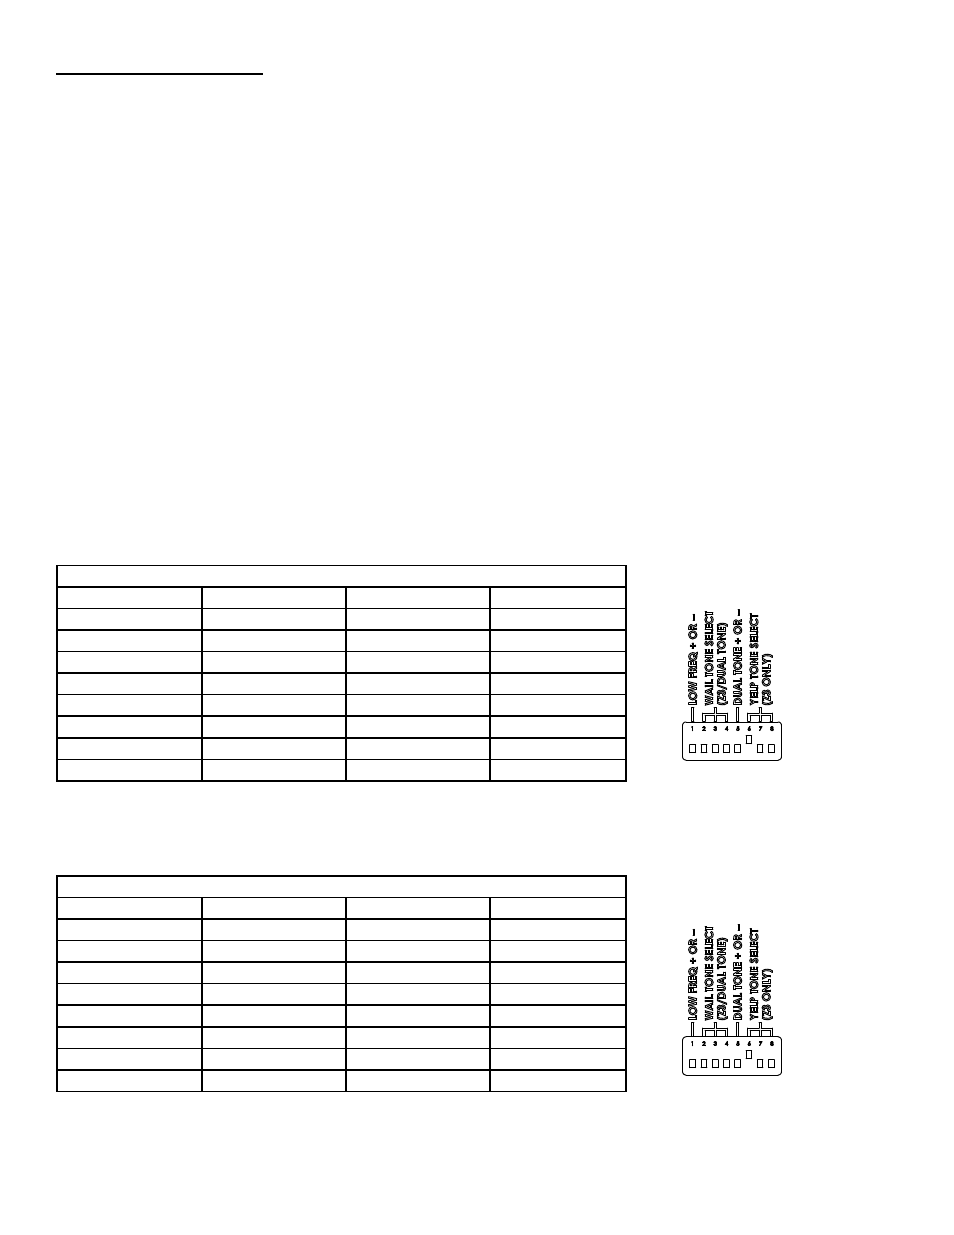
To configure the Dual Tone for the Z3 Control Head WAIL button, set the DIP switches according to Table 3 (reference Figure 2).
Table 3: Z3 Dual Tone WAIL Configuration
Switch Position 2
Switch Position 3
Switch Position 4
Configuration
Down
Down
Down
*Wail
Up
Down
Down
Yelp
Down
Up
Down
Hyper-Yelp 1
Up
Up
Down
Hyper-Yelp 2
Down
Down
Up
Hi-Lo 1
Up
Down
Up
Hi-Lo 2
Down
Up
Up
Hyper-Lo 1
Up
Up
Up
Hyper-Lo 2
*Factory Default Setting.
Z3 Dual Tone Operation (YELP)
To configure the Dual Tone for the Z3 Control Head YELP button, set the DIP switches according to Table 4 (reference Figure 3).
Table 4: Z3 Dual Tone YELP Configuration
Switch Position 6
Switch Position 7
Switch Position 8
Configuration
Down
Down
Down
Wail
Up
Down
Down
*Yelp
Down
Up
Down
Hyper-Yelp 1
Up
Up
Down
Hyper-Yelp 2
Down
Down
Up
Hi-Lo 1
Up
Down
Up
Hi-Lo 2
Down
Up
Up
Hyper-Lo 1
Up
Up
Up
Hyper-Lo 2
*Factory Default Setting.
Figure 2
Figure 3