Craftsman 486.248531 User Manual
Page 13
Attention! The text in this document has been recognized automatically. To view the original document, you can use the "Original mode".
ATTACHING WEIGHT TRAY TO TRACTOR
•
Loosen the top hex bolt on each side of the tractor
frame at the rear. Assemble the slotted end of the
side braces down onto the loosened bolts. Do not
tighten yet. See figure 25.
• Place the weight tray on top of the tractor hitch and
fasten the side braces to it using two 5/16" x 1"
carriage bolts, 5/16" lock washers and 5/16" hex
nuts. Do not tighten yet. See figure 25.
• Fasten the weight tray to the tractor hitch using a
1/2" X 1-1/4" hex bolt, a 1/2" lock washer and a 1/2"
hex nut. Do not tighten yet. See figure 25.
• Fasten the cross brace to the side braces using
two 5/16" X 1" carriage bolts, 5/16" lock washers
and 5/16" hex nuts. See figure 25. Tighten all
loose bolts at this time.
NOTE: Tire chains on extra wide tires may rub the hex
bolt. See the alternate instructions on this page.
• Place the plastic keg on the weight tray and fill with
approximately 75 lbs. of dry sand.
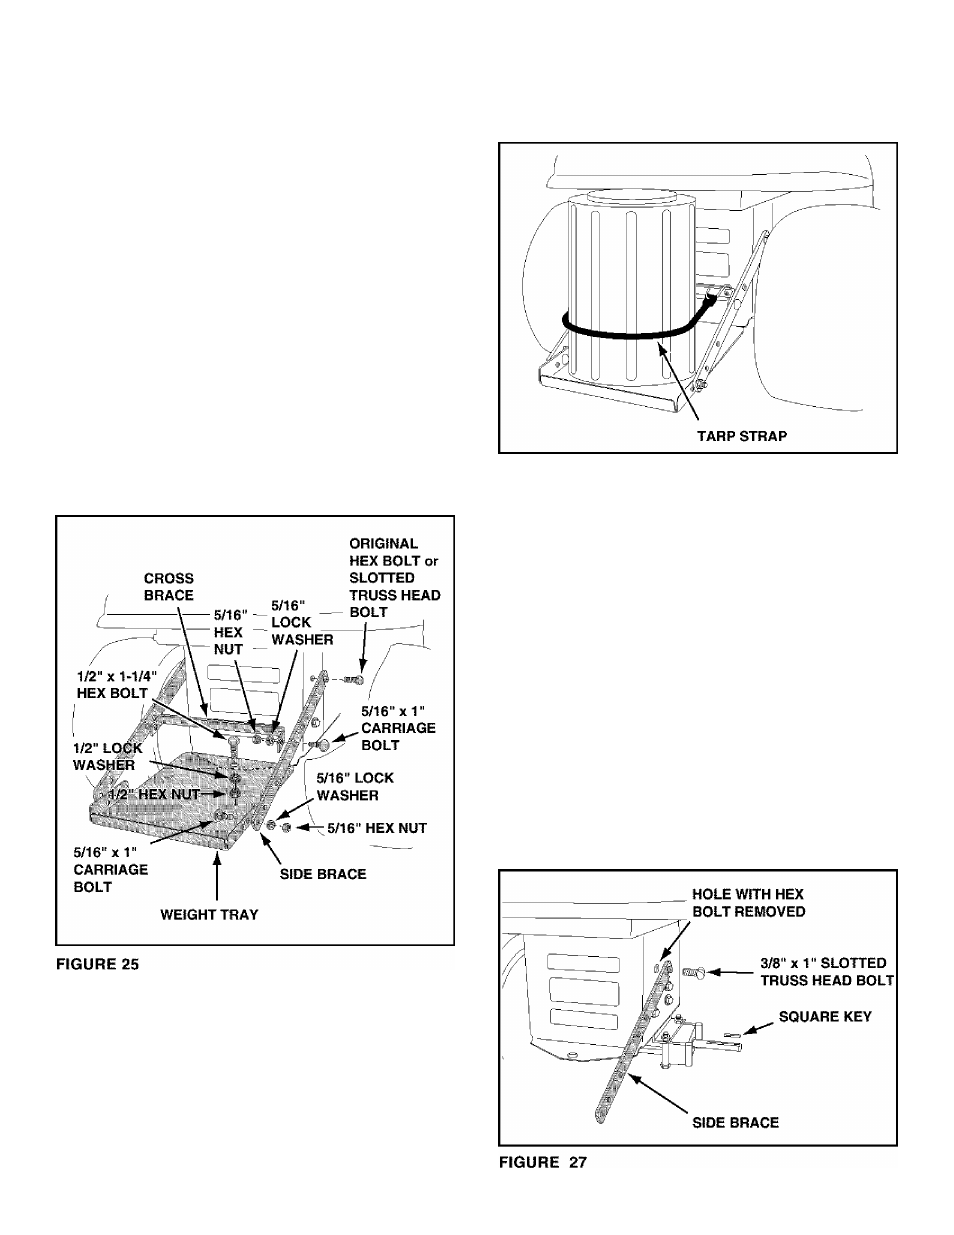
• Secure the keg with the rubber tarp strap hooked
into the holes in the cross brace. See figure 26.
FIGURE 26
ALTERNATE INSTRUCTIONS IF TIRE CHAINS
RUB AGAINST HEX BOLT
• Block up the rear of the tractor to allow removal of
rear wheels.
•
Remove the rear wheels from the axle, retaining
the square key and all other parts for reassembly.
•
Remove the hex bolt from the top hole in the side
of the tractor frame as shown in figure 27.
•
Assemble the notched end of each side brace to
the top hole in the each side of the tractor frame,
using the provided 3/8-16 x 1" slotted truss head
bolts. See figure 27.
•
Reassemble the wheels onto the axle, making sure
to reassemble the square keys and all other parts
which were removed.
• Assemble the weight tray to the side braces as
instructed in figure 25 on this page.
13