Identity code – Crestron electronic CNAMPX-2X60 User Manual
Page 13
Crestron CNAMPX-2X60
2 Channel Professional Audio Amplifier
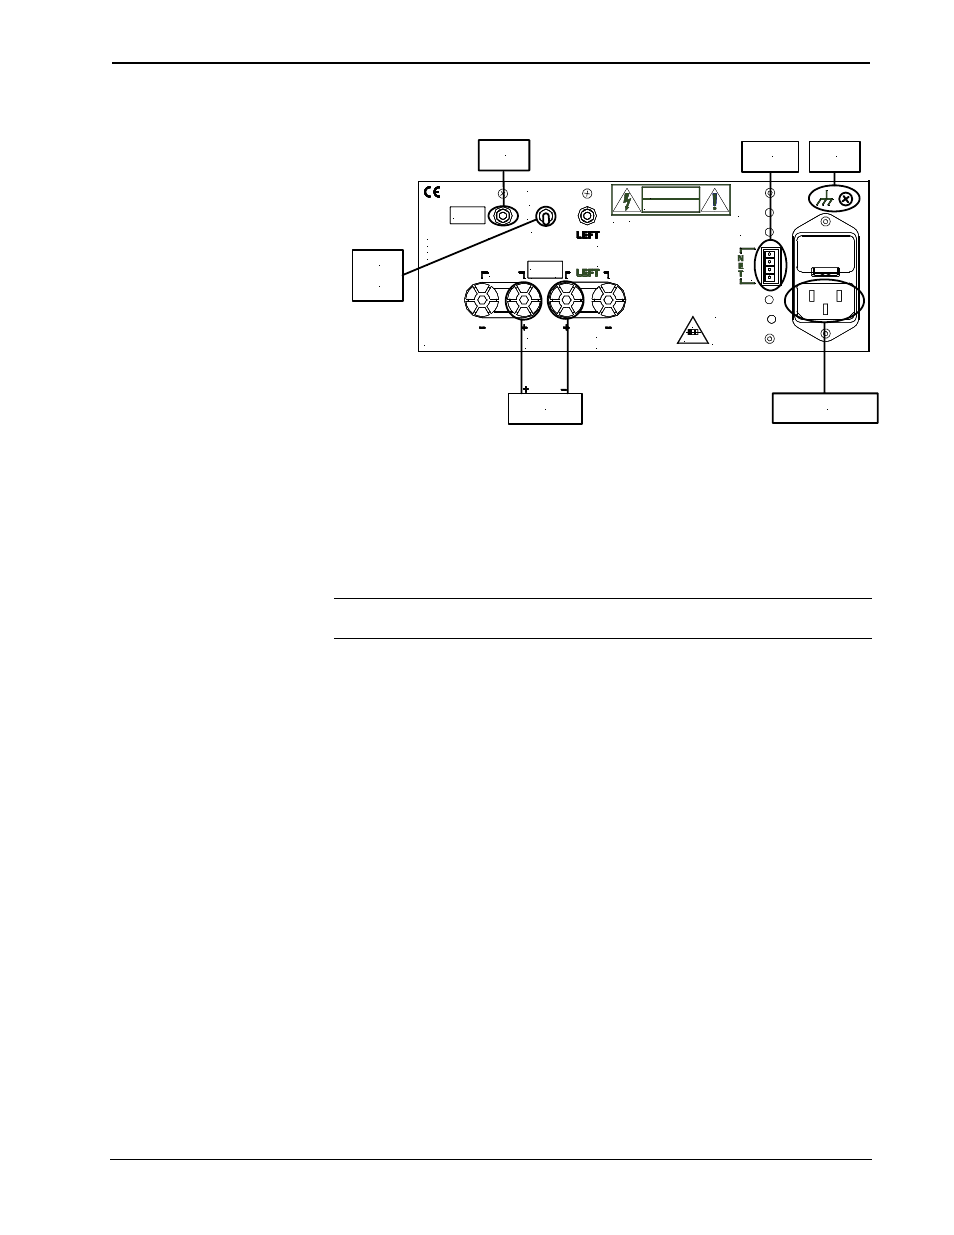
Hookup Connections for the CNAMPX-2X60 in Bridged Mode
INPUTS
SUMMING
S T
BRIDGED
RIGHT
BRIDGED
ATTENTION:
POUR LA PROTECTION CONTRE LES RISQUES
BRIDGED
+
–
D'INCENDIES N'UTILISEZ SEULEMENT LE MÊMES TYPE DE
FUSIBLE. DÉBRANCHEZ LE CÂBLE D'ALIMENTATION
AVANT DE CHANGER LE FUSIBLE.
RISQUE DE CHOC ELECTRIQUE NEPAS OUVRIR
AVIS:
RISK OF ELECTRIC SHOCK
DO NOT OPEN
CAUTION
PWR
NET
CAUTION:
FOR CONTINUED PROTECTION AGAINST FIRE
HAZARD USE ONLY SAME TYPE AND RATING FUSE.
DISCONNECT SUPPLY CORD BEFORE CHANGING FUSE.
24
Y
Z
G
OVERRIDE/
SETUP
F
8A 125V
120V~60Hz
960 WATTS MAX
MADE IN THE USA
DATE:
4 - 8 OHM
OUTPUTS
CRESTRON
RIGHT
FROM AC OUTLET
OR POWER STRIP
AUDIO
SOURCE
AUDIO
SOURCE
GND(S)
CONTROL
SYSTEM
MODE
SWITCH
SET TO
BRIDGED
SPEAKER
Identity Code
Every equipment and user interface within the Cresnet system requires a unique NET
ID. These codes are recognized by a two-digit hexadecimal number from 03 to FE.
The NET ID of the unit must match an ID code specified in the SIMPL Windows
program. The NET ID of the CNAMPX-
2X60
is factory set to 3F. The NET IDs of
multiple CNAMPX-
2X60
must all be unique and changed from a personal computer
(PC) via SIMPL Windows or VisionTools™ Pro-e (VT Pro-e).
NOTE: VT Pro-e is a Windows compatible software package for creating Crestron
touchpanel screen designs.
The method for changing the unit’s NET ID is identical regardless of the software
chosen. Complete the following steps to change the NET ID.
1. Attach only one of the CNAMPX-
2X60
s to the control system (verify
that the software is running).
2. From the SIMPL Windows or VT Pro-e menu, select Tools | Viewport
to open the Crestron Viewport.
3. From the Viewport menu, select Functions | Set Network ID. The
software checks the baud rate and then opens the “Set Network ID”
dialog box.
4. In the “Set Network ID” dialog box, select the CNAMPX-
2X60
from
the Current Network Devices text window.
5. From
the
Choose the new network ID for the selected device (Hex): text
box, select the new Net ID for the CNAMPX-
2X60
.
6. Click
Set ID to initiate the change. This will display the “ID command
has been sent” dialog box.
7. In the “Command Complete” dialog box, click OK.
8. In
the
Current Network Devices text window, verify the new NET ID
code.
9. In the “Set Network ID” dialog box, click Close.
Operations Guide – DOC. 8178
2 Channel Professional Audio Amplifier: CNAMPX-2X60
• 9