Culligan US-550 User Manual
Page 2
Installation
NOTE:
• For standard under-sink installation on 3/8-inch (10 mm) cold water line (copper or PVC
pipe).
• Please read all instructions, specifications, and precautions before installing and using your
water filter.
• Install filter cartridge in housing before proceeding with installation (see Filter Cartridge
Replacement on page 3).
• Numbered diagrams correspond with numbered steps.
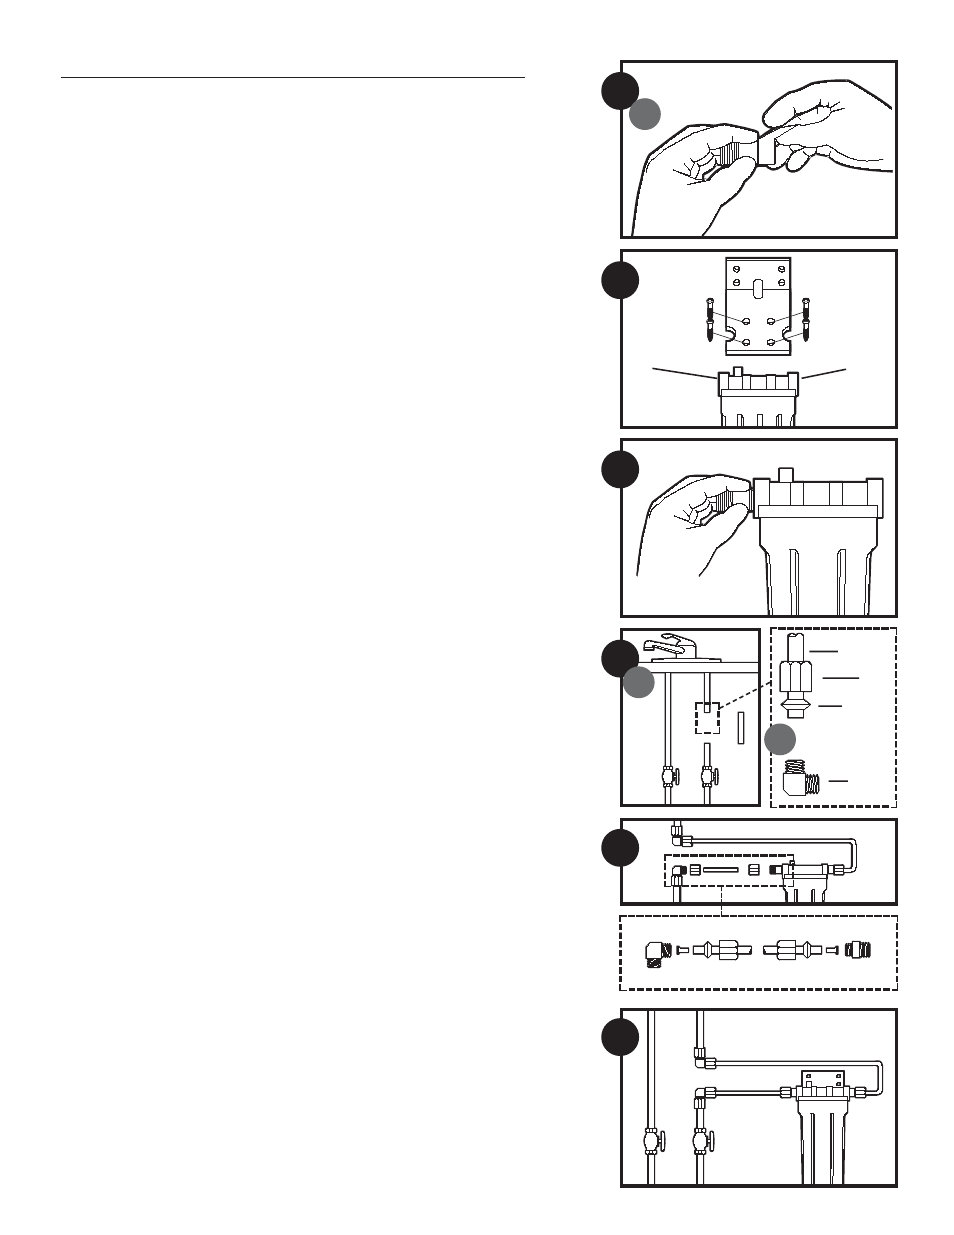
1. Prepare Area and Adapters
(A) Turn off cold water supply and open nearest faucet to release pressure in pipes before
starting installation. Place a tray or towel under the cold water line to catch excess water.
(B) Apply about 3–4 inches (76–102 mm) of Teflon
®
tape in clockwise direction to pipe
threads of each adapter.
2. Attach Mounting Bracket
Using the self-tapping screws, attach mounting bracket to cap, then mark location under
sink where filter is to be mounted.
NOTE: Allow 1-1/2 inches (33 mm) under filter to enable filter cartridge changes.
3. Attach Pipe Adapters to Filter Cap
Start connector into inlet on filter cap by hand. Using an adjustable wrench, tighten con-
nector firmly. DO NOT OVERTIGHTEN. About one thread should remain visible. Repeat
for outlet on filter cap.
Mount filter in marked location with mounting bracket.
4. Attach to Cold Water Line
(A) Using a pipe cutter or hacksaw, remove a 3-inch (76 mm) section of pipe from the cold
water line. Deburr ends of remaining pipe with a file.
(B) Disassemble nuts and ferrules from compression elbows. Install a compression elbow onto
each end of remaining cold water line as shown. Using two wrenches, tighten compression
nuts firmly.
NOTE: Use metal ferrules with copper pipe and plastic ferrules with plastic pipe.
5. Installing the Tubing
Determine the lengths of tubing needed to connect the inlet and outlet sides of filter to the
compression elbows on the cold water line. Measure tubing short enough to prevent
kinking. Assemble as shown. Using two wrenches, tighten compression nuts 1–2 turns.
6. Completing the Installation
Turn on the water supply to allow filter to slowly fill with water and then press the red
pressure-relief button on top of the housing to release trapped air. Check for leaks and
tighten as needed.
NOTE: A drinking water cartridge may contain carbon fines (very fine black powder). After
installation, flush the cartridge for 5 minutes before using the water.
It is recommended that you run the tap at least 20 seconds prior to using the water for
drinking or cooking purposes.
2
1
4
5
6
3
2
IN
OUT
3”
cold water line
nut
ferrule
elbow
B
B
A