The hiking kit, Danger – Chariot Carriers CX 1 User Manual
Page 41
41
8. The Hiking Kit
Supplied as standard
2 hiking arms with shoulder harness and waist strap
Safety instructions for use as a Hiking Carrier
Please make sure you read the safety instructions in the
“Safety” section at the beginning of this Owner’s Manual.
Before each journey check that all components are properly
¿WWHGSDUWLFXODUO\WKHZKHHOVDQGWKHKLNHUDUPV
Always make sure that the security pin of the hiker arms
is properly installed so as to prevent the carrier from
accidentally separating from the arms.
Be mindful of the space needed due to the width and length
RIWKHFDUULHU7DNHFDUHLQRQFRPLQJWUDI¿FRQQDUURZSDWKV
Please remember that controlling a fully loaded hiker
UHTXLUHVH[SHULHQFHDQGJRRGSK\VLFDO¿WQHVV
Particular care is needed on slopes, uneven terrain and
ZKHQVWRSSLQJ'RQRWXVHRQVWHHSRUGLI¿FXOWKLNLQJWUDLOV
First take the hiker for a practice run without children, but
with the maximum load. Perform the practice run on terrain
WKDWLVPRUHGLI¿FXOWWRFRYHUWKDQWKDWZKLFK\RXZDQWWR
travel later with children.
•
•
•
•
•
•
•
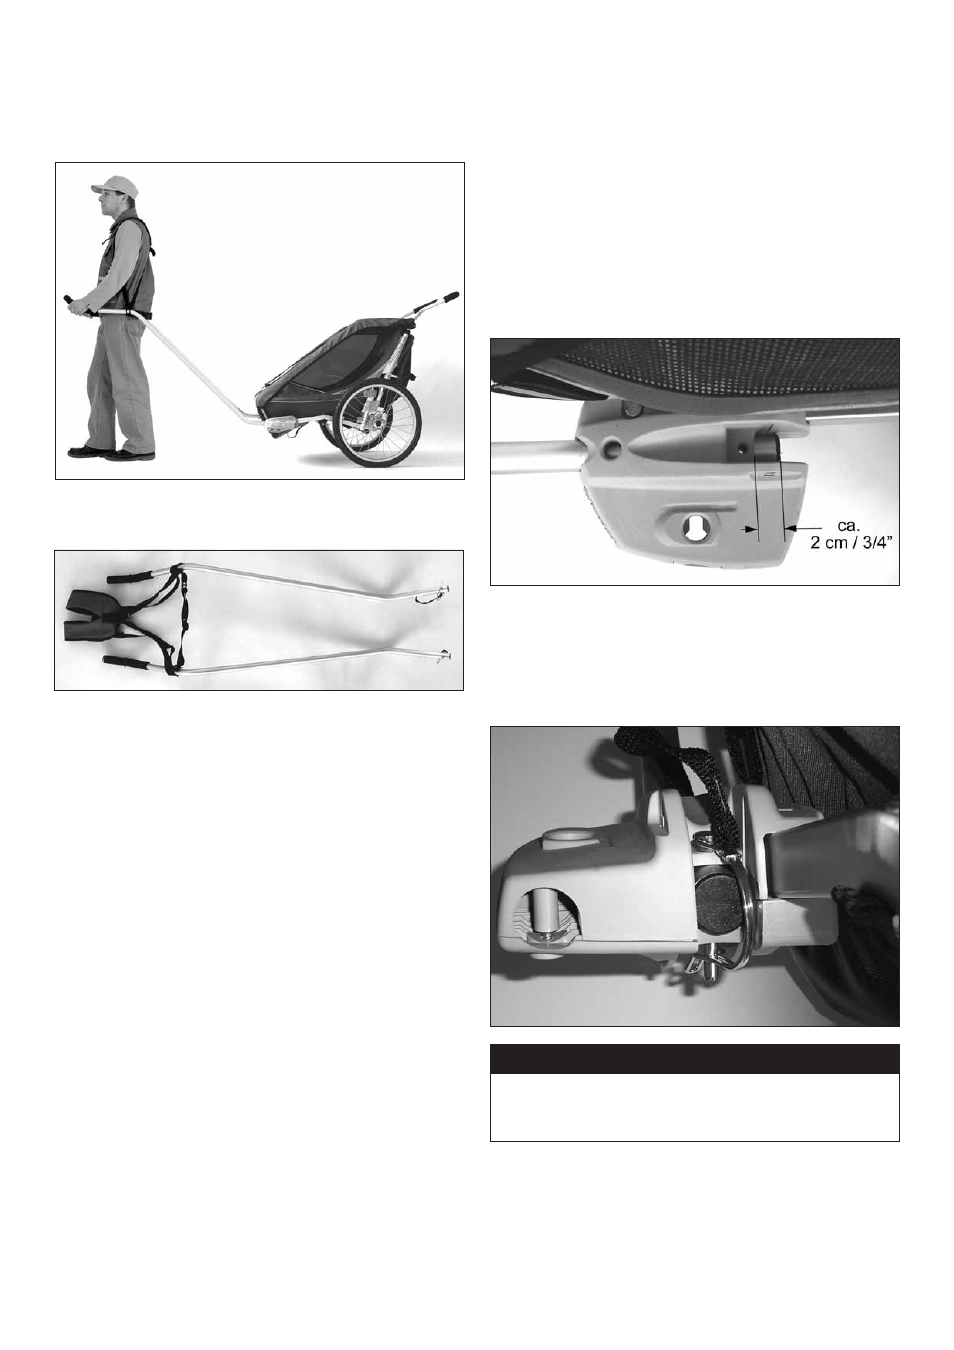
Assembly
Lay both the hiking arms with shoulder harness and waist strap
as shown in the “Supplied as standard” illustration in front of the
carrier. The waist strap must be attached to the insides of both
arms.
Insert each arms into the VersaWing 2.0 until the vertical holes
in the arms and VersaWing 2.0 are aligned with each other.
The arms should now protrude about 2 cm / 3/4 inch out of the
rear side of the VersaWing 2.0.
Now secure the arms by inserting the security pin from above
through the vertical hole in the arm and VersaWing 2.0 until it
stops. Lock the security pin by looping the spring clip over the
pins end that protrudes underneath the VersaWing 2.0.
DANGER
Always make sure that the security pin of the hiking arms
are properly inserted to prevent the carrier from accidentally
rolling away. You run the risk of an accident!