0 additional technical information – Cooper Instruments & Systems ACX-1 Aircraft Cable Tension Meter User Manual
Page 4
CF 155
4
9/25/07
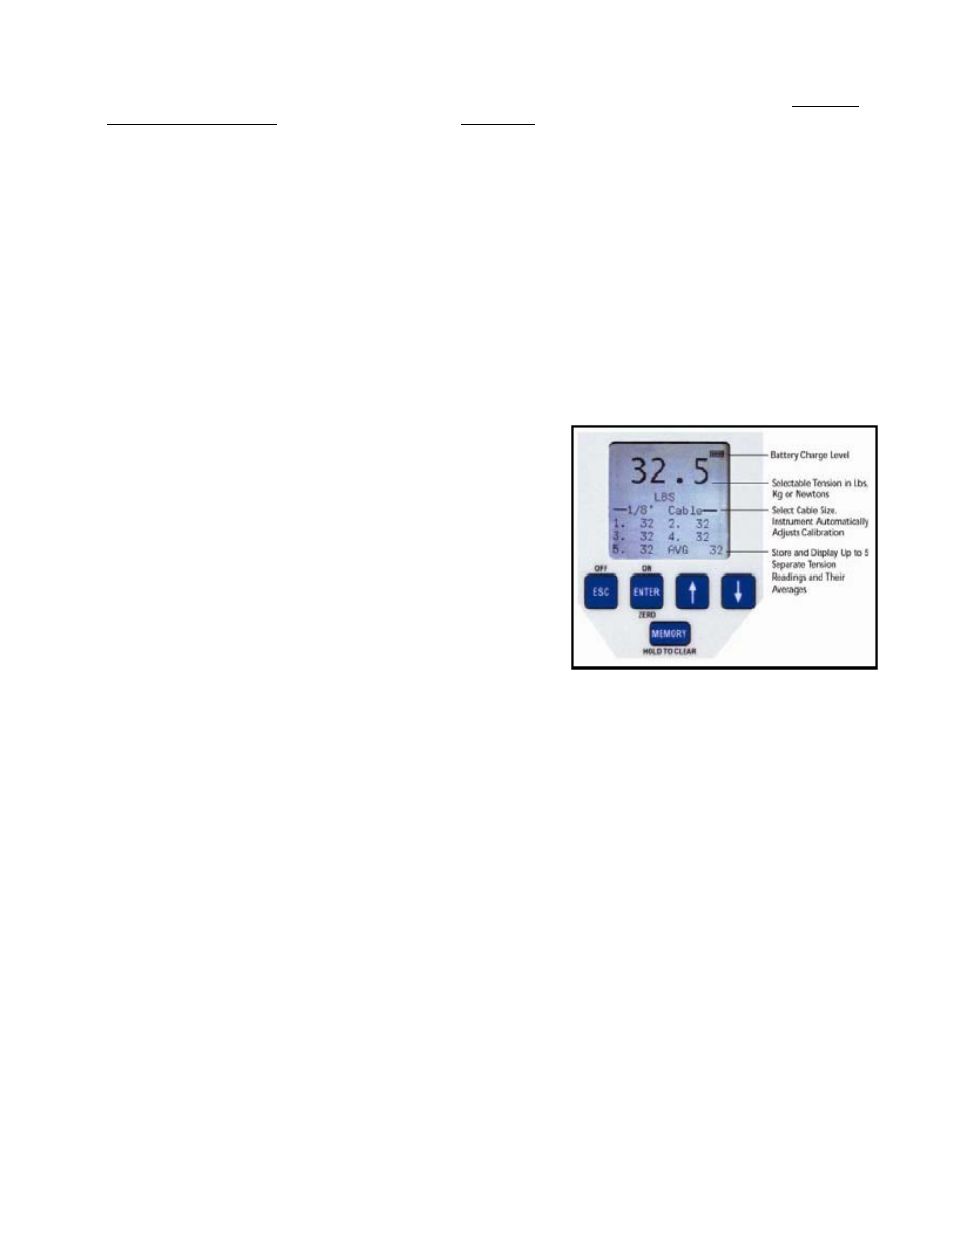
5. READING OF TENSION. Variations in materials and sizes affect tension readings. It is essential to select the
correct material and size from the calibration menu before use, or values may be incorrect.
6. SELECT MATERIAL. From the Main Display (first screen seen when unit is turned on) use the
↑
or
↓
keys until
SELECT MATERIAL is displayed. Press ENTER. Next toggle through the various selections using the
↑
or
↓
arrows until correct cable size is highlighted, and press ENTER to make your selection. If your specific material
is not listed, follow the calibration instructions included at the end of these instructions, or send a sample and
the instrument to Cooper Instruments for a custom calibration.
7. SELECTING TENSION UNITS IN LBS, KILOGRAMS or NEWTONS. Press the
↑
or
↓
keys until TENSION
UNITS is displayed. Press ENTER. Next, select: Lbs, Kilograms or NEWTONS and ENTER selection.
8. ENGAGE INSTRUMENT TO TENSIONED MATERIAL. For best accuracy hold the instrument in the attitude
the measurement will be taken in and press ZERO. Push “closure bar” away from the instrument handle to
raise the outer cable guides. Engage the tensioned material by routing the cable so that it falls under the outer
cable guides and over the center, contact point. Squeeze the “closure bar” shut until it locks into position beside
the handle, and note the tension reading.
4.0 ADDITIONAL TECHNICAL INFORMATION.
1. SPEEDING UP OR SLOWING DOWN DISPLAY LCD
REFRESH RATES - DAMPENING ADJUSTMENT. To either
speed up or slow down the rate at which tension values refresh
on the display. Use the
↑
or
↓
keys, select SETUP, and press
ENTER. Next select Dampening and after entering this
selection, choose the refresh rate from: 1Hz, 2Hz or 5Hz. When
new rate is highlighted, press ENTER.
2. AUDIO. Turn on or off audio beep (with key inputs) by selecting:
SETUP, then select Audio, and finally either select ON or OFF.
3. BACKLIGHTING INTENSITY. Increase or decrease backlighting
intensity by selecting: SETUP, then BACKLIGHT, and finally
intensity level.
4. DISPLAY CONTRAST. Increase or decrease LCD display
contrast by selecting: SETUP, then select CONTRAST, and
finally manipulate contrast using the
↑
or
↓
keys. Remember to ENTER your new setting.
5. VERSION. Instrument Model No. along with software version information can be viewed under SETUP and
then selecting Version.
6. CUSTOM CALIBRATIONS. Calibrations are password-protected to prevent unintended changes. See Page 9
for step-by-step instructions, or contact your Metrology Department or Cooper Instruments for assistance. If you
simply want to verify your instrument’s accuracy refer to Note 1., Checking Accuracy on Page 9.
7. CUSTOM CALIBRATION NAMES. Custom Calibrations (listed as Custom 0 - 9) can be renamed so that the
Main Display indicates your name for the calibration instead of Custom 1, 2, etc. From the Main Display use the
↑
or
↓
keys until SETUP is selected. Press ENTER. Using the
↑
or
↓
keys select Custom Names. Press
ENTER. Next, using the
↑
or
↓
arrows select calibration number, or previous name you wish to rename. Press
ENTER. Using the
↑
or
↓
keys select the number, letter or character for the beginning of your new name.
Press ENTER. Follow the same procedure for each sequential letter or space of your new description. Continue
pressing ENTER until all spaces in the description have entered values. Once your new name has been
entered you will be returned to the SETUP screen. To select your new calibration follow the procedures
outlined in Sec.3.6.
8. MONITORING TENSION THROUGH THE ANALOG OUTPUT (Optional feature). Output values are: 0 – 5
VDC or 4 – 20 mA. Connect Analog Output Cable to receptacle located on the bottom side of instrument.
Connect output cable leads to the analog input of your measurement or control device. The RED lead is
Voltage +, the WHITE lead is mA, and the BLACK lead is ground. From the main display use the
↑
or
↓
keys
until you reach SETUP. Press ENTER. Next using the
↑
or
↓
arrows select ANALOG OUTPUT. Press ENTER.
Using the
↑
or
↓
arrows select from: ANALOG TENSION CURRENT OR ANALOG TENSION VOLTAGE.
Once correct selection is made press ENTER.