Understanding the warnings & alarms – Basement Watchdog Emergency User Manual
Page 11
Page 10
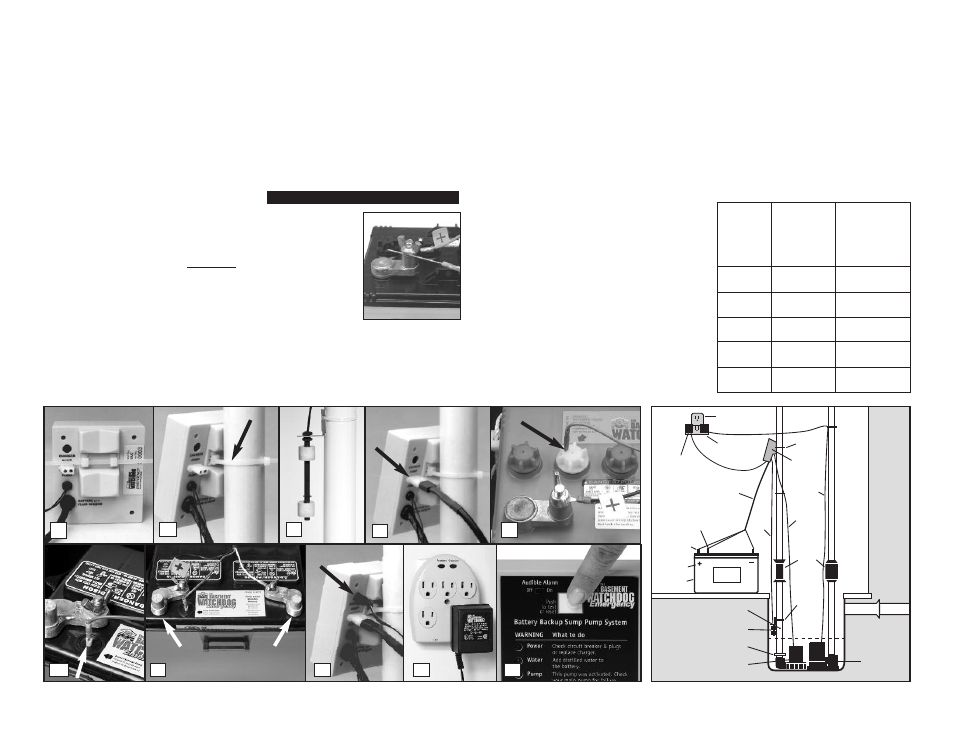
3. Connecting the pump: Remove the security
tag from the pump and plug the pump wires
into the pump connector on the back of the
control unit. Keep the backup pump wire, the
AC pump wire, and the float wire separate
from each other. Do not let them cross on the
final installation.
4. Installing the battery fluid sensor:
BASEMENT WATCHDOG BATTERIES COME IN
TWO CONFIGURATIONS. THE HOLE FOR THE
FLUID SENSOR IS MARKED BY AN ARROW ON
THE TOP OF EACH BATTERY. Remove the cover
of the battery box by pushing in the tabs on
the front and back, then lifting up. Fan the
area around the top of the battery with a
piece of cardboard (or another non-metallic
material) to remove any hydrogen or oxygen
gas that may have been emitted from the
battery. (a) If the top of the battery has six
small battery caps, replace the battery cap
that is 2nd from the POSITIVE (+) post with
the battery cap that is provided in the
Basement Watchdog package. An arrow on
the top of the battery marks this position.
There are two holes in this battery cap. Insert
the fluid sensor in the hole that is off-center
on the top of the cap. Do not glue the sensor
into the cap. (b) If the top of the battery has
two large caps, place the fluid sensor in the
hole molded on the top of the battery. It is
located in the second cell from the positive
post, and the location is marked by an arrow
on the top label. Hold the sensor straight up
and press it firmly into the hole. Do not bend
the sensor.
If you are not
using the Basement
Watchdog Standby
battery, you cannot
use the battery
fluid sensor. How-
ever, you must
attach the sensor
to the POSITIVE (+)
post of the battery
or the alarm will sound continuously. The
Basement Watchdog sump pump system will
not warn you if the fluid level is low in this
configuration. You will need to check your
battery every couple of months to see if it
needs water. If the battery dries out, the
system will not work.
5. Connecting the battery: Remove the wing
nuts from the battery terminals. Remove the
security tag from the battery cables. Attach
the battery cables to the battery…the WHITE
wire to the NEGATIVE (-) post, and the BLACK
wire to the POSITIVE (+) post. Replace the
wing nuts and tighten them.
6. Connecting the charger: Immediately plug
the charger into the charger hole on the back
of the control unit, then into an AC outlet on
the wall. (You should provide additional
protection for the control unit by using a
surge protector).
7. If the pump alarm is sounding, press the
WHITE button to silence the alarm.
8. Secure the cover on the battery box by
slipping the tabs through the fittings on the
front and back of the box.
9. BE SURE TO PLUG IN THE MAIN AC PUMP
WHEN YOU COMPLETE THE INSTALLATION.
Understanding the
Warnings & Alarms
The Basement Watchdog control unit features a
series of warning lights that pinpoint potential
problems. In addition, an alarm sounds to alert
you to the problem. In some cases the lights
and alarm will go off automatically when the
problem has been solved. In others, the WHITE
button must be pushed to silence the alarm.
Refer to the table below for a quick review of the
features and their corresponding alarm status.
1a
Diagram F
PUMP
FLOAT
WIRE
WIRE
AC
PUMP
WIRE
CONTROL
UNIT
WIRE
TIE
WIRE
TIE
MAIN
AC PUMP
BATTERY
CABLE
SENSOR
TERMINAL
BATTERY
BOX
BATTERY
DRAIN TILE
PIPE ADAPTER
FLOAT SWITCH
BASEMENT WATCHDOG
EMERGENCY PUMP
AC
OUTLET
SURGE
PROTECTOR
CHARGER
UNION OR
CHECK
VALVE
DRILL 1/8” HOLE IF
CHECK VALVE USED
1b
2
3
4b
5
POSITIVE
POST
NEGATIVE
POST
6b
6a
4a
7
CAUTION
Power
Yes
Yes
Alarm
Water
No
Yes
Alarm
Pump
Yes
No, push the
Alarm
WHITE button
System
No alarm
No alarm
Light
Battery
No
Yes
Alarm
Alarm can be
silenced
before
problem is
corrected
Alarm shuts off
automatically
when the
problem is
corrected
Warning