Control unit connections – Basement Watchdog Special User Manual
Page 10
Page 9
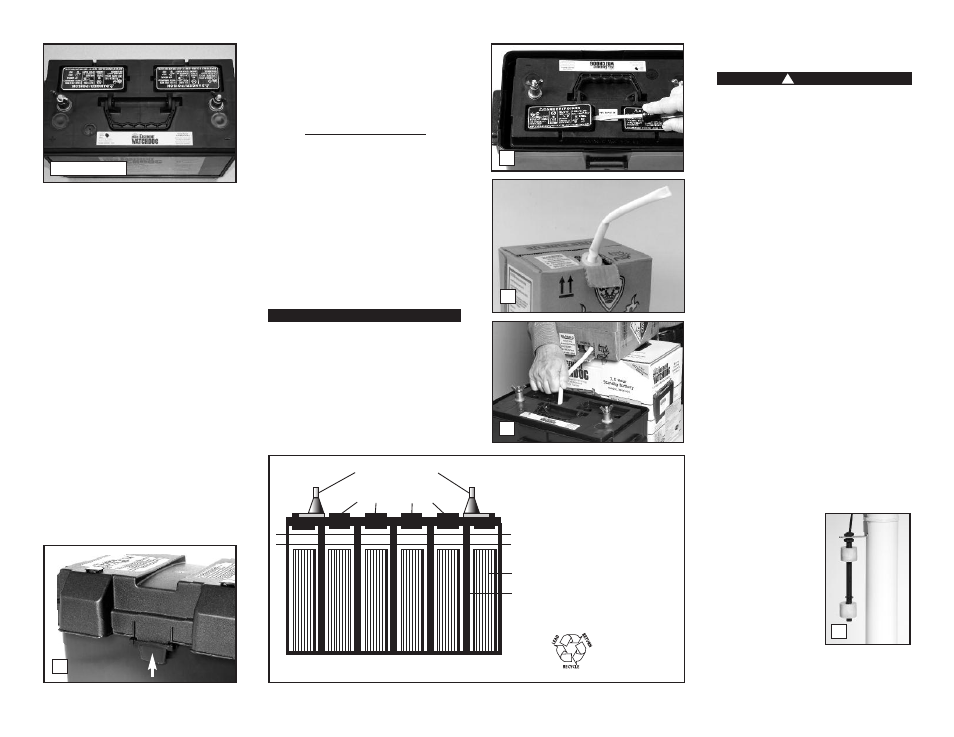
If your battery looks like the battery above,
follow these instructions:
1. Remove the cover of the battery box by
pushing in the tabs on the front and back of
the box and lifting up.
2. Place the battery box on the floor. Place the
dry (unfilled) battery into the battery box.
Remove the two battery caps by carefully
prying them up with a screwdriver as shown
on the right. Place the screwdriver in the
middle of the cap on the top of the battery.
DO NOT lift the cap by prying it up from the
groove on the back of the battery. It may
damage the vent.
3. Carefully push in the perforated tab at the top
of the acid pack. Lift up the large tab and pull
out the dispensing hose. Hold the hose
upright above the pack and squeeze the hose
forcing all the acid back into the pack.
4. Position the acid pack and battery as shown at
the right. Pinch the end of the hose together
and cut off the tip. Insert the end of the hose
into each cell. Control the flow by pinching
the hose with thumb and forefinger. Fill each
cell of the battery to a level just covering
the battery plates, and then go back and
top off each cell equally. It is important to
have all the cells filled equally or the
battery will not operate properly. The acid
should reach a level about ¼” below the cap
ring as shown in the diagram below. DO NOT
OVERFILL THE BATTERY. (Diagram E)
A newly filled battery will sometimes require
additional acid after about 20 minutes. Re-
examine the fill level, and add additional acid if
necessary. The battery acid may bubble at this
time and give off a sulfur-like smell, but this is
normal. After the battery has been filled, press
the caps securely on the top of the battery.
When you fill the battery for the FIRST time,
it will be the ONLY time you add acid to the
battery. In the future, when the fluid level is
low, add distilled water to the cells. NEVER
add more acid.
Control Unit Connections
Risk of electrical shock or battery explosion,
which can cause serious injury or death.
Unplug the main AC pump to avoid electrical
shock. Wear eye protection. Work in a well-
ventilated area. Do not smoke or allow a
spark or flame in the vicinity of the battery.
Avoid dropping metal tools on the battery.
If battery acid contacts eyes, flush with
water for 15 minutes and get prompt
medical attention. Review the safety
instructions on page 1.
When you position the battery with the control
unit on the top, be sure the charger cord will
reach the AC power outlet, and the pump cable
and the float switch will reach the bottom of the
sump. Position the unit in a well-ventilated
area. (Diagram F)
1. Positioning the dual float switch: The float
switch will activate the pump when the water
raises either float, and it will remain running
as long as the water is above the float. When
the water drops below the float switch, an
internal timer in the control unit will keep the
pump running an additional 25 seconds to
empty the sump pit. The switch should be
mounted about six (6) inches above the water
level line in the sump pit. Attach the float
switch very securely to the discharge pipe
with the plastic wire tie. Be sure the switch is
positioned vertically
with the mounting
bracket at the top.
Do not tilt the
switch. Do not
position the float
switch on the side of
the discharge pipe
facing the drain tile
or any incoming rush
of water!
2. Connecting the pump: Remove the security
tag from the pump and plug the pump wires
!
DANGER
BATTERY B
CAUTION
1
3
2nd LEVEL
1st LEVEL
PLATES
CELL WALL
1
1st LEVEL, COVER THE PLATES
THE BOTTOM OF THE CAP RINGS
BATTERY TERMINALS
BATTERY CAP RINGS
CROSS SECTION OF BATTERY
1. Fill to 1st level, cover
the plates
2. Then fill to 2nd level,
just below the bottom
of the cap rings
Diagram E
Do not throw an
old battery in the
trash. Take it to a
service station or
recycling center.
2
4
1