Basement Watchdog Big Dog User Manual
Page 16
battery cables to the battery…the WHITE wire
to the NEGATIVE (-) post, and then the BLACK
wire to the POSITIVE (+) post. Tighten the
wing nuts on the battery posts. (e) Plug the
control unit back into the wall outlet.
3. (a) Check the DC fuse by pulling it out of the
fuse holder. (b) If the wire within the fuse is
burned and broken, replace the fuse with a 20
amp DC safety fuse. If the fuse blows again,
unplug the computer control unit from the wall
and disconnect the battery cables from the
battery. Then call Glentronics technical
support for instructions at 800-991-0466,
option #3. You may need to replace the pump.
4. Plug the main AC pump back into the wall
outlet.
5
Pump was activated
When water rises in the sump pit and lifts the
float switch, the pump will begin pumping, and
the “Pump was activated” light and alarm will
turn on. The pump warning stays on to alert you
to the fact that the standby system was used to
empty the water from the sump. Try to
determine what caused the system to activate.
• Check the main pump for failure. It may not
be working, the float switch may be stuck,
or it may be too small to handle the inflow
of water.
• Make sure the check valve is working and
installed correctly. It may need to be
replaced.
• Make sure the discharge pipe is not clogged
or frozen.
• If the power was out, the backup pump was
automatically activated. You need to push
the WHITE button on the front of the
control panel to silence the alarm.
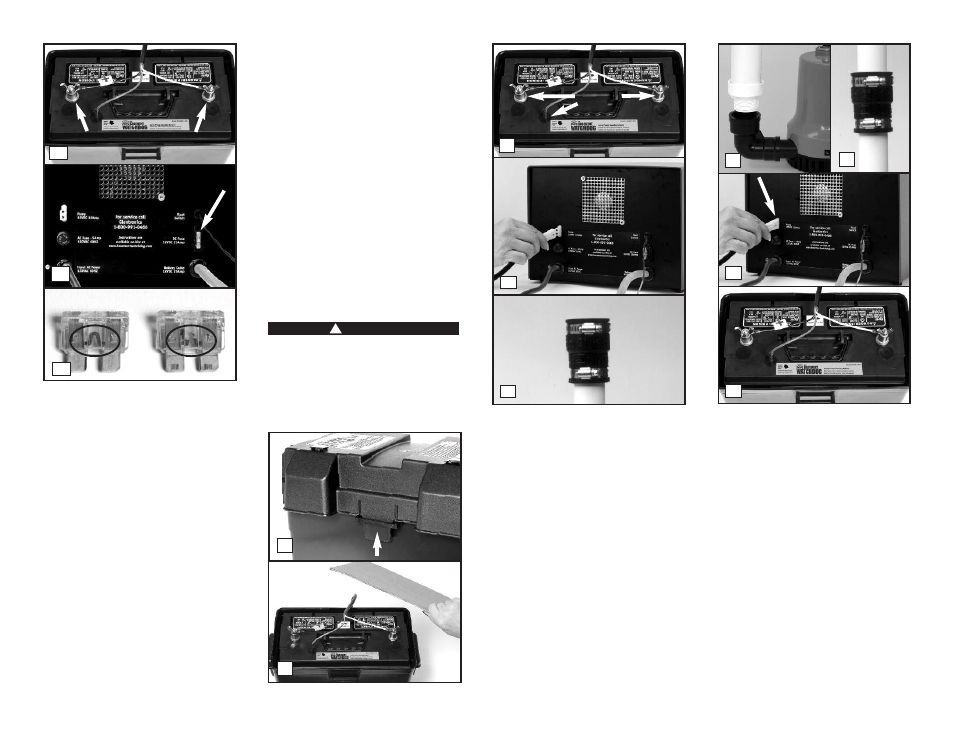
REPLACING THE PUMP
Unplug the main AC pump when installing the
backup pump to avoid electric shock. Failure
to do so could cause serious injury or death.
Review the safety instructions on page 1.
REFER TO PHOTOS BELOW AND AT RIGHT
1. Unplug the Basement Watchdog control unit
from the wall outlet.
2. Remove the cover of the battery box by
pushing in the tabs on the front and back,
then lifting up.
3. Fan the area around the top of the battery
with a piece of cardboard (or another non-
metallic material) to remove any hydrogen or
oxygen gas that may have been emitted from
the battery
4. Remove the fluid sensor and the battery
cables from the battery.
5. Unplug the pump from the back of the control
unit.
6. Release the union or check valve and remove
the pump and the rigid PVC pipe section from
the sump pit.
7. Unscrew the pipe and adapter from the old
pump, and screw them into the new pump.
8. Lower the pump into the sump and reconnect
the union or check valve.
9. Plug the pump wires into the back of the
control unit.
10. Replace the fluid sensor in the top of the
battery. Connect the battery cables to the
battery…the WHITE wire to the NEGATIVE (-)
post, and then the BLACK wire to the
POSITIVE (+) post. Tighten the wing nuts.
Replace the fluid sensor.
11. Replace the cover of the battery box.
12. Plug the control unit and the main AC pump
back into the wall outlet.
13. If any alarms are sounding, press the WHITE
button on the front of the control panel for
one (1) second to silence them.
Page 15
3a
3b
GOOD
BLOWN
!
DANGER
3
2
5
6
8
7
10
9
2d
POSITIVE
POST
NEGATIVE
POST
4
REMOVE